
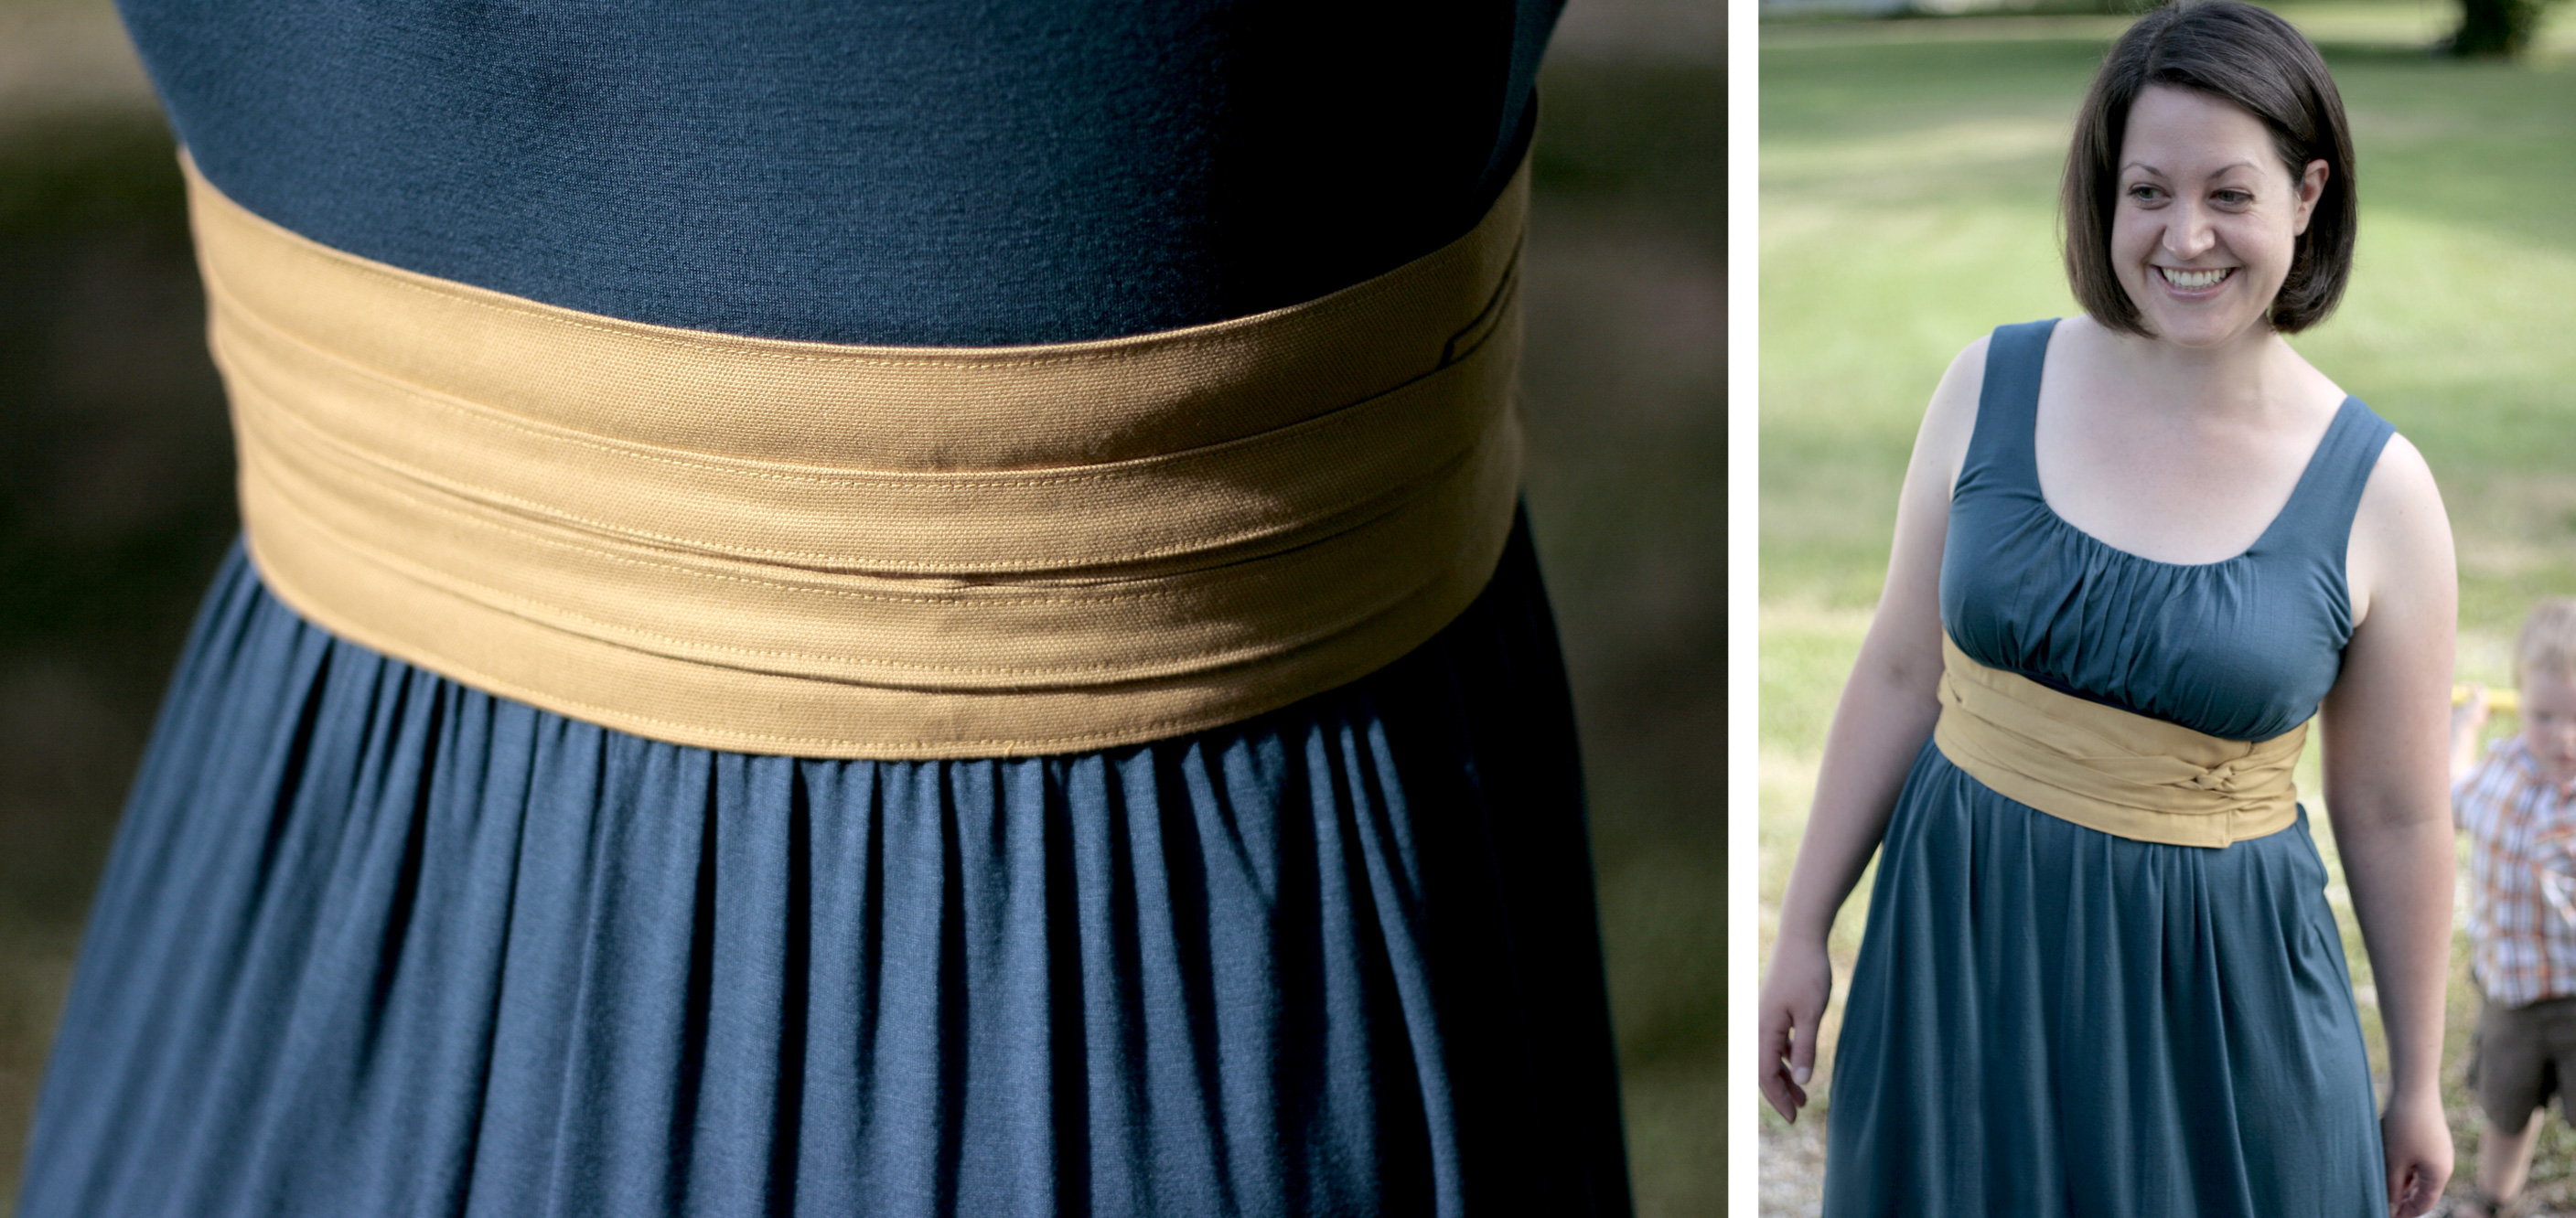
Summer is great for cool cotton dresses and flowy shirts, but sometimes they need a little extra color or a more defined waistline. Enter the wrap belt, inspired by an Anthropologie design! This fabric band wraps around your waist to give you definition and a pop of color. You can vary the fabrics in color or pattern, or even try a patchwork version.
This is a fairly easy project, especially if you use a decorative ribbon for the narrow center strap. For the way I made it with the fabric strap, here’s a list of the materials you’ll need:
- The wide strap is going to be 9.5″ wide and the length is the measurement of your waist plus 6″. Measure wherever you plan on wearing the belt—under the chest, around your natural waist, or lower at the hips.
- The narrow strap is 2.5″ wide and the length is the measurement of your waist plus 6″ multiplied by 3. For example, your waist is 34″ +6″=40″, then 40″x3=120″. You may have to cut several strips of fabric and sew them together for this length. From my fabric, I had to cut three strips 40.5″ long each, and then I sewed them all together.
- Additional notes: I used upholstery weight fabric. For thinner fabrics you may want to use stabilizer in the wide band to help it keep its shape. Also, if you have problems with the wide part of the belt shifting, you can hand stitch one or two snaps to hold it in place.

Making the Belt:
First, if you had to cut several pieces of fabric for the narrow strap, stitch them all together. Next you’ll iron under the edge of the fabric 1/4″ on all four sides. Then fold the fabric in half lengthwise and iron again.

Stitch around all four sides of the strap (including the side that’s just a fold) to give it a more finished look.

The narrow center strap is now complete! Now on to the wide strap. Fold the fabric in half lengthwise with right sides together and iron. Stitch around the sides and top, and leave a 6″ opening in the center.

Snip the corners and turn right side out through the opening you left. Fold in the open edges and iron flat. Next, sew around all four edges.

Wide strap is complete! Now you just need to line up the narrow strap in the center of the wide band. Line up the narrow strap so there is a 6″ opening on the left as shown in the photo below. Both narrow straps hanging off the wide band should be the same length. You can offset them by a couple inches if you want the ends to be at sightly different heights once it’s tied (see the right image, 2 photos down). Once you have the narrow strap and wide band lined up, sew them together where you see the yellow rectangle in the photo below.

Your belt is now complete! Now to actually wear it, you’ll first wrap the wide band around your waist. The flap (left side in the photo above) goes underneath and the other side (right side in the photo above) goes on top of that. Then wrap the two long, narrow bands all the way around your waist in opposite directions. Bring them around to the front and tie in a knot. You can either leave the bands hanging down as they are below or tuck them under the other straps as I did in the very top photo of this post. You can click on the photo below for a larger view.

Here’s a photo of the back of the belt, and another of the front withe me looking goofy in front of the camera (and a little nervous because you can see my toddler sneaking up behind me with a baseball bat).
Enjoy! And if you make one of these Anthropologie-inspired belts, feel free to share the link with us in the comments or add to our Flickr group.


36 comments
So pretty! I love it. Totally going on Pinterest. 🙂
Fabulous tutorial! And I love how it turned out 🙂
I am totally going to make one of these! Thanks for the great tutorial.
What a great belt- so many possibilities! Thanks for this!
I LOVE your belt! You did such a great job! It looks absolutely adorable on you!!
I love how this turned out! How fantastic!! Thanks for the great tutorial too 🙂
This is such a great idea – I love the look. Thanks so much for sharing with us.
This is so great! Thanks for sharing your instructions. I’m going to make one right now to wear to church in the morning. 🙂
Glad you liked it enough to stay up late sewing! If you take a photo we’d love to see your finished belt in our Flickr group!
Such a cute belt. Can’t wait to make my own!
I love this belt. I want to go make one ASAP! You did an amazing job! Thank you for linking up to Sew Woodsy last week. We’ve featured your project today. Please remember to link up tomorrow!
I featured this on my blog tonight! Thanks so much for linking up to Your Whims Wednesday 🙂 Come grab a button! https://mygirlishwhims.blogspot.com/2011/07/your-whims-wednesday-17-and-features.html
Thanks for sharing the Belt at Craft Buds!
I created this and posted it on my blog this morning! Thank you!!
https://mama-schiesher.blogspot.com/2011/07/kojo-blue-dress-and-craft-buds-belt.html
This is such a fun belt and it looks pretty simple to make. I would love for you to share at my Feature Friday Link Party.
https://blissfulanddomestic.blogspot.com/2011/07/feature-friday_29.html
Thanks Danielle! Just linked up and added your button to our Linky Parties page.
Very cute, I can see this as a little girls belt.
Thanks for Sharing!!
Brenda
https://www.piggygiggles.com
So, do you actually sew the thin strap to the thick strap, or just put it on (like you’re putting on 2 belts) and hope it stays? You don’t mention any sewing there, and I can’t tell from the photographs, but it sounds like it would be a little harder to put on if you’re trying to hold up the thick strap with no closures (except optional snaps) while putting on the unconnected thin strap… but maybe I’m missing something.
Sorry for the confusion! I went back and added in a sentence to the instructions. Yes, you sew the thin strap to the thick one. In the third photo up from the bottom you’ll see a yellow rectangle and that’s where you should sew.
Thanks! On my list of must-makes 🙂
I am winging it making a dress for a wedding next weekend and have been debating some type of ribbon belt but want something out of atrypical, so I stumbled across this post at the absolute perfect time!
Great! If you make one, we’d love to see it. 🙂
finally, something amazingly cute, practical and even a necessity!!!
thanks now to copy the instructions!
my daughter asked me to look for wide belts at thrift stores this one taker ot that thanks suzieQ
Lovely idea!!
I’m going to try, for sure!!
Thanks for sharing.
Carol
I LOVE LOVE LOVE this!! I want WANT WANT one!!! Off to sew right now! SERIOUSLY want one~
such a cute idea! i have been planning to make a similar sort of belt that i saw in another store, but i think i like yours more. but hey, i suppose i can always make both…you can never have too many! 😉 thanks! lisa
Thank you for sharing your craftiness! I have been meaning to make this for months and finally got around to it yesterday! Great tutorial and REALLY cute belt! Thanks again!
Thanks Kate, glad to hear you use the tutorial! If you get a chance I’d love to see a photo if you want to post one to our Flickr group!
Thanks for the great tutorial. Made one last weekend and I love it! Figure I’ll probably make a couple more in different colours.
That’s awesome Laura! I (Lindsay) made one myself this last week–we’d love to see pics!
Thanks for this great tutorial, I just finished making mine and it looks great 🙂
Thank you! I am a small 51 year old and can never find wide fabric belts that fit! This is going at the top of my “to do” list for the weekend.
I’ve just finished this belt and I love it! Thank you so much for this great tutorial, so easy to do. Will be making more ????????
I just made one for myself with your instructions, came out lovely! Thank you! 🙂
I’ve made four of these belts, two plain ones and two patterned ones made from old cotton scarves that I never wore. The belts are really brilliant for pulling an outfit together. Thank you for showing how to do it!