Art & Craft, DIY ideas and Tutorials – Craftbuds
  • About Us
  • Needlecraft
    • Crochet
    • Knitting
    • Quilting
    • Sewing
    • Embroidery
  • Cricut
  • Jewelry Making
  • Paper Craft
    • Origami
    • Drawing
  • Engraving
  • Collectibles
    • Numismatics
43K Followers
25K Followers
1K Subscribers
Subscribe
Art & Craft, DIY ideas and Tutorials – Craftbuds
  • About Us
  • Needlecraft
    • Crochet
    • Knitting
    • Quilting
    • Sewing
    • Embroidery
  • Cricut
  • Jewelry Making
  • Paper Craft
    • Origami
    • Drawing
  • Engraving
  • Collectibles
    • Numismatics
  • Craft

Fabric Covered Buttons

  • Lindsay
  • Posted: August 29, 2011
Covered Buttons Tutorial
Total
0
Shares
0
0
0


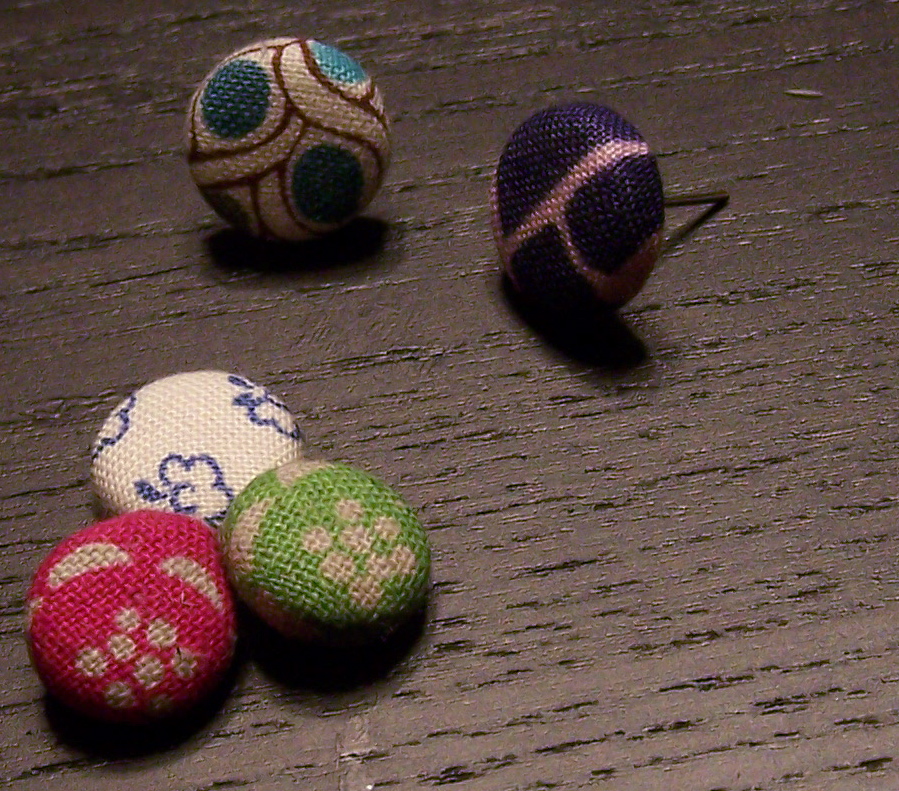
I’ve been making a lot of covered buttons lately, to turn into adoption fundraiser earrings. Today I wanted to share with you a basic tutorial on how to make fabric covered buttons. It’s so easy to do as long as you have the right tools!

Supplies:

Dritz and Maxant are two companies that specialize in cover button kits. When purchasing a kit, make sure you pay attention to the size of the buttons (size 18-60, typically). You’ll also want to buy a kit with the mold and pusher (the white and blue pieces), and not just refill buttons.

Dritz Cover Button Kit

The buttons I’m making here are size 20, and they are about a half inch in diameter. Sizes 24 through 45 are common in craft stores and quilt shops, but you will likely need to shop online for other sizes. Take note of the button style, as there are two main types: flat buttons and half-ball buttons, which are rounder like pearl buttons. I’m making flat buttons.

Gather some scraps of fabric. I’m using a thick linen/cotton blend, but you can also use regular quilting fabric to cover buttons. If you discover that your fabric is too thin, you may want to first iron on some fusible interfacing to the back side of the fabric so the shiny aluminum buttons don’t show through.

Button Cover Supplies

You’ll need a pair of scissors, which you may use to cut the pattern piece of the appropriate size from the cardboard back of the button kit. Don’t throw this away; I recommend storing all spare button parts along with your kit in separate baggies labeled with the size.

Covering Buttons

1. Cut a circle of fabric to the size of template on back of button kit box. You’ll want to choose a print that’s the right size for your button. 2. Place printed side of fabric face down on top of button mold. 3. Place button upside down on top of fabric circle. 4. Use blue pusher to move button and fabric deep into the mold, as far as possible.


5 and 6. Remove pusher and use your fingers to fold edges of fabric down. Make sure all sides are even. If not, fabric will poke out the edges of the finished button. If your fabric is uneven, just pop out the button and try again. 7. Once fabric is pressed to the center of the button, place button back on top of the button mold with the loop side facing up. 8. Use the pusher to secure button back to the button.

9. Use your fingers to bend the button mold, and your covered button should easily pop out. Repeat with the remaining buttons.

Covered Buttons Tutorial

You can use these fabric buttons to decorate clothing and accessories or change out the button backs to make jewelry, push pins, and lots more. If making jewelry, you’ll want to find buttons with flat backs, or else you’ll have to remove the button loop with pliers before gluing on your earring posts, bobby pins, push pins, and so forth. Have fun!

Pin It

Total
0
Shares
Share 0
Tweet 0
Pin it 0
Related Topics
  • button fabric
  • button jewelry
  • buttons earrings
  • cover button kit
  • covered buttons
  • dritz
  • dritz button cover kit
  • fabric button maker
  • fabric button supplies
  • fabric buttons
  • fabric covered button kits
  • fabric covered buttons manufacturers
  • fabric covered buttons tutorial
  • how to cover buttons with fabric
  • how to make fabric buttons
  • how to make fabric covered buttons
  • maxant
  • upholstery buttons
Lindsay

Hi, I’m Lindsay Conner, an author, modern quilter, editor, and founder of the Lindsay Sews blog. I’m a Baby Lock ambassador and Stash Books author who loves writing modern sewing and quilt patterns for beginners and weekend sewists! I live in Indianapolis, Indiana with my husband, son, and two loveable cats, Murph and Chloe. I’ve been crafting for as long as I can remember. As a kid, I saved my dollar bills for trips with my mom to Jo-Ann Fabrics, where I’d find new floss for friendship bracelets or mini cross-stitch kits. Because my mom has always shared my love for crafting, she bought me my first sewing machine, a Hello Kitty Janome.

Previous Article
Sewing Tools from Pattern Patti
  • Giveaways

Giveaway! Sewing Patterns from Pattern Patti

  • Lindsay
  • Posted: August 29, 2011 - Updated at: September 3, 2011
View Post
Next Article
  • Fresh Picks

Fresh Picks for Wednesday, 8.31

  • Lindsay
  • Posted: August 31, 2011
View Post
You May Also Like
View Post
  • DIY projects
  • Home

nPhoto – Professional Photo Printing Services for Photographers: Develop Your Brand with Us!

  • Jeremie Berton
  • Posted: January 14, 2025
View Post
  • Craft
  • Outdoor

5 Great Destinations in Costa Rica for Your Next Crafting Retreat

  • Craftbuds Editorial Team
  • Posted: December 16, 2024
Why-Professional-Locksmiths-Are-Essential-for-Home-Security
View Post
  • Home

Avoiding DIY Disasters: Why Professional Locksmiths Are Essential for Home Security

  • Jeremie Berton
  • Posted: April 3, 2024
Putting Together a Wooden Nativity Set for the Holidays
View Post
  • Craft
  • DIY projects
  • Home
  • Outdoor

Putting Together a Wooden Nativity Set for the Holidays

  • Sheila Mae Pedregosa
  • Posted: February 7, 2024
How is AI Impacting Crafting
View Post
  • Craft
  • Tools & Supplies

How is AI Impacting Crafting

  • Craftbuds Editorial Team
  • Posted: December 5, 2023 - Updated at: December 7, 2023
How Funny Phrases on Shirts Have Transformed
View Post
  • Craft

The Evolution of Humor: How Funny Phrases on Shirts Have Transformed 

  • Craftbuds Editorial Team
  • Posted: October 23, 2023 - Updated at: October 24, 2023
Craft Organizers for Efficient Storage Use
View Post
  • Craft
  • DIY projects

DIY Craft Organizers for Efficient Storage Use

  • Craftbuds Editorial Team
  • Posted: October 23, 2023 - Updated at: October 25, 2023
make-christmas-more-special-for-your-loved-ones
View Post
  • Craft

5 Ways to Make This Christmas More Special For Your Loved Ones!

  • Craftbuds Editorial Team
  • Posted: September 28, 2023
19 comments
  1. Megan @ Canoe Ridge Creations says:
    August 29, 2011 at 1:11 pm

    So FUN! 🙂 Thanks for linking up to {Sew} Modern Monday and have a great week!

  2. Toni says:
    August 29, 2011 at 3:10 pm

    Very cute! It’s fun to see the different looks you can get from one fabric!

  3. Liz says:
    August 29, 2011 at 8:11 pm

    I just love covered buttons for so many things! And it is great that it only takes just a tiny bit of fabric!

  4. Jill says:
    August 30, 2011 at 12:00 am

    Great little tutorial! Making covered buttons is on my to do list!

    Thanks for linking to a Round Tuit!
    Hope you have a great week!
    Jill @ Creating my way to Success
    https://www.jembellish.blogspot.com/

  5. btanders says:
    August 30, 2011 at 12:57 pm

    These are soo cute! I’ve seen lots of stuff using these. I MUST buy some! Thanks for sharing!

  6. Keren Duchan says:
    August 31, 2011 at 10:42 am

    Yay! I’m keeping this tutorial – I’ve never made fabric buttons but I want to! I think I even have the kit somewhere in my house…

  7. Tara says:
    August 31, 2011 at 11:36 am

    Oh the ideas for these are endless! I never knew they were so easy to make, I defiantly want to try them now! Thanks for sharing 🙂

  8. Ashlee says:
    August 31, 2011 at 2:50 pm

    I LOVE these! Will definitely be using this tutorial, thanks!

  9. karen says:
    August 31, 2011 at 8:27 pm

    I pinned this- I love how you have the pin it button on the bottom of your post- I will have to steal this for my blog!

  10. Lindsay says:
    September 1, 2011 at 12:18 am

    Karen, check out the Pin It Button for websites easy form at https://pinterest.com/about/goodies/. You have to create one for each post, but it’s pretty easy to do!

  11. Deborah says:
    September 2, 2011 at 6:15 pm

    What a GREAT tutorial…thanks for the inspiration!

    Deborah (happily visiting from
    https://upcyclingmylife.blogspot.com)

  12. Michelle says:
    September 3, 2011 at 12:20 pm

    I love the fabrics you chose. I really should get a kit, they turn out lovely! Thanks for linking up with DIY under $5!

  13. Mindie says:
    September 4, 2011 at 6:37 pm

    Thank you for linking up at bacon time. I love covered button earrings and have a kit to make them. I love the fabric you used for these. Good luck with your fundraiser. Hope you will join us each week the linky.

  14. AngelPearls says:
    September 5, 2011 at 1:50 am

    They are super cute!
    Eva

  15. Sweet Peas and Bumblebees says:
    September 6, 2011 at 11:38 pm

    We are featuring your project at the start of another What I Made Wednesday Party! Come and join us & grab a button!

    Alisa
    Sweet Peas and Bumblebees

  16. Danielle says:
    September 8, 2011 at 11:19 pm

    love these. too cute!

  17. wale says:
    November 30, 2013 at 11:43 am

    pleas i will like to know how i can buy your mould in large quantitypls get back to asap

  18. Alana says:
    October 23, 2014 at 6:20 am

    Great tutorial and your fabrics are so cute!! Where do you get your fabrics from?

Leave a Reply

Your email address will not be published. Required fields are marked *

Subscribe

Subscribe now to our newsletter

Art & Craft, DIY ideas and Tutorials – Craftbuds
  • About Us
  • Editorial Guidelines
  • Our Experts
  • Privacy Policy
  • Contact Us
Find fun and creative craft ideas and tutorials across various categories such as Knitting, Quilting, Sewing, PaperCraft, Jewelry Making and much more

Input your search keywords and press Enter.