Have you also seen those exquisite face masks at parties and wondered if you could get one for yourself? Don’t worry! A simple art form called paper mache is fascinating and gives excellent outcomes.
Numerous old art styles have evolved into contemporary crafts over time. One of those arts is paper mache, which is particularly beneficial for creating face masks.
As we advance, I’ll go over the simplest ways to construct an eye-catching paper mache mask, whether you’ve got a character party to attend or want to add extra decoration to your next themed party, including coming Halloween ones.
Related: How To Make Paper Mache With Glue – The Ultimate Guide [2023]
Table of Contents
How Do You Make A Paper Mache Face Mask?
This tutorial will demonstrate how to make a precisely-sized face mask from a regular balloon. This method is relatively easy to use and yields some excellent outcomes.
Supplies required:
- Half-cup of flour
- 1 cup water
- Big bowl
- Paper strips from an old newspaper or magazine
- Aloe balm or vaseline
- Yarn, hemp, or thread
- Acrylic paints, varnishes, marker pens, and pencils
Procedures:
Once you have all of your materials ready, follow the given steps.
-
Inflate And Cover The Balloon
Inflate the balloon to the desired size and store it. Prepare the flour (1 part) and water mixture (2 parts), then slice the paper into strips.
Begin to cover the balloon in uniform layers. Since this mask won’t get the wire mesh sustaining it, you need to add roughly 7-8 layers to ensure that it has structural strength.
Note: Give the balloon a few hours to dry based on how many layers you place.
-
Pop The Balloon
When entirely dry, use a needle to puncture the balloon gently. Cut the ball form in half and distribute it after deflating the balloon.
Here, you could slice out the desired forms and create holes for the face and mouth. Include two little holes for your thread to pass through at the sides.
Add the string, then use your finger or any remaining glue solution to soften any sharp edges.
-
Finish Off Your Mask
The time has come to add your mask’s finishing touches. If you have placed sufficient layers, you will have the structural stability to sustain 3D elements like curved paper strips or paper mache clay.
Before applying the desired paint colors, let that dry and prime your area. With your décor, you can use as much imagination as you like. Once everything is sealed with a sealer, your mask is prepared.
Tip: Use the wire mesh method to make a paper mache mask without a balloon.
Look at some of the top creative ideas to make your paper mache mask stand out.
5 Paper Mache Mask Ideas – You Gotta Try These
Although creating a mask out of paper mache is a bit more complex than some other paper mache crafts, you’ve much artistic freedom to include any embellishments you like.
1. Pumpkin Head Paper Mache Mask
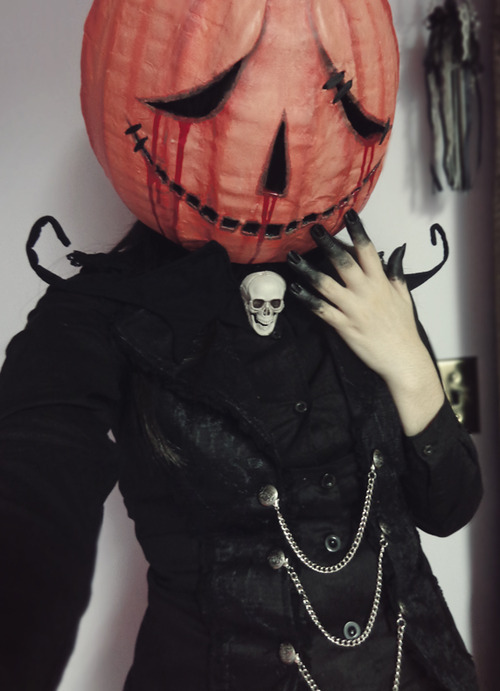
Source: Drawkill
I recommend this pumpkin head paper mache mask if you want something unique and creative.
Supplies required;
- Plastic grocery bag
- Fiberfill stuffing
- Yarn
- Orange acrylic paint
- String
- Old newspaper
- Water
- Flour
- Stick (approximately pumpkin’s stem width)
- A round piece of cardboard
- Cutting device (Dremel, scissors, or sharp serrated knife)
- Small nail
- Hot glue gun + spare glue sticks
Procedure:
- Put fiberfill packing inside the trash bag.
- Ensure all the air is forced out of the supermarket bag before you tie a knot near the fiberfill.
- Remove the bag’s handles, leaving a few inches of the material above the knot.
- To create a stalk for the pumpkin, fold the leftover hook and tape it together.
- Gather some yarn and cut a long length to wrap the pumpkin (about 20 inches).
- Cut the free threads near the knot after tying a knot in the yarn that has been tightened.
- Tear the newspaper into strips – 4 to 6 inches long and 1/2 to 2 inches wide.
- Insert a strip of newspaper thoroughly into the paper mache solution. To remove the extra paste, wipe it off with your fingers.
- With your fingertips, press the strip on the pumpkin so it is vertical.
- As you go around the pumpkin, add additional paper strips with paper mache paste, placing some sideways and overlaying them.
- Add the newspaper strips until the pumpkin’s top is completely covered.
- Cover the top of the stem with paper mache strips, and attach them to the pumpkin’s stem.
You can color or prime the entire pumpkin in white when the second layer of paper mache is dried. This step is optional, but I’ve found that if you paint the newsprint white first, it covers it with fewer coats of orange paint.
2. Japanese Kitsune Mask
Also called the “fox mask,” this traditional Japanese Kitsune mask is a common sight in Japan on unique festivals to pay tribute to Gods.
Supplies required:
- Cereal box
- Old newspaper
- Tape
- Scissors
- Hot glue gun + spare glue sticks
- Measuring tools
Procedure:
- Open your cereal box and cut strips of 1.5 cm to create a frame for your face. Start with the diameter, then add a vertical strip that extends just below your nose, followed by a horizontal strip that crosses your nose and joins the vertical line.
- Use tape to bind the strips together. Consider using a mirror.
- Make the bottom of the face with sloping cardboard pieces.
- Cut two triangles of the same size from the leftover cereal box to create the ears. On the top of the head, tape the ears in place.
- Utilizing crumpled newspaper, expand the nose, then mask the entire mask (including the inside) with tape. Due to the paper-poor mache’s adhesion to sticky tape, this is required.
- The foundation is now finished, so it’s ready for paper mache. It can get pretty dirty, so it would be a good idea to cover the surface you’re working on with some newspaper. The paper mache mixture can be made using the flour or glue technique. I’m applying the glue technique.
- Cut out the eyes once satisfied with the shape, and the paper mache is dry. Create a template on a different piece of cardboard, then sketch around it to ensure both are equal. Make sure your eyes are facing the other person.
- You can remove the entire eye or only create viewing holes, as I’ve done.
- Additionally, you might want to make holes on either side for string attachment.
- Put a white kitchen towel or toilet paper over the mask. This keeps the newspaper’s printed content from showing through your paint.
Cover the paint with a coat of varnish or clear-drying glue to stop the paint from flaking away after it has dried.
3. DIY Halloween Mask
With Halloween kicking in, what’s better than a DIY Halloween paper mache mask to rock the party?
Supplies required:
- 1 cup flour and water
- Mixing bowl and spoon
- Old newspaper
- Balloon
- Ribbon or string
- Scissors/craft knife
- Hot glue gun
- Recycled cereal or cracker boxes
- Acrylic paint, primer, and paintbrush
Procedure:
- Prepare the flour and warm water paste for the paper mache. Ensure no lumps.
- Cut out 1-inch newspaper strips, dip them in the above mix, squeeze any excess paste, and evenly spread them over the balloon. Add multiple layers. Let everything dry for 24 hours.
- Using any sharp object, pop the balloon and take it out.
- Next, use a pencil to mark the eyes on the mask and cut using the craft knife.
- Similarly, take another cereal box and cut out the snout and ears. Attach them at appropriate places on the mask using the hot glue gun.
- Paint the front of the mask with any primer.
- Use your creativity, paint the mask with your favorite colors, and give it a realistic design.
- Tie the regular string around the back side of the mask to wear it.
Your Halloween mask is now ready to make you stand out in the crowd.
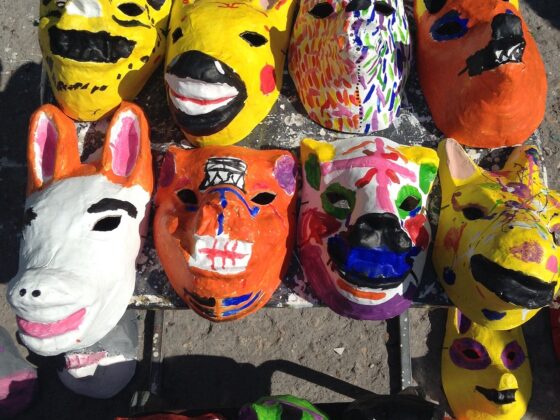
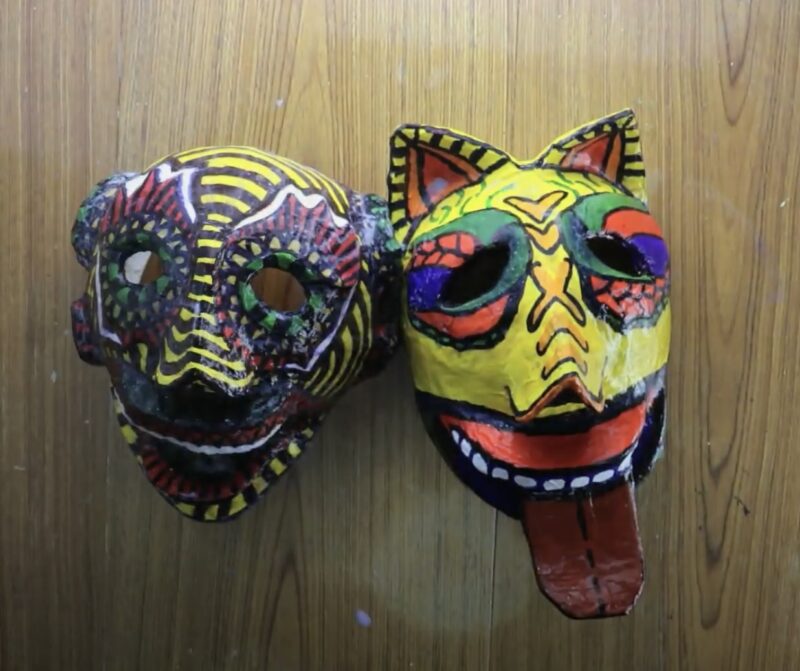
4. Animal-Theme Paper Mache Mask
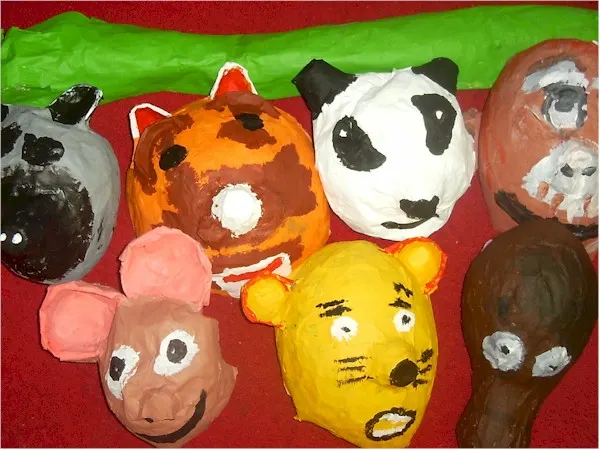
Source: Kinderart
What is your kid’s favorite animal? Is it a dog, cat, lion, fox, leopard, or something else? Nevertheless, they can imitate the same using this quick paper mache procedure.
Supplies required:
- Inflated balloons
- Masking tape
- Old newspaper strips
- White glue (or PVA glue)
- Warm water
- Acrylic paints
- Paint brushes
- Craft knife/scissors
Procedure:
- Prepare the paper mache mixture using warm water and white (or PVA glue) in equal proportions.
- Take the inflated balloon (of approximately your face’s size).
- Cut the old newspaper into strips of 1-inch length. Dip these properly into the above water and glue mixture.
- Wipe off any excess paper mache mixture from the strips using your index finger and thumb.
- Apply the strips all over the balloon. Repeat this step at least 2-3 times for a firm look. As the thumb rule, the color of the balloon should not be visible through the layers. So, add sufficient layers.
- Let the entire structure dry for around 24 hours.
- Take the Exacto knife and pop the balloon out.
- Cut the balloon into two halves. This will create an animal-theme paper mache mask for two animal lovers.
- Take another newspaper piece and masking tape to make eyes, mouth, snout, ears, etc.
- Once the above step is done, give the entire mask a single base coat. Let it dry.
- Next, use your creativity and design your kid’s favorite animal using the remaining colors on the mask.
- Tie a string at the back, between the ears, to wear the mask.
Your animal-theme paper mache mask is ready.
5. Carnival Mask Using Paper Mache
Source: Instructables
How many of you can’t resist those stunning carnival masks at a masquerade ball? I know such masks look super awesome, so I thought of crafting them using paper mache.
Supplies required:
- Old newspapers
- Large bowl or container
- Regular flour
- Water
- Petroleum jelly or aloe vera gel
- Scissors
- Mirror
- Fan
- Glittering paint
Procedure:
- In a large bowl or container, mix 3 parts of water with 1 part of flour. Mix both ingredients in a rounded motion to prepare a pancake-like batter.
- Sit in front of a huge wall mirror and use a light source. Now, apply some petroleum jelly or aloe vera gel on your entire face. You can also use olive oil for this purpose.
- Cut two strips from the old newspaper, dip them in the flour + water mix, and place them in an “X” shape on your upper face (till nose). This will make the structure of your carnival mask.
- Next, prepare the forehead section of the mask using paper strips and the paper mache mixture. Use multiple layers for extra security.
- Leave two spots on either side of the mask for the eyes, and don’t forget the nose and ears.
- If you’re making a full-face carnival mask, repeat the above steps for the lower section of your face. That is, lower jaw and chin.
- Apply some additional layers on the entire mask and use a small fan to dry it out.
- Once dried, apply one base coat on the entire face mask and dry it.
- To finish off, give the entire face mask a nice touch with your favorite glittering paints and other accessories.
You’re now ready to roll in the masquerade ball event.
Conclusion
So, here you go. Try these fantastic paper mache masks, and let me know how it feels. Apart from the above ideas, you can also think of other designs; the basic steps will stay the same.
Tip: Use a newspaper over a magazine since the former is easier to fold and apply than the latter.
Paper Mache Mask Ideas (FAQs)
-
How Many Layers Does A Paper Mache Mask Need?
Ans: You can use up to 5 to 6 layers of strips to ensure your paper mache base is durable. However, when making a face mask that needs more endurance and stability, I will advise going up to 10 – 14 layers.
This will help you achieve the desired build.
-
How To Make A Paper Mache Mask With Aluminum Foil?
Ans: To make a paper mache mask with aluminum foil, start by layering three pieces on top of one another to create a mask out of tin foil and tape. After that, apply the foil pieces on your face to form a mold for the mask.
Next, gently remove the foil, and you should use scissors to cut the mold’s edges so that you are left with quite an oval-shaped mask.
-
How To Make A Paper Mache Mask With Cardboard?
Ans: Here are the steps to make a paper mache mask with cardboard.
- Create a crude head shape out of cardboard.
- Accentuate the aspects of the face (use a mirror as a reference).
- Place paper strips on a form after dipping them in a water dish.
- Coat paper strips in a paste made of flour and water, then quickly lay them on top of the water layer.
- Hold off until both layers are dry.
- Withdraw from mold; make nostrils and eye openings.
- When the paste is of the desired strength, add additional layers inside and out.
Use your favorite acrylic paint and finish the mask.