
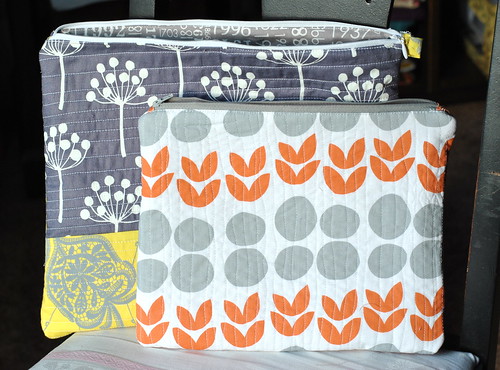
Looking for an e-reader sleeve to protect your iPad, Kindle, tablet or other device? This easy zippered iPad sleeve is lined and quilted to keep your device protected and dust-free! The e-reader cover can be made with our easy and free sewing pattern, which will teach you how to install a simple zipper in a fully-lined pouch. It also works great as a simple, lined pouch for your journal, pen or crafting supplies. The device cover makes a great gift, too!

Materials
– 2 fat quarters (18”x22”) of cotton quilting fabric
– Quilt batting scraps (4 pieces slightly larger than outer fabric)
– 11″ or longer zipper (1.5″ longer than the widest measurement of your device)
– Sewing machine with zipper foot
Finished Size
10.5″ long x 8.25″ wide
All seam allowances are 1/4″ unless otherwise noted.
Cutting:
iPad Size Sleeve:
From outer fabric and lining fabric, cut (2) rectangles 9.25″ x 11.5″ and (2) zipper tabs tabs 1.5” x 3”. From batting, cut (4) pieces slightly larger than outer fabric.
Any Size e-Reader Sleeve:
Measure your device and add 2″ to height and width. For instance, since the iPad is 7.25″ x 9.5″ (and just 1/2″ thick), I added 2″ to the length and width, which is what I used for my pattern pieces.
Quilting the Panels

Stack outer fabric on quilt batting. Quilt as desired. I chose a wavy lines design.

Adhere the lining pieces against your other batting scraps, and quilt as desired. I used a can of spray baste adhesive and two free-motion quilting designs: one stipple and one square quilting shapes. Trim the excess batting off the outer fabric and lining pieces.
Prepping the Zipper

Fold zipper tabs in half widthwise, to make a square shape.

On the right side of zipper, position fold of one zipper tab so it just overlaps metal end of zipper. Center and pin in place. Using zipper foot, stitch zipper tabs in place with horizontal line along folded edge, about 1/8” from fold. Avoid metal parts as you sew.

Position other folded zipper tab so fold just overlaps edge of zipper pull. Again, center and pin in place. Test zipper to make sure tabs do not interfere with zipping. This is what your zipper tabs will look like.
Note: If using a zipper longer than 10″, pin zipper tabs so entire length from end of one tab to end of the other tab is as wide or wider than you pouch front. Then use scissors or pliers to trim off excess from zipper end.
Attach Zipper to Panels

Center zipper edge along the pouch front, so right sides of pouch and zipper are facing. Pin edge of zipper to raw edge of top flap. With zipper on top, stitch 1/4” from pinned edge.

Place the other outside panel in front of you, and align the zipper against the long raw edge, and pin. The right sides of the fabric should be facing. Stitch zipper edge to the panel.

This is what you should see after stitching the zipper to both outer panels.

Lay the pouch wrong side up. Pin the right side of one lining panel to the exposed zipper edge. Stitch 1/4” from pinned edges to attach the lining panel.

This is what you’ll see when you open up the first panel.

Place the raw edge of the second lining panel against the raw edge of the zipper, so that both linings face each other. Pin in place and stitch 1/4″ from the edge.

This is what the lining of your zipper pouch will look like, opened up.

If you’d like, you can top stitch very close to the zipper, to sew the lining and pouch front together. This will help the zipper from sticking due to bunched up fabric.

Leave zipper unzipped, and pin together right sides of pouch body. Pin together right sides of lining pieces.

Stitch 1/4” around perimeter of both body and lining, leaving 4” open at bottom of lining for turning.

Turn pouch inside out, and push lining into bag.

Press clutch and hand-stitch lining closed. Enjoy your new quilted iPad case, Kindle cover or e-Reader sleeve!
If you make this free e-reader sleeve sewing pattern, we’d love to see it in the Craft Buds Flickr group! If you are looking for a beginner’s version of this project, try the Easy Lined Zipper Pouch.


22 comments
I love the fabric you used- what pattern is it?
What an adorable case! Just in time for Christmas My 5 year old is a purse addict this would be great for her collection!
Beautifully designed! This case is so versatile. Thank you for the stepped-out instructions. I Pinned it.
Hi Emily! It is Center City by Jay McCarroll for FreeSpirit.
Thanks, great tutorial. You solved my problem of how to deal with 2 layers of batting.
Thanks so much for this tutorial!!!! I just got a sewing machine for Xmas and I managed to make one of these for my hubby’s Windows Surface. I just took some stealthy measurements when he wasn’t looking, added 2 inches (5cms for me) to the top and bottom for the pattern and voila! Your easy to follow, step by step instructions helped me conquer my fear of quilting, and of zippers (I still battled with the zipper for the better part of an hour). Hubby is going to be stoked when he gets his tablet case for Xmas. Not too sure how to upload a photo, but I’m happy to share (I’m super proud if you can’t already tell haha!)
Go you! That’s so encouraging, Sara! Thanks for letting me know. 🙂 If you are on Flickr, you can add the photo to the Craft Buds Flickr group: https://www.flickr.com/groups/1657763@N24/. I’m also on CraftFoxes, where you can create an account and upload photos of your projects: https://www.craftfoxes.com/
I love this design for an iPad case, so I made one for my sister for Christmas. I cut my pieces a bit bigger than suggested, just in case, and made a lovely zipped bag–I even added a layer of PUL for water resistance since I know this will probably get tossed into a diaper bag fairly regularly. But my iPad doesn’t fit in it! There’s no way it could even get past the zipper. Good thing my mom could use a new Kindle case (I’ll trim it down to fit), but I’m back to the drawing board for an iPad case.
Hi Amy! You and I did the exact same thing, for the first go-round. I didn’t have an iPad to measure by, so I increased my measurements for the second version. Do you recall what size zipper you used? I believe I might change the tutorial to read 11″ or longer zipper. I’m sorry it didn’t fit your iPad, but let me know if I can do anything to help. 🙂
Hi Lindsay,
I am with Amy:
I love your sleeve and your tutorial is great.
But my sleeve won’t fit my iPad… 🙁
I am sure I did everything right, but I would have to squeeze my iPad too hard to get into the bag…
I guess you really should change that 10″ zipper into a 11″ zipper. 😉
Anyway:
Thank you though!
(And please don’t mind my English….;))
Cheers,
Dorothee
You are an excellent pattern tester! I apologize for the error, and will get it updated. Thanks Dorothee!
Thanks for a super tutorial, great project for my weekend :). I love your potty zip, can I ask where you got it from please
Katie, it’s a Coats & Clark zipper, though I’m not sure where they are sold!
Super cute!
I’m trying to learn to sew, at least sew simple things. This Kindle cover would make a great gift for my Sis since she has made me a few knitted scarves. I just might try this project if I can get some fabric, not an easy thing to do in the winter when the nearest fabric store is 35 miles away over a snow covered mountain pass.
Being a 60+ year old male, I keep looking for your section on using camo fabrics!!! Kidding on that, but some projects with a manly bent would be great. I hope to adapt the techniques in this project and others in making some of my own items for bicycling, hiking, etc.
Thank you for this site and thanks to those who comment and offer their ideas/improvements.
Thanks for your comments! So glad you are enjoying the tutorials.
I am years late to this but just found it and used the tutorial to make my ipad sleeve. It’s a great tutorial! I blogged about the process and finished product at notimefordiy.wordpress.com. Thank you!