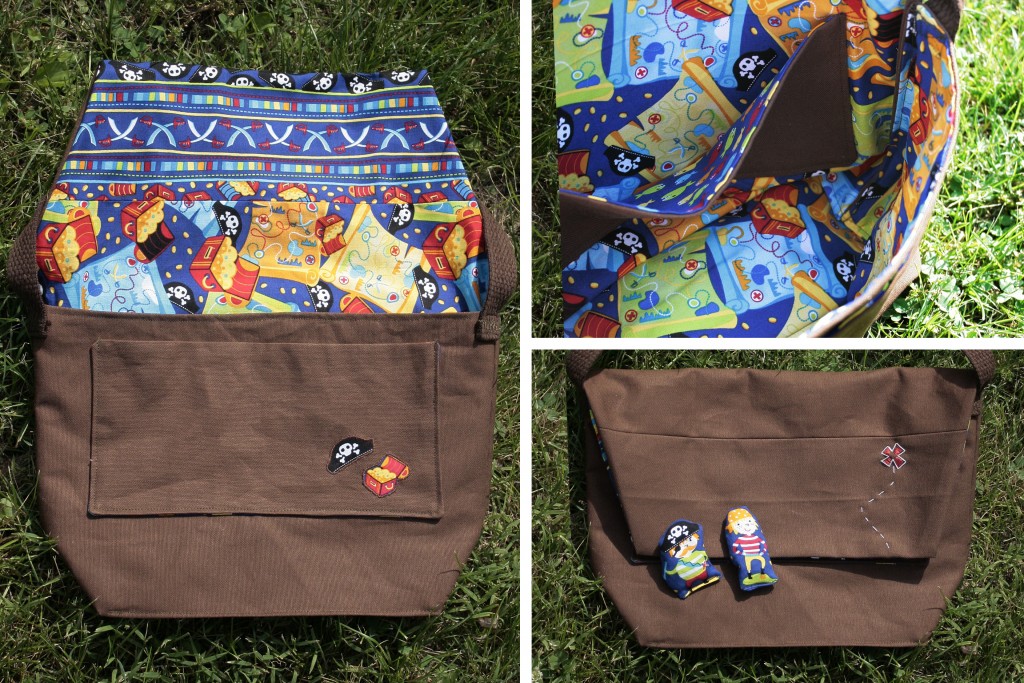
When my two-year-old son decides he wants to go somewhere he picks up my purse, puts it over his shoulder, and heads for the door. As cute as that is, Daddy thought a cool boyish bag should be made for him as soon as possible! So I came up with this messenger bag that’s toddler sized. It also makes a nice smaller sized bag for an adult. For my son’s, I used pirate, treasure map and fish fabrics for the insides of the bag and pockets. The main fabric is a heavy weight brown canvas. To finish off the set, I made two little pirate bean bag guys from some fabric scraps and made a pirate hat and treasure chest applique for the outer pocket. And at JoAnns I found a 3-pack of pirate hats, perfect for the set!
So let’s get started. Here’s your materials list:
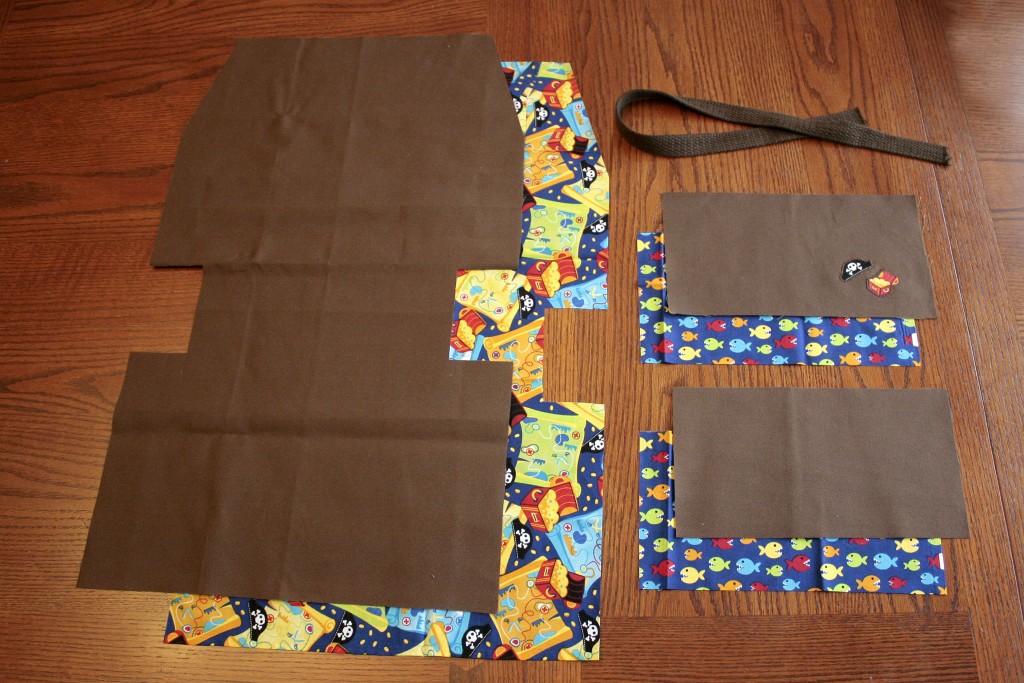
- 2 rectangles of fabric, one each for the inside and outside of the bag, 15.5″ wide X 31.5″
- 4 rectangles of fabric, two each for the inside and outside of the 2 pockets, 11″ wide x 6″ tall
- A shoulder strap cut to a length that fits your or your child comfortably (my son’s is 32″)
- My free pattern you can download here. The pattern just includes the bag, not the rectangles for the pockets and it’s a 5 page PDF. Print it out, line up the stars and tape it together. I’ve included a scale in the pattern so you can make sure it’s printing to the correct size.
All seam allowances are 3/8″ unless otherwise noted.
1. First let’s get the pockets ready. With right sides together, stitch all the way around the pocket but leave a 3″ opening in one of the long ends. After sewing, snip the corners then turn right side out. Iron flat with the open seam folded inside.
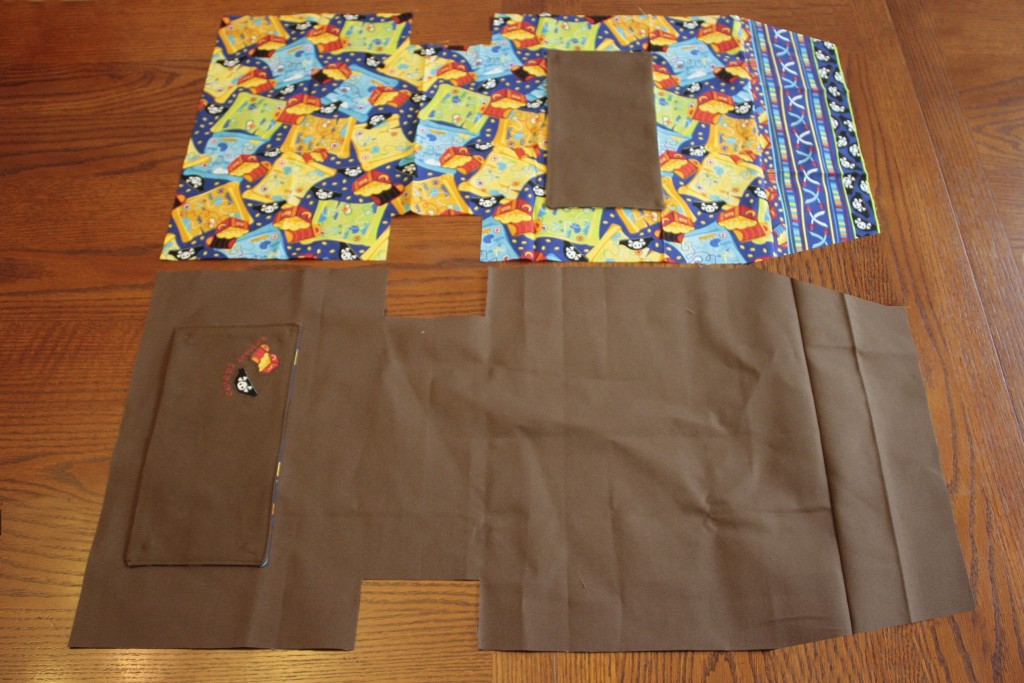
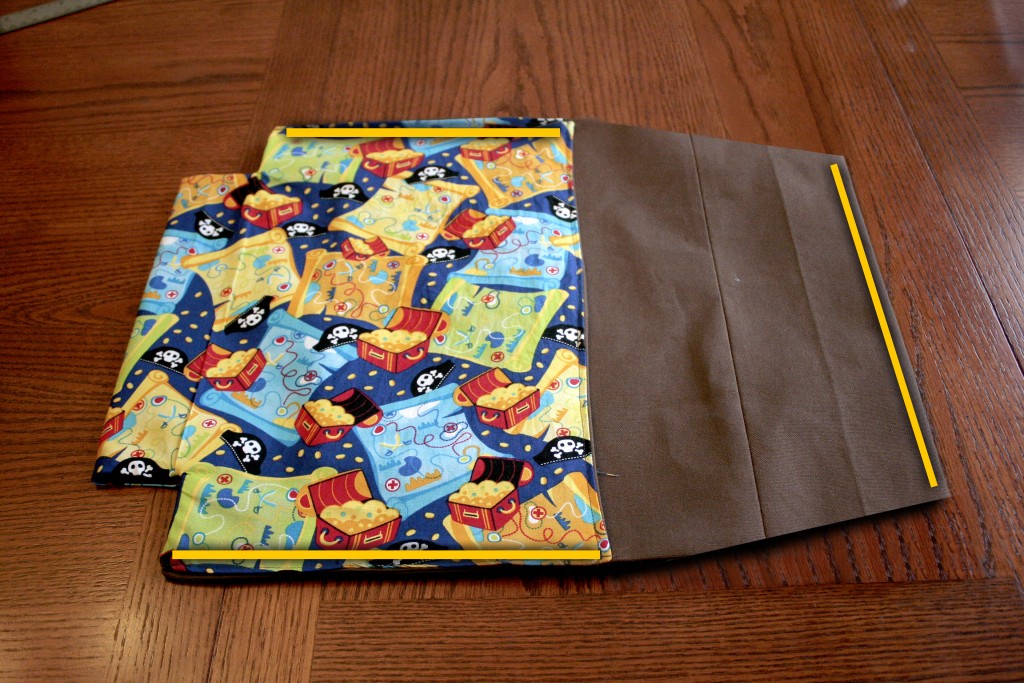
2. Sew the pockets to the front and back pieces. With my pocket placement, the outer pocket will be hidden under the flap and the inner pocket will be against the back of the bag. Measuring from the right side (if the bag is oriented as shown below), the inner pocket (top of photo) is sewn on 9.5″ in from the side. The exterior pocket (bottom of photo) is sewn on 1.5″ away from the left side. (You may notice in the photo below that I added an additional strip of fabric not shown in the top photo. I didn’t make it quite long enough in my initial pattern so I added the extra strip of fabric and really like the end result! My pattern uses the correct length.)
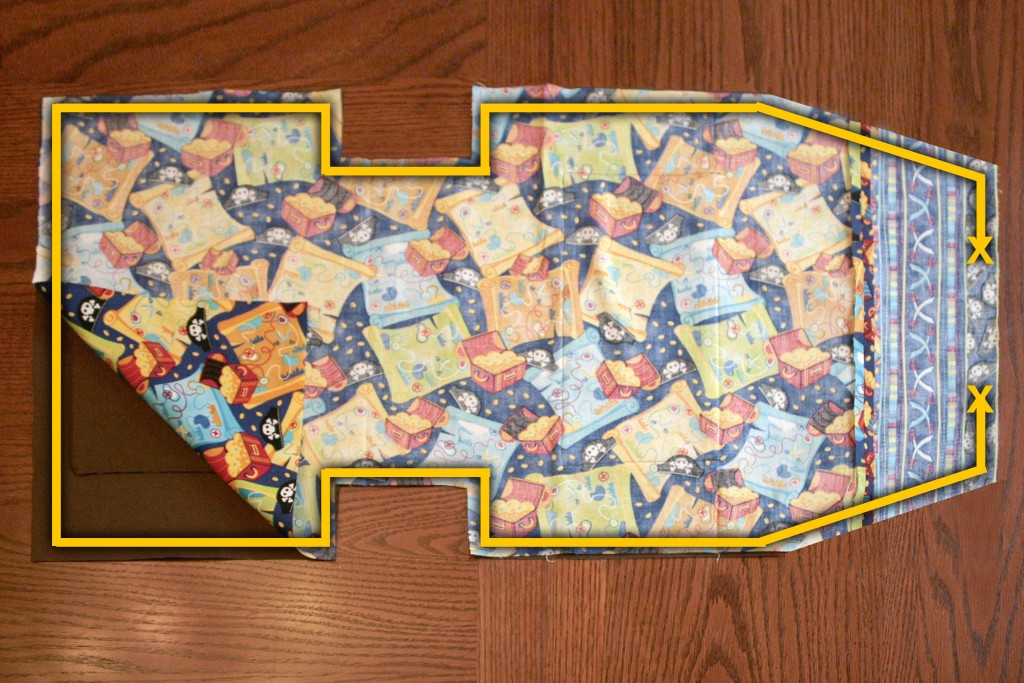
3. Now we’ll start sewing the bag. With right sides together, stitch all the way around the bag but leave a 5″ opening in the top flap. I flipped up the corner in the photo so you could see that the right sides are together and you can see part of the pocket.
4. Snip all the inner and outer corners then turn the bag right side out. Iron flat and press in the raw edges in the opening.
5. Fold over the bag as shown in the photo below so the exterior is on the inside and you’re looking at the interior. Stitch along the sides and along the flap to close up the opening.
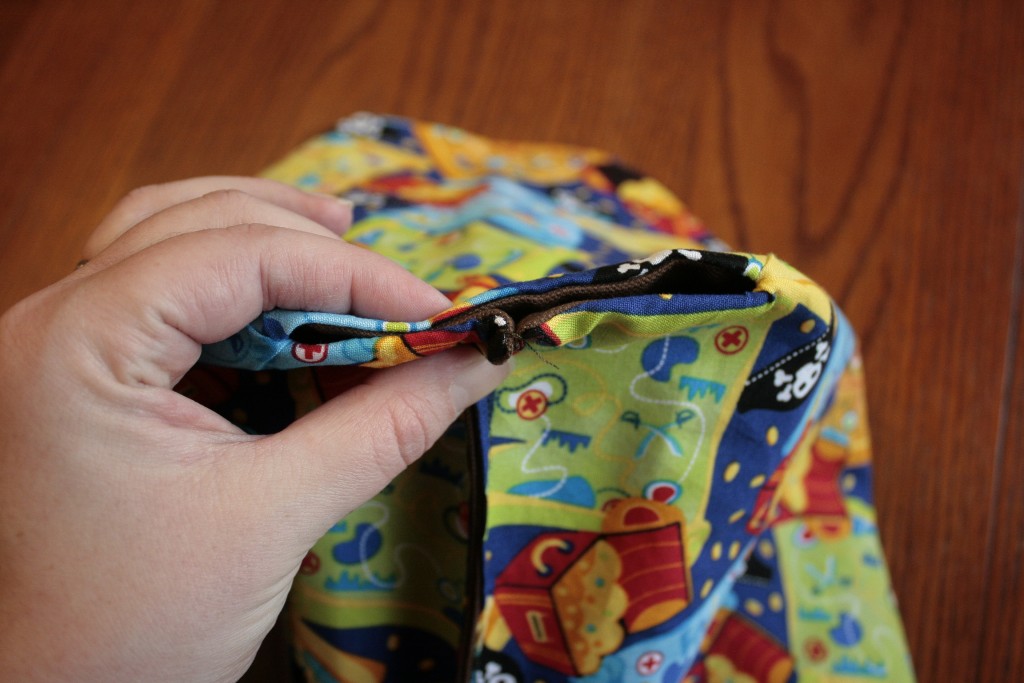
6. Open up the corners and fold them together as shown in the photo below and stitch them closed.
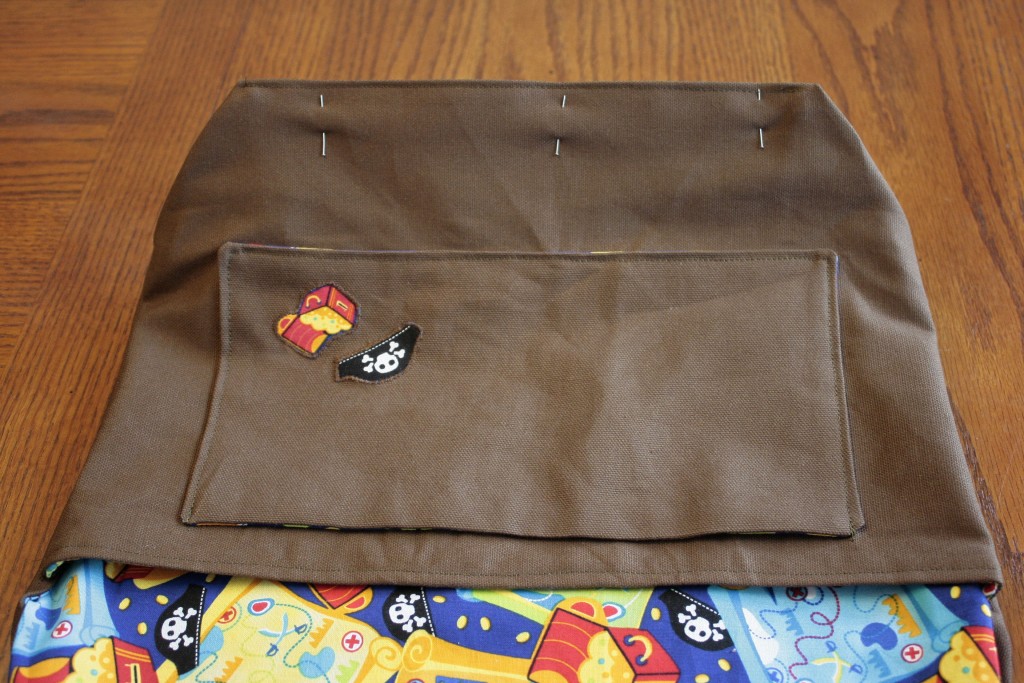
7. Turn the bag right side out. Fold the bottom of the bag between the corners on both the front and back. Pin and stitch 1/8″ away from the edge.
8. Sew on the strap just inside the side seams. The woven strap I used frays at the end so I folded under the ends of each side 1/2″ and zig zag stitched them before attaching. I like to sew on straps using an X inside a square to make sure it’s extra reinforced. Now your little pirate (or princess) is ready to load up their treasures and head out on adventures! The final bag tapers slightly so the top is a little wider than the bottom.







39 comments
So cute! And I absolutely love the little trail marking the way to the X on the front. Adorable!
This is adorable and a perfect project, thanks for sharing.
What an awesome project! I have 4 little grandsons who would love this! Thanks for sharing it!
Awesome project, thanks for sharing it. I’ve passed this lovely award along to you. Check it out here:
https://slipstitchesandmore.blogspot.com/2011/07/one-lovely-blog-award-goes-to.html
Thank you so much Sabina, we’re honored! Glad you’re enjoying our site :).
What a cool idea! I bets all his friends will be wanting one too. You should market this.
What a cool idea! I bet all his friends will be wanting one too. You should market this.
I love this! I would love it if you would link up to my Tuesday Confessional link party going on now: https://www.craftyconfessions.com/2011/07/tuesday-confessional-link-up-2.html. I hope to see you soon!
~Macy from Confessions of a SAHM
Just linked up, thanks Macy!
My two year old would love this, too. So cute! Following you from Tip Junkie‘s link party. Would love to have you link this up to my {wow me} wednesday link party going on right now over on my blog. Hope to see you there. 🙂
Ginger
gingersnapcrafts.blogspot.com
Thanks Ginger! I added the messenger bag to your link party.
Very cute! And a great tutorial! Found you on Ginger’s link up party.
This is awesome! I love the bean bag pirates too!
what a great idea! My 2-year-old son would love this! He likes to carry his toys around in a bag as well. I’ll have to make one for him. Thanks for the tutorial!
This is awesome! Thank you so much for linking up to Sew Woodsy today.
Cute bag — my girls are forever looking for bags to put “stuff” in. I might just have to make a couple. I found your blog through the WW hop and liked you on Facebook. Thanks!
That is super cute! My son would love that!
New blog follower! Come follow back and enter my great giveaways! {One Ends Tonight} -Shannon- Stuff for your little stinker! https://www.peacelovepoop.com
HELLO, I LOVE THIS. IVE BEEN LOOKING FOR THIS KIND OF BAG EVERYWHERE. IM NOT A GREAT SEWER BUT I WANT TO TRY IT.. IM CONFUSED ON STEPS 5 & 6. ND SHOULD I USE A SPECIFIC TYPE OF NEEDLE IF IM SEWING THICKER FABRIC LIKE THIS ONE? PLEASE HELP. MY EMAIL IS [email protected] THANKS
Hi Stacey! I used a universal standard point needle. I also just sent you an e-mail so I can help you with steps 5 and 6. 🙂
I really love this bag. The colors you used are so cute, and what a great thing to have on the go!
I love that. Thanks for the great tutorial. I have made a couple messenger bags for my kids, they are bigger. I am saving this to make for littler kids.
LOVE IT! I make a new bag for each trip that my daughter takes (this upcoming excursion makes 3 :-P), and I was driving myself crazy trying to over-design a bag in my head. This one came together in one afternoon!
As soon as she wakes up, I’ll measure and attach the shoulder strap. When I’m done, I’ll post a picture!
I’m so glad to hear the pattern worked out for you! Thanks so much for letting us know and I look forward to seeing pictures!
I finished it!
https://lilyruthsmama.blogspot.com/2011/12/um-i-made-some-more-stuff.html
Ooooh, I can’t wait to try this. I’ve been wanting a bag like this for my son to put all his extra cub scout patches on that aren’t allowed on the uniform. This will be perfect! And he can keep his scout books and things in it.
The bag came out great, and I’m getting his patches sewn on. I changed it up just enough to put plastic in the back side so it is less collapsible. He loves it!
I’m helping my granddaughter to make this and I’m not sure how to do steps 6 & 7. Can you please help? This is actually going to be her first sewing project (she’s 10) and she’s so excited. We went to JoAnn’s last night and picked out the fabric and bought some fancy buttons to sew on the flap. We’re making it a little bigger so she can use it as a book bag for school.
I’ll post a picture when it’s done.
Thanks!
Hi Debbie, I’m excited for you and your granddaughter to make this bag together! In steps 6 and 7 you’re creating the bottom of the bag. In step 6 you’ll have the bag inside out and you open up the corners and fold them flat to create the sides of the bottom panel. In step 7, with the bag right side out you’ll fold a crease along the bottom to create the other 2 sides. It makes more sense once you’ve got the bag in front of you. If you need any more details just let me know! Thanks and I’m looking forward to seeing your final bag!
I love this idea! Thank you for posting this, I can’t wait to make this for both my girls! LOL they can start carrying their own stuff!
Help – I know this is an old post, but I am wanting to download the PDF pattern to make a whole bunch of these as the goody bag at my son’s party. Everytime I try to click on the pattern link it just takes me to Google Docs and I cant get any further!
Are you able to email me the PDF maybe or let me know how to access it another way perhaps?
Thanks for your help!
Cheers, Tash
Hi Tash, just sent you an e-mail about the pattern!
This is EXACTLY what I was looking for to make for my son. Thank you so much for sharing.
Question – How much fabric did you buy in yards? I’m not good with figuring that. Would a yard of each fabric be enough?
A half yard of each of the two fabrics should work if you’re careful. A yard of fabric would be 36″ long, and usually 44″ wide (but double check your specific fabric to make sure, it can vary). If your length is 44″, you can cut the 3 liner pieces from 1 half yard, and the 3 exterior pieces from another half yard. (The exact math is: the large piece is 31.5″ long and the shorter pieces are 11″ long for a total of 42.5″ long with just 1.5″ to spare.)
Could you let me know the finished dimensions of the bag? Thank you! I love this tutorial and believe me, I’ve looked at zillions to make a bag like this! 🙂
Hi Heather, I’m glad you like the tutorial! It’s been awhile since I made the pattern but the approximate dimensions are 8.75″ tall by 14″ wide at the top. It tapers down to 10″ wide at the bottom by 5″ deep.
Hi Mary,
I love your bag. My Son and I are planning to make one as a present. I notice that you use interfacing. Do you find that Bag is strong enough without it? Our bag will be sent overseas so we do still want it to be flexible for packaging but still hard wearing. Thanks so much for your time. Leanne
Sorry I was meant to say ‘That I notice you do NOT use interfacing” not that you do. Sorry about that I should check messages more carefully before posting.
Leanne
Hi Leanne, I haven’t made any tote bags with interfacing so I can’t say how that would help the durability. I’ve got a few tote bags that I made without interfacing and they’ve all held up pretty well. If you want to make it extra durable try using heavy weight material on both the inside and outside (home dec fabric, canvas, duck cloth, upholstery weight, etc.) and no quilting cotton. Those fabrics can be pretty stiff at first but they soften a lot once washed and they hold up really well in tote bags. Hope that helps!