
Design boards are a great way to get your ideas out of your head and onto paper. They can be made for almost anything, especially when you’re in the design phase of creating something. You may need them to design home décor projects, web layouts, or any other project requiring creative visualization, such as quilting!
I typically lay out my quilt blocks and fabrics on the carpet to test designs. But this method only seems to attract cats or general foot traffic until my blocks are so tossed about that I can’t remember what I was doing in the first place. Do you have this problem?
Enter the design board! Also called a design wall, a design board is a helpful tool for quilters that works much like a felt or flannelgraph board. Cut fabric squares or quilt blocks will temporarily “stick” to it while figuring out an arrangement you like. The lightweight board can be nailed to a wall, or you can slide it under the bed when you’re ready to take a break from your design.
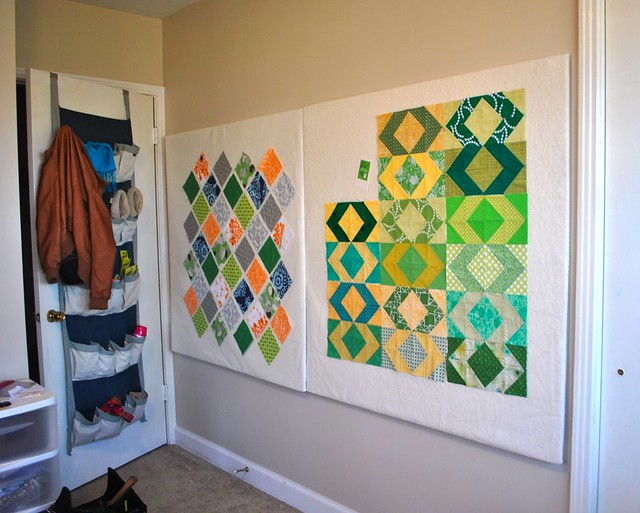
Below you’ll see two 4′ x 8′ design boards, which create a great workspace when placed side by side. I can use one of the boards when working on a smaller quilt. Also, each board easily comes off the wall if I need to move it to another room and work!
Here is what you need to make your design board
- 1 Sheet of foam insulation 4′ x 8′ (and about 1″ thick), from a hardware store
- Packing tape or duct tape
- Box cutter
- Iron
- 4 clothespins or binder clips
- Nail and hammer (if mounting to a wall)
- Queen-size batting or two batting scraps at least 54″ x 54″
- (I used Warm & Natural, but any cotton white batting would work)
- Staple gun (optional)

To get my foam insulation board home in the car, I cut it into 4 quadrants (one cut down the vertical center, and another cut down the horizontal center). This way, it easily fits in the back seat of my compact car! I knew I’d tap it when I got home, so this was no big deal. You may keep your board in one piece if you can transport it home.
Tip: If you often work on large quilts, you might want to purchase two boards for an 8-foot x 8-foot workspace. Just make sure you have the available wall space for it!

Tape the sections back together with clear packing tape if you cut your board.

Here is what the board looks like, all taped together. I decided this was bigger than I wanted to wrangle, so I untaped the vertical center and left it in two halves.

Next, cut a piece of quilt batting 3″ longer than the board on each side. Mine was 54″ x 54″.

Press your batting to make a smooth surface. You can iron right on top of your board.

Once your batting is smoothed out, stand your board upright and use clothespins to secure the batting tight onto one side of the board—Tape the edge of the batting to the board, one side at a time. Flip your board and pin the opposite side, pulling the batting taut. If you have a staple gun, you can secure the batting. Duct tape would also work in a pinch.

Here is what the back of your design board should look like.

To hang your design board on the wall, use the point of your scissors to poke a hole into the back side of the foam board directly in the center and about 4″ down from the top. Hammer a nail into the wall and place the hole into the nail. You could also attach your board to the wall with sticky mounting tape or adhesive velcro (if you want to take it off and put it back on quickly).

Place quilt blocks or fabric swatches on your design wall and arrange them as desired. Your quilter’s design board is complete!


33 comments
hi lindsay….i have no wall space in my sewing room so i bought a flannel backed tablecloth at the dollar store….cut it in half…put grommets along the top…and hung it on nails on the back of the sewing room door…quick, easy & cheap!!
Linda, that is so smart–and portable! Thanks for sharing your tip. 🙂
Looks great. Now I just have to talk the husband into letting me hang this up on the wall 🙂
Love this. I been meaning to get to Lowe’s, these boards are very reasonable. Thanks for the reminder. And using clothes pins to hold in place is a great tip, thanks! This will be so much easier than going back and forth to another room to lay out my blocks on the spare bed 🙂
Love seeing how these are made! Thanks for the specifics…
With six cats, I definitely have that problem, or my husband comes home from work and I yell – “don’t walk on my quilt!), the cats love to scratch at the blocks, toss them in the air and crawl under them! I can’t wait to make a design wall when I move!
What a great idea! My cats are constantly messing up my quilt designs 🙂 Would it be okay if I pinned this to my Sewing board on Pinterest
Absolutely! You may pin anything on the Craft Buds site. 🙂
What a great idea! I’ve been looking for a lightweight, removable board, and this is just the ticket. Ironically, I just threw out a ton of this very purple insulation that I used to ship Stella (my grandmother’s treadle sewing machine) from Seattle to Florida. If I’d only been as clever as you! Off to Home Depot soon to pick up some more! At least it’s not expensive. Thanks for a great idea!
I had a huge piece of white felt ( from a roll) that was left over from some Chtistmas crafting project and given to me by my mother in law. (Just imagine sewing hundreds of felt stockings to be filled and gifted to senior citizens!) I just used pushpins and hung it on my ONE wall in my studio that is unbroken by doors, or a closet or window. It is the perfect size. From the ceiling it reaches to only about 18 -24 inches off the floor and it is about 5 ‘ wide. VERY cheap and easy!!! The fabric sticks like a dream!
Do you think heavy duty Command strips could be used to hang board. They hold my quilt hangers
Yes, definitely! Good idea. 🙂
Is there only the one nail to keep each board up? I’m a little unclear once you got to the hanging on the wall part… I’ve got two boards ready to hang, they are just leaning against the wall now… Thanks!
Just found your site and I love the idea of your design boards. I’m going to make them then hang them with the Command hooks to not damage my nice walls. Thanks for the idea.
Interesting but one caution. Foam insulation board is flammable and some make very toxic smoke.
It is intended to be covered with sheetrock etc. See for example the spec sheet for what Lindsey used
at https://www.rmax.com/products/wall-products/rmatte-plus-3/
Fred, partner of quilter Becca (www.ecbrackett.cohousing.org) who wants a better design board so I’m looking for ideas…
I don’t think that’s much of a worrisome threat. After all, the fabric we’re putting on the design board is also obviously quite flammable. Lots of things are flammable. But the threat of a house fire is pretty low. (And I’ve had a house fire where the repairs took 5 months out of the house, living in a hotel.)
This idea is great, I’ve used the design walls but the grommets and cloth is tear easily. I like this idea since it can be portable with hooks on back to attach and detach easily enough. It does not bother me about the reference of toxic chemical if it should be on fire. I would hope if this is the case, I would have long vacated from the area B4 any toxic smoke was released although thanks for the caution.
I like this idea. I made one similar to this at my last house. I used foam core – purchased at Micheals. And I used cheap flannelette from Walmart and spray glued it to the foam core. My only issue was that the “holding” power wasn’t great, so I sometimes had to use pins here and there so the blocks didn’t fall off. My sister currently uses the backside of a picnic tablecloth and clamps to attach to her door frames – it works for her, but I want something a little more permanent.
I like the idea of using batting – I would spray glue it in place. I like the idea of something like foam as you can pin into it – a 1″ would ensure that you don’t pierce your drywall behind the wall. Also my sister has signboard that they use at their store that gets changed on a regular basis, she is going to save me some sheets of that. You should be able to get that for free from a lot of places as they typically just throw it out. Thanks for the idea of using batting – much better idea.
I have no wall space either, but I have a cabinet that I could use with your great idea. Thanks for sharing????
What a help this will be to me thankyou soooh much
I love this but I don’t have a large enough wall that I can put it on and I usually make lap size and larger quilts. I also don’t have a place to store something like this. What is a good option for a portable one? I do have a spare bedroom and can close the door to keep the kitties out, they just like to lay on it and I have that problem when I am quilting it.
Hi Brenda! You can use a large sheet of batting and pin it to your wall with push pins, then just roll it up when not in use. I don’t keep these design boards on my wall anymore–I store them in the basement and pull them out when needed!
I have been trying to figure out how to hang a temporary design wall in my sewing room/guest room over the sliding mirrored closet doors. (I don’t have enough open wall space.) I think I can modify your ideas to hang it on hooks attached above the door molding with binder clips attached to the top of the boards. When not in use, I can slide them behind the day bed. I also might try making it a folding board by joining sections with Gorilla Tape, something like those folding cardboard cutting boards.
I made myself some smaller boards when piecing small blocks by using those foam core signs that realtors use for advertisement, the ones on those wires that stick in the ground! Here in Texas, they put them on the easement behind my fence, so I pull them up and use the free foam core! Then I dispose of the wire properly. They are about 18″x24″ and are the perfect size to use when making my smaller blocks, especially transporting them from the cutting table to the sewing machine. All the little tiny pieces of fabric stick to the off-white flannel I use, without blowing off (unless my fan hits it just right when I move it).
How do you get the blocks stick to the tablecloth?
This is the perfect solution for apartment living, thanks!
It is a fuzzy batting on the back of a tablecloth, so the blocks “stick” a little bit naturally.
I use skirt hangers on my 36″ X 48″ cutting mat to hang it over the top facing of my sliding door closet in my spare bedroom. This would also work for a design board, I think. I don’t think the foam would be too heavy for the skirt hangers. More than two can be used. Minnie
easy peasy love this idea can hang anywhere and then fold it up until needed again fantastic
Try putting command hooks up and put a hem in your table cloth. Then using a cheap round curtain to hang it by. If you want it larger use 3 hooks and put a hold on the middle of your hem on the back side for it to sit on. They have clear hooks so maybe hubby won’t mind then up my ceiling.
Can be easily stored when not in use.
Thank you very much for the main idea craftbuds.
I was thinking of doing it using the folding display boards used for school projects as i dont have a lot of room either, just not sure if it will hold the batting well or not
Will gave to try and test ????
Can you pin, thumbtack on this too, like for a project idea board? I don’t quilt but sew garments.
Great craft you can do it with carpet also.