Art & Craft, DIY ideas and Tutorials - Craftbuds
  • All Craft
  • Needlecraft
    • Crochet
    • Knitting
    • Quilting
    • Sewing
    • Embroidery
  • Jewelry Making
  • Paper Craft
  • Engraving
  • Collectibles
43K Followers
24K Followers
367 Subscribers
Subscribe
Art & Craft, DIY ideas and Tutorials – Craftbuds
  • All Craft
  • Needlecraft
    • Crochet
    • Knitting
    • Quilting
    • Sewing
    • Embroidery
  • Jewelry Making
  • Paper Craft
  • Engraving
  • Collectibles
  • Craft
  • Needlecraft
  • Sewing

How to Shorten a Belt

  • Lindsay
  • Posted: January 27, 2022
How to shorten a belt
Total
3
Shares
1
0
3

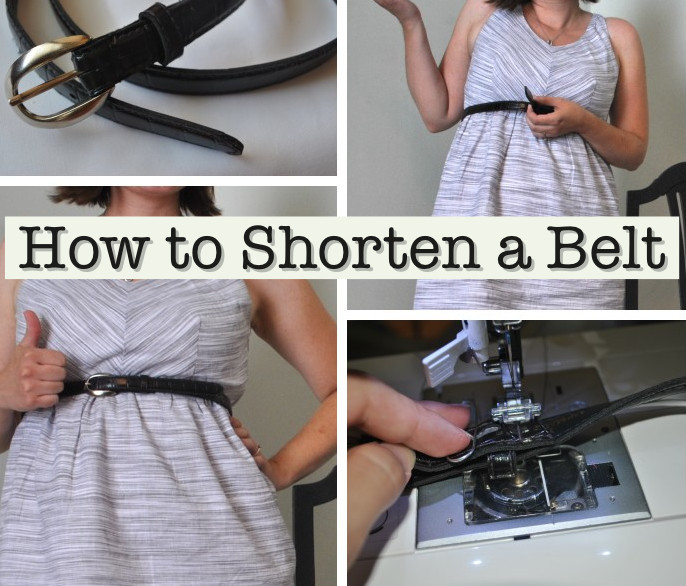
I recently bought a dress and thought, “This would look better with a belt.” The high waistline meant none of my current belts would fit (without a long flap hanging off), so I found a faux leather one for $1 at Goodwill and set out to alter it to fit an empire waist dress. Here’s how I did it.

With non-fabric scissors (so you don’t dull out your good shears), snip into the back of the leather holding the buckle.

Cut completely across, then snip off the excess leather tab as pictured.

Now use your scissors to cut open the remaining flap and release the buckle. Snip through the thread only, not the leather belt.

This is what your belt should look like disassembled.

Use your scissors to widen the hole for the belt prong. I wanted to shorten my belt by about two inches, so I widened the hole by two inches.

With the belt buckle positioned underneath the belt, slip the prong only through your newly created hole to the front side.

Pull the belt buckle through until the prong catches on the end of the long hole you cut earlier. Fold back the end of the belt and hold it together with your fingers.

Before sewing, test out your belt to see if you have an ideal fit. Temporarily hold together the belt ends with the buckle sandwiched between. The tiny leather loop should also catch just inside of the folded leather back.

Take your belt to the sewing machine. I removed my presser foot to sew through this thick leather material. Warning: Take extreme caution when sewing without a presser foot because your fingers can easily slip beneath the needle without the extra protection of the presser foot.

To move the leather through the sewing machine without breaking your needle, turn the sewing machine’s knob with your hand instead of using the foot pedal to create a slow and steady stitch. With matching thread, slowly stitch through both layers to attach the end of your leather flap to the belt. The leather loop should be positioned just inside your stitch line. I like to sew this step with the belt face up for a clean stitch line.

Flip your belt and machine stitch a line across both layers just beneath the buckle. Again, slowly stitch by turning the sewing machine knob with your hand, and trap the buckle inside your stitch line.

It’s now ready to wear! Here is the back view of the completed belt. You can see that both the small leather loop and the metal buckle are trapped inside the newly secured and stitched fold.

Total
4
Shares
Share 1
Tweet 0
Pin it 3
Related Topics
  • alter
  • alter belt
  • belt
  • buckle
  • how to make a belt smaller
  • leather
  • shorten a belt
  • shorten belt
  • skinny belts
Lindsay

Hi, I’m Lindsay Conner, an author, modern quilter, editor, and founder of the Lindsay Sews blog. I’m a Baby Lock ambassador and Stash Books author who loves writing modern sewing and quilt patterns for beginners and weekend sewists! I live in Indianapolis, Indiana with my husband, son, and two loveable cats, Murph and Chloe. I’ve been crafting for as long as I can remember. As a kid, I saved my dollar bills for trips with my mom to Jo-Ann Fabrics, where I’d find new floss for friendship bracelets or mini cross-stitch kits. Because my mom has always shared my love for crafting, she bought me my first sewing machine, a Hello Kitty Janome.

Previous Article
How to make a design board for quilting
  • Craft
  • Quilting

How to make a design board for quilting

  • Lindsay
  • Posted: January 27, 2022 - Updated at: November 13, 2022
View Post
Next Article
What Size Bracelet Should I Get
  • Jewelry Making

What Size Bracelet Should I Get

  • Jeremie Berton
  • Posted: January 30, 2022 - Updated at: January 26, 2023
View Post
You May Also Like
Best Sewing Machine For Kids
View Post
  • Craft with Kids
  • Indoor
  • Needlecraft
  • Sewing

Best Sewing Machine For Kids – Top 5 Picks in 2023

  • Lindsay
  • Posted: January 28, 2023 - Updated at: January 29, 2023
Best Wig Sewing Machine
View Post
  • Needlecraft
  • Sewing

Best Wig Sewing Machine In 2023: Top 6 Picks 

  • Lindsay
  • Posted: January 16, 2023
Air-Dry Clay Ideas
View Post
  • Craft
  • Craft with Kids
  • DIY projects

15 Amazing Air-Dry Clay Ideas To Get Started

  • Lindsay
  • Posted: December 30, 2022
Best 3D Printers Under $500
View Post
  • Craft
  • Engraving

Best 3D Printer Under $500 – 6 Models to Consider in 2023

  • Sheila Mae Pedregosa
  • Posted: November 25, 2022 - Updated at: December 21, 2022
Best Sewing Machines for Beginners
View Post
  • Product Reviews
  • Sewing

Best Sewing Machines for Beginners – 7 Top Models in 2023

  • Lindsay
  • Posted: November 24, 2022
What Can I Make With A Cricut Machine
View Post
  • Craft

What Can I Make With A Cricut Machine? 15 Ideas For All Levels

  • Mahnoor Malik Awan
  • Posted: November 23, 2022
Foiled Business Cards
View Post
  • Business
  • Craft

How To Make Business Cards On Cricut? The Complete Guide

  • Mahnoor Malik Awan
  • Posted: November 23, 2022
Best Laptop For Cricut Maker
View Post
  • Craft

Best Laptop For Cricut Maker – 5 Top Picks Reviewed

  • Mahnoor Malik Awan
  • Posted: November 19, 2022 - Updated at: November 23, 2022
2 comments
  1. Kristy says:
    July 7, 2012 at 9:29 am

    Clever! And it looks great! 🙂

    Reply
  2. kathleen marie says:
    January 6, 2014 at 1:39 pm

    I love to help my daughter keep up with the trends and this belt idea is great! Her little waist can make belt buying difficult. I’m a little unsure of the machine part and if it will still look nice and neat but we will see. I can’t wait to try it out! 😉

    Reply

Leave a Reply Cancel reply

Your email address will not be published. Required fields are marked *

Social Links
Facebook 43K Followers
Pinterest 24K Followers
YouTube 367 Subscribers

Subscribe

Subscribe now to our newsletter

Art & Craft, DIY ideas and Tutorials – Craftbuds
  • Privacy Policy
  • About
  • Contact
Find fun and creative craft ideas and tutorials across various categories such as Knitting, Quilting, Sewing, PaperCraft, Jewelry Making and much more

Input your search keywords and press Enter.