
I’ve had the idea for this pillow for a few months and the pillow contest at Sew Mama Sew was the motivation I needed to get me going. The inspiration was Anthropologie’s Smoldering Hues Shower Curtain.
The ruffles in this pillow are all knit fabrics. I thought this would be a fast and easy project and whenever I think that, I’m nearly always wrong. I had to visit 3 fabric stores to find enough shades in the orange/red/purple range to make this work. Once I finally found all my fabrics the sewing part wasn’t too difficult. I used an 18″ pillow form and a cotton fabric for the pillow case.

To make the ruffles put your sewing maching on the largest stitch setting. If you can reduce the tension without causing problems stitching do that as well. Stitch along the length of each strip of fabric twice, once 1/2″ down from the top and again 3/4″ down from the top. You will be removing these threads later in the process so you don’t have to be too precise. Tightly hold only the top or bottom threads (whichever works more smoothly for you) and start scrunching your fabric toward the center. Do this from both sides and scrunch until the length is 20″. Repeat for all 7 strips.


Next, mark the backing of your pillow where each ruffle will be stitched down. The first ruffle is stitched 3/4″ down from the top of the fabric. Every other ruffle is down 2 9/16″ from there but I was nice and did the math for you so see the diagram below. The ruffles should all be lined up along the left side, I just moved them over in the diagram to make it easier to see. The darker border is the seam allowance area. If you’re having trouble seeing the measurements, measuring from the top down you’ll mark a seam at 3/4″, 3 5/16″, 5 7/8″, 8 7/16″, 11″, 13 9/16″, 16 1/8″ and you’ll have about 1/4″ of the ruffle below the seam:

You’ll start with the top ruffle (the orange in my case) and work your way down. To have a nice finished top so you don’t see the stitching you’ll actually be sewing along the bottom of each ruffle. Then you’ll fold them all down so the rows of stitches are hidden under each ruffle. I found it easiest to first sew one direction as close to the top of each ruffle as possible even if I missed a little of the fabric. Then I stitched the other direction 1/8″ below my first seam. Here you can see how the stitches looked on one of the purple ruffles and then the finished edge when it was folded over.


Below is how the back of the fabric looked like after all the ruffles were added. You’ll see that the fabric did scrunch a little so I was glad I gave myself 20″ to work with!

After stitching down each ruffle pull out your loose stitches that you used to make the ruffles. For me some pulled out easily and some took more effort. Just don’t pull too hard and damage your fabric!

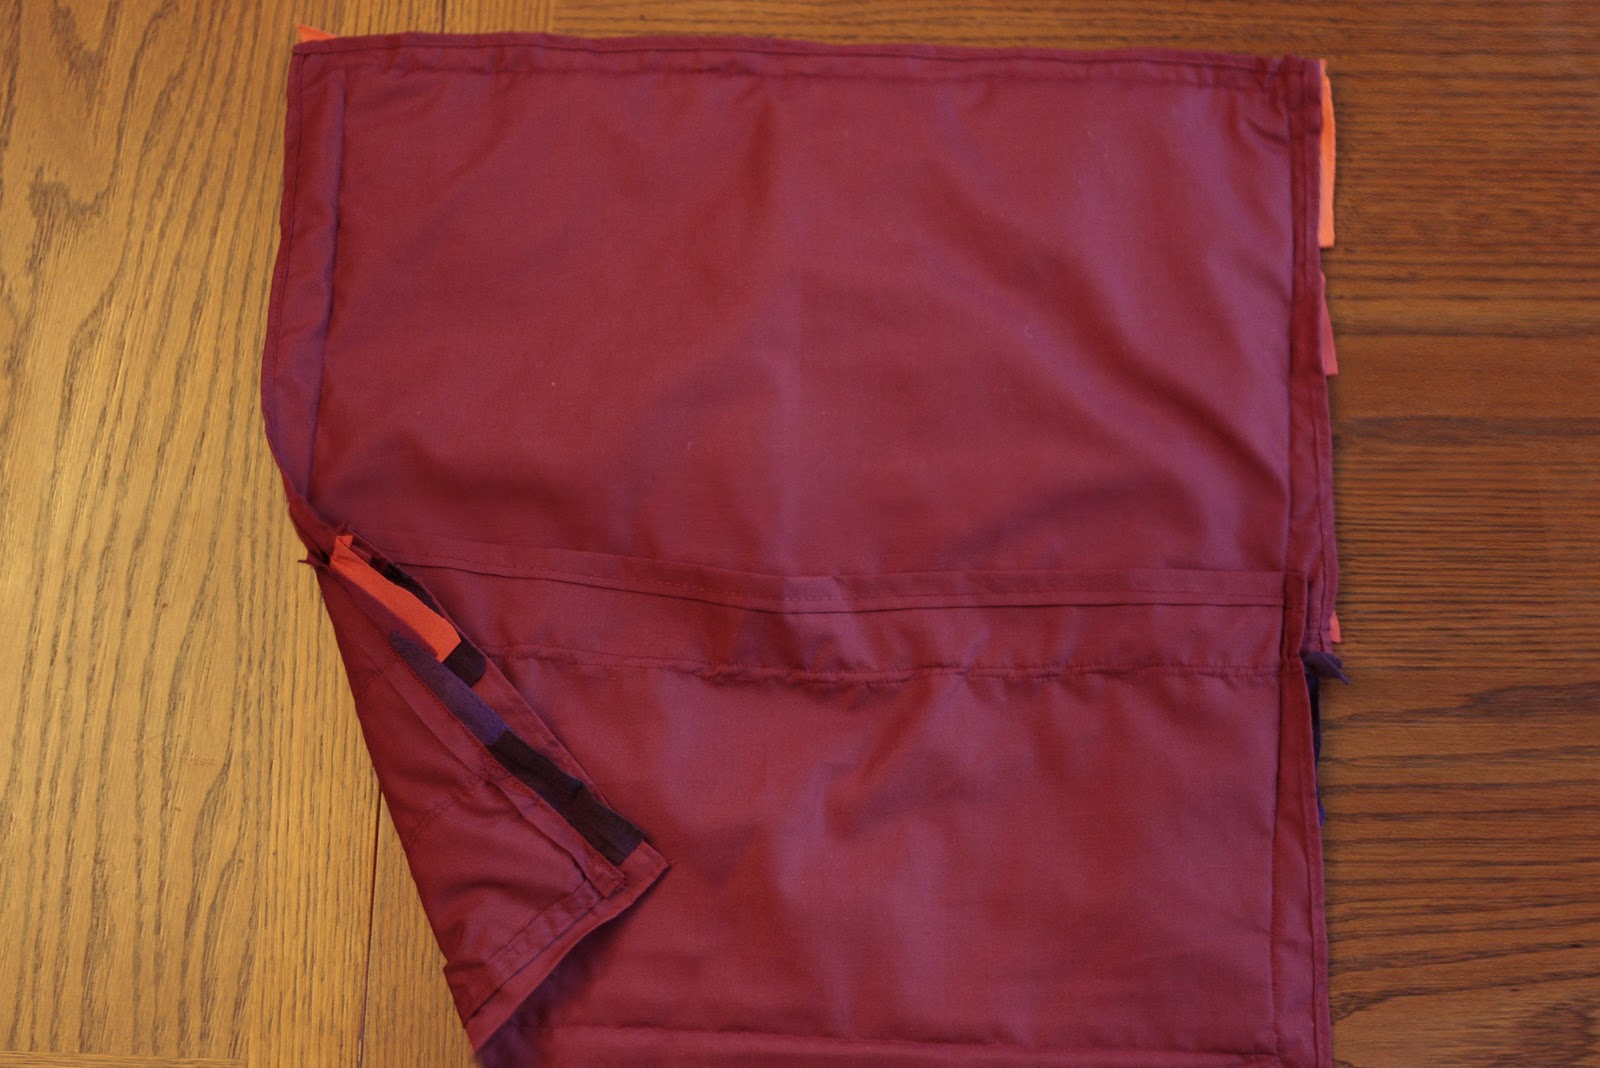
For the back I did an envelope opening hidden by two ruffles. I cut two rectangles, 19″ wide x 12.5″ tall for the top piece and 19″ wide x 10″ for the bottom. I hemmed the edge that would be showing (1/2″ folded twice) and added a ruffle using the same method I used for the top. If you’re having difficult seeing the diagram below, the top orange ruffle is stitched 3/4″ up from the bottom of the hem. The bottom purple ruffle is stitched 2″ down from the top of the hem.

To finish it off, lay the pillow front down with the ruffles facing up and make sure that the bottom of the lowest ruffle is at least an inch away from the bottom so it doesn’t get sewn in. On top of that place the top of the back (with the ruffles facing down). Lastly, place on top the bottom of the back so that it overlaps the top piece by 1 1/2″. Then measure and mark if necessary an 18″ square. Finally, smooth out all the edges of the ruffles and stitch around all 4 sides.
Then trim off any excess, flip it right side out and put the pillow in!


20 comments
>Mary, this looks great! I blogged mine just in time to shoot off an e-mail and enter. 🙂 I am crossing my fingers for you to make the top 20!
>This is so adorable! I love it! Great work, Mary.
>So cute! I just made my first ruffle pillow. Now I think I might have to try your version.
>Beautiful! I'm going to have to try that. Love the back too!
>Such a pretty pillow and the tutorial looks great. I have several pillow covers on my list and ruffles was one of them. I'll be using your tutorial for sure.
>That pillow is beautiful! I love the colors and ruffles so much!!! Looks like something that you'd get at Anthropologie!
Also, I have a great Dove chocolate giveaway going on right now and would love if stopped by and entered: https://eyespydiy.blogspot.com/2011/02/dove-chocolate-discoveries-giveaway.html
~Katie @ Eye Spy DIY
>What a beautiful pillow! Great tutorial and I love the colors! I'm a new follower! I also gave you an award over at my blog. Feel free to stop by and grab it! Dana @ D'Lea Designs
http://www.dlea-designs.blogspot.com
>So great! Love this pillow so, so much! 🙂 Thanks for linking up to {Sew} Modern Monday! Have a wonderful week.
>Soooooo pretty! And great instructions too! 🙂
>Beautiful! I love your pillow, and thanks so much for the tutorial!
Thanks for linking up to my ruffle madness!
So cute, just love the ruffles!
Thanks so much for linking up to Point of View, Mary. This pillow is fabulous! It was featured today…
https://www.gwennypenny.com/2011/06/point-of-view-features-and-theme-for.html
This is so pretty I want to make one noe thank you
I love ruffles and your instructions are great. I usually cannot follow peoples instructions, but you made them very easy. Thank you. I was wondering if you had made any shower curtains, and if so what do you use for the backing? Thank you, Charlene
Hi Charlene, I’m so happy to hear that the instructions were clear! I’ve never made a shower curtain but I would guess that using a plain fabric shower curtain and attaching the ruffles to that would work well.
Since I have a ruffles for my machine, I would use that and just trim the ruffles even with the edge of the base fabric. I agree, the hard part would be finding the gradation of shades for the ruffles. I would try quilting stores, since they usually have a good range of solids in cottons.
I like the full ruffled one. I might have to try that one day, I am a little intimidated with trying gathering. However, I know it is simple, just never have done a project with it. Time to start, huh?
Were your ruffles folded in half length wise or did you stitch the bottom of each ruffle to keep it from fraying?
Hi Crystal! I used cotton blend knit fabrics and they don’t fray when cut so the edges are just raw. It still looks just as good several years after making it! If you’re not sure, cut a test strip of your fabric and stretch it out and see if it frays or runs.