Art & Craft, DIY ideas and Tutorials – Craftbuds
  • About Us
  • Needlecraft
    • Crochet
    • Knitting
    • Quilting
    • Sewing
    • Embroidery
  • Cricut
  • Jewelry Making
  • Paper Craft
    • Origami
    • Drawing
  • Engraving
  • Collectibles
    • Numismatics
43K Followers
25K Followers
1K Subscribers
Subscribe
Art & Craft, DIY ideas and Tutorials – Craftbuds
  • About Us
  • Needlecraft
    • Crochet
    • Knitting
    • Quilting
    • Sewing
    • Embroidery
  • Cricut
  • Jewelry Making
  • Paper Craft
    • Origami
    • Drawing
  • Engraving
  • Collectibles
    • Numismatics
  • Craft
  • Sewing

Easy Fabric Letters

  • Lindsay
  • Posted: October 6, 2014 - Updated at: May 10, 2022
Total
0
Shares
0
0
0

Easy Fabric Letters

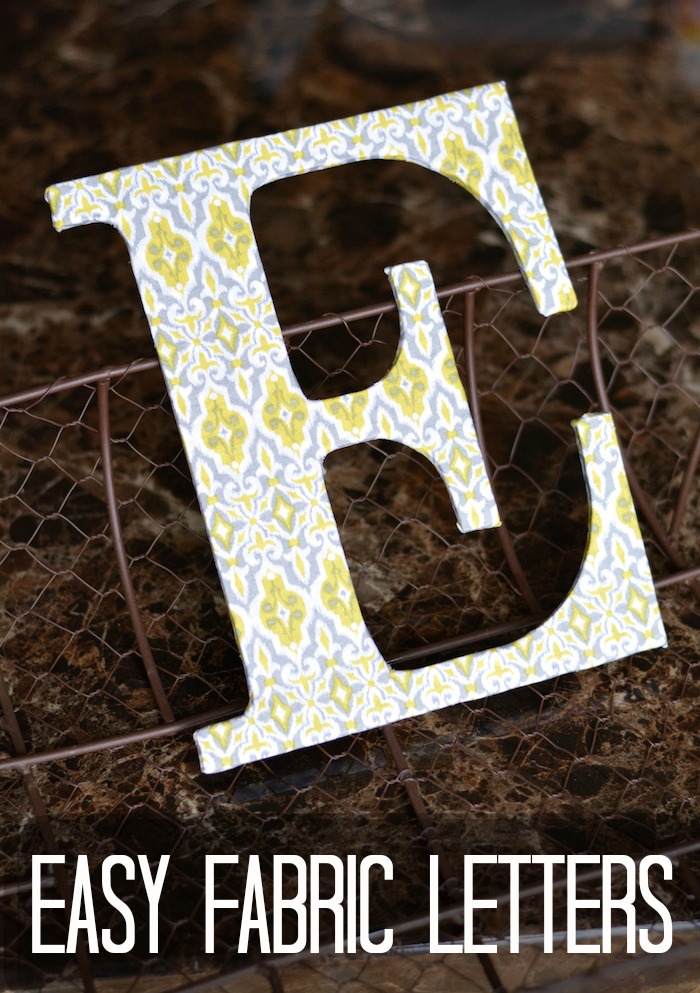
Looking for a quick and easy no-sew fabric project? Since I have less and less time to sew these days, I decided to make a fabric-covered letter to hang on the wall in my son’s room. Here’s how to make your own!

Materials:
– Fabric (I used Turkish Delight by Josephine Kimberling for Blend Fabrics)
– Wooden letters from the craft store (I got mine on clearance for $1.49)
– Mod Podge (I used matte finish)
– Paintbrush or foam brush
– Scissors (the sharp kind, for cutting fabric)

Easy Fabric Letters Tutorial

1. First, cut a piece of fabric a bit larger than your letter.

2. Place your letter right side down on the wrong side of the fabric.

3. Cut around the letter, leaving about 1/2” of fabric on each side. You may need to adjust this based on the height of your letter.

4. Snip the fabric in the corners and around the curves.

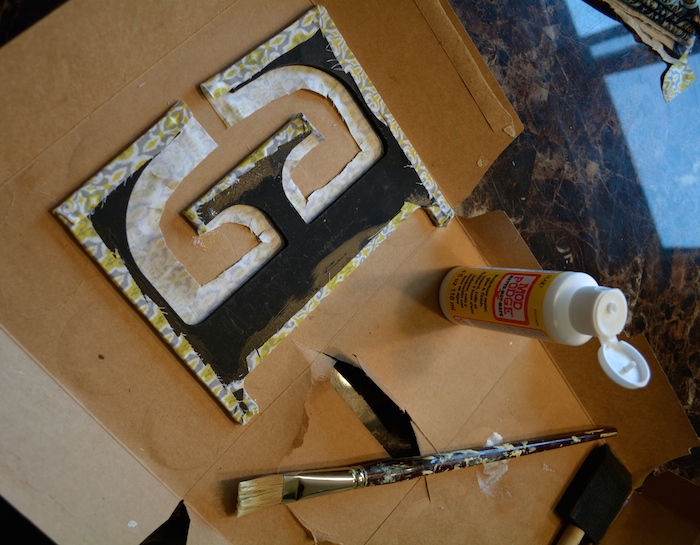
5. One section at a time, use your paint brush or foam brush to apply Mod Podge just to the edge of the letter, folding the raw edge of your fabric over top. Now paint over the raw edge of the fabric to seal, smoothing the fabric out with your fingers. Repeat this around all of the edges of your letter.

6. Let this dry, then Mod Podge a second layer over the raw edges of the fabric on the letter back.

7. I chose to leave the front of my fabric letter as is, for a natural, fabric look. If you want a more slick texture, you can Mod Podge the entire front of the letter using one or two coats.

Fabric Letters TutorialIt’s that easy! The letter is perfect to add to a keepsake box or pin on the wall with a single nail or straight pins. This idea also works with thicker, boxy letters. You’ll just need to apply fabric to the front of the letter, and then wrap strips of fabric around the 3-D sides of each letter.

Easy envelop pillow

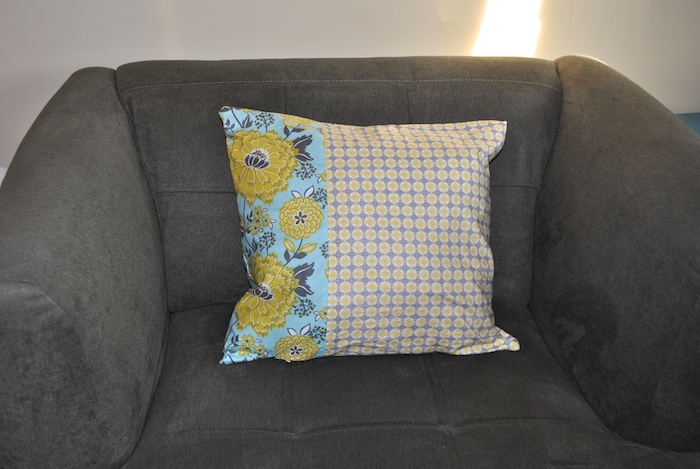
Here’s a simple patchwork throw pillow I made using some other prints from Turkish Delight, using the easy envelope pillow cover and DIY pillow form!

Turkish Delight for Blend Fabrics
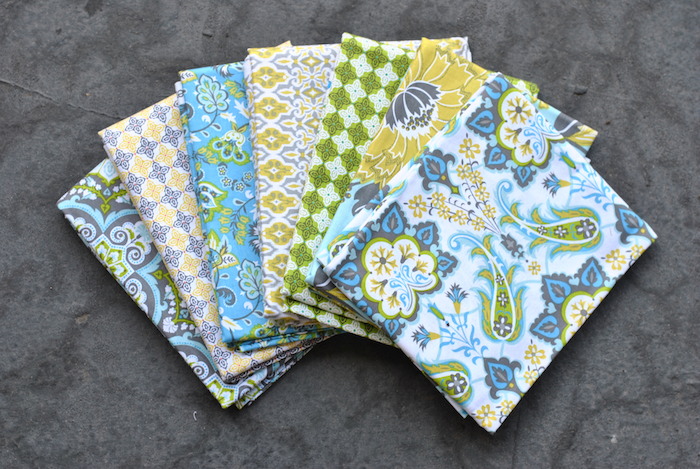
And the rest of the Turkish Delight fabric collection . . .

What’s your favorite easy, no-sew fabric project?

Total
0
Shares
Share 0
Tweet 0
Pin it 0
Lindsay

Hi, I’m Lindsay Conner, an author, modern quilter, editor, and founder of the Lindsay Sews blog. I’m a Baby Lock ambassador and Stash Books author who loves writing modern sewing and quilt patterns for beginners and weekend sewists! I live in Indianapolis, Indiana with my husband, son, and two loveable cats, Murph and Chloe. I’ve been crafting for as long as I can remember. As a kid, I saved my dollar bills for trips with my mom to Jo-Ann Fabrics, where I’d find new floss for friendship bracelets or mini cross-stitch kits. Because my mom has always shared my love for crafting, she bought me my first sewing machine, a Hello Kitty Janome.

Previous Article
  • Uncategorized

Covered Light Switch Plates

  • Lindsay
  • Posted: October 4, 2014 - Updated at: July 16, 2020
View Post
Next Article
  • Uncategorized

Guest Post: Stenciled Jack O’ Lantern Drinking Glasses

  • Mary
  • Posted: October 7, 2014 - Updated at: July 16, 2020
View Post
You May Also Like
View Post
  • DIY projects
  • Home

nPhoto – Professional Photo Printing Services for Photographers: Develop Your Brand with Us!

  • Jeremie Berton
  • Posted: January 14, 2025
View Post
  • Craft
  • Outdoor

5 Great Destinations in Costa Rica for Your Next Crafting Retreat

  • Craftbuds Editorial Team
  • Posted: December 16, 2024
Why-Professional-Locksmiths-Are-Essential-for-Home-Security
View Post
  • Home

Avoiding DIY Disasters: Why Professional Locksmiths Are Essential for Home Security

  • Jeremie Berton
  • Posted: April 3, 2024
Putting Together a Wooden Nativity Set for the Holidays
View Post
  • Craft
  • DIY projects
  • Home
  • Outdoor

Putting Together a Wooden Nativity Set for the Holidays

  • Sheila Mae Pedregosa
  • Posted: February 7, 2024
How is AI Impacting Crafting
View Post
  • Craft
  • Tools & Supplies

How is AI Impacting Crafting

  • Craftbuds Editorial Team
  • Posted: December 5, 2023 - Updated at: December 7, 2023
How to Sew Leather
View Post
  • Needlecraft
  • Sewing

Sewing Leather & Faux Leather Made Easy: A Step-by-Step Guide to Perfection

  • Michelle Rowley
  • Posted: October 24, 2023
How Funny Phrases on Shirts Have Transformed
View Post
  • Craft

The Evolution of Humor: How Funny Phrases on Shirts Have Transformed 

  • Craftbuds Editorial Team
  • Posted: October 23, 2023 - Updated at: October 24, 2023
Craft Organizers for Efficient Storage Use
View Post
  • Craft
  • DIY projects

DIY Craft Organizers for Efficient Storage Use

  • Craftbuds Editorial Team
  • Posted: October 23, 2023 - Updated at: October 25, 2023
1 comment
  1. Veronica says:
    October 7, 2014 at 1:07 pm

    I love this idea! It is so clever. Where did you find the letter? I need one for Ella!

Leave a Reply

Your email address will not be published. Required fields are marked *

Subscribe

Subscribe now to our newsletter

Art & Craft, DIY ideas and Tutorials – Craftbuds
  • About Us
  • Editorial Guidelines
  • Our Experts
  • Privacy Policy
  • Contact Us
Find fun and creative craft ideas and tutorials across various categories such as Knitting, Quilting, Sewing, PaperCraft, Jewelry Making and much more

Input your search keywords and press Enter.