Art & Craft, DIY ideas and Tutorials – Craftbuds
  • About Us
  • Needlecraft
    • Crochet
    • Knitting
    • Quilting
    • Sewing
    • Embroidery
  • Cricut
  • Jewelry Making
  • Paper Craft
    • Origami
    • Drawing
  • Engraving
  • Collectibles
    • Numismatics
43K Followers
25K Followers
1K Subscribers
Subscribe
Art & Craft, DIY ideas and Tutorials – Craftbuds
  • About Us
  • Needlecraft
    • Crochet
    • Knitting
    • Quilting
    • Sewing
    • Embroidery
  • Cricut
  • Jewelry Making
  • Paper Craft
    • Origami
    • Drawing
  • Engraving
  • Collectibles
    • Numismatics
  • Craft
  • Sewing

Knit Bess Top by Imagine Gnats

  • Mary
  • Posted: April 30, 2014 - Updated at: July 17, 2020
Total
1
Shares
0
0
1

I was so excited when Rachael of Imagine Gnats e-mailed us this pattern as a “thank you” for Craft Book Month back in September. It looked really cute and flattering on any size, and it comes in sizes 2-20! And this week, Rachael is hosting Selfish Sewing Week so it’s a great time to make something for yourself!

I decided that my knit tops are the ones I wear the most, so even though this pattern isn’t technically meant for knits I went for it and I’m so glad I did! Here’s the final product and I’m so happy with how it turned out. Now I’ve got a flattering, comfortable, and stretchy shirt.

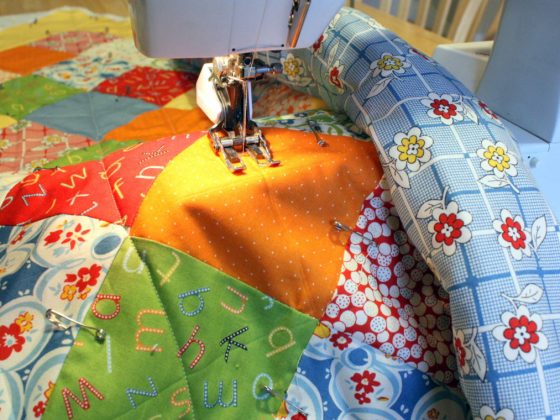
Because I was using a stretch fabric, I went down a size from what the size chart recommended. If you’re not sure on size, line up a favorite knit shirt on the pattern and mentally add a 1/2″ seam allowance to determine size.  If I were making a non-knit shirt I would have gone with the size recommended. The pattern was awesome and the way the sleeves are incorporated is genius, the pattern is just two pieces! There’s a front piece and back piece that has the sleeves incorporated that wrap around to the front. I made mine a colorblock version so it was 3 pieces, plus some strips of knit to finish off the neck, arms, and hem. The instructions and accompanying photos were easy to follow and this was a relatively fast project to sew.


As for sewing with knits, there’s definitely some things you can do to make it easier when using  a sewing machine rather than a serger. First of all, make sure to pre-wash your fabric! When sewing, I used a ballpoint needle and my Janome even feed foot to ensure that the top and bottom fabrics didn’t get stretched at different rates.You can check out this YouTube video to see the even feed foot in action (video is by Ken’s Sewing Center). When feeding in the knit fabric, I let it have just a little slack so the machine was pulling the fabric through all on it’s own without me pushing or pulling at all.

I also set my machine to use a special stretch stitch (button #6). The icon looks like a lightening bolt on my Janome QDC4120. For each seam, I started and ended with a regular straight stitch so I could reverse and lock the stitch in place. Then I switched to the stretch stitch for the length of the seam. I wanted this shirt to be durable so I did each seam at least twice (first the recommended 1/2″ seam allowance, then again at 3/8″) and then topstitched most seams. If you don’t have the lightening bolt stitch, a narrow zigzag will give you similar results.

The only thing I did that wasn’t in the pattern was to topstitch the neckline a second time closer to the neck opening after doing the intial 1/2″ seam. It helped the neck look smoother with the knit fabric, but I think it would have been fine with a single seam on a non-knit version. The method for finishing the shirt was new to me (basically sew a strip of knit fabric to the outside of the shirt with a 1/2″ seam allowance, then fold it to the inside and topstitch down) and turned out great.

And as for the fabric, I used this reversible knit from JoAnn’s in black (what I used in this post) and stocked up on orange (also shown below). One side is a tiny stripe and the other side is solid with a very subtle (almost nonexistent) sparkle effect. It looks a lot different on the JoAnn’s website so I can’t guarantee it’s a match but the item numbers match up to what’s on my receipt. After this top turned out so well I’m excited to make a few more!

If you have a serger (hopefully I’ll get one someday), this knit shirt could be made in no time! But even without the serger, it was a fast sew with the right techniques and I’d definitely recommend this pattern in a knit fabric, or woven fabric as recommended in the pattern. Happy sewing!


Total
1
Shares
Share 0
Tweet 0
Pin it 1
Related Topics
  • bess top
  • imagine gnats
  • knit shirt
  • knit shirt techniques
  • knit shirt tips
  • knit top
  • selfish sewing week
  • sewing with knits
Mary

Previous Article
  • Craft
  • Food
  • Product Reviews

Frosted Easter Cookies: A Craftsy Class Review

  • Mary
  • Posted: April 19, 2014 - Updated at: July 17, 2020
View Post
Next Article
  • Uncategorized

Quick Quilting Tips: Pinning Alternatives

  • Lindsay
  • Posted: May 2, 2014 - Updated at: July 17, 2020
View Post
You May Also Like
View Post
  • DIY projects
  • Home

nPhoto – Professional Photo Printing Services for Photographers: Develop Your Brand with Us!

  • Jeremie Berton
  • Posted: January 14, 2025
View Post
  • Craft
  • Outdoor

5 Great Destinations in Costa Rica for Your Next Crafting Retreat

  • Craftbuds Editorial Team
  • Posted: December 16, 2024
Why-Professional-Locksmiths-Are-Essential-for-Home-Security
View Post
  • Home

Avoiding DIY Disasters: Why Professional Locksmiths Are Essential for Home Security

  • Jeremie Berton
  • Posted: April 3, 2024
Putting Together a Wooden Nativity Set for the Holidays
View Post
  • Craft
  • DIY projects
  • Home
  • Outdoor

Putting Together a Wooden Nativity Set for the Holidays

  • Sheila Mae Pedregosa
  • Posted: February 7, 2024
How is AI Impacting Crafting
View Post
  • Craft
  • Tools & Supplies

How is AI Impacting Crafting

  • Craftbuds Editorial Team
  • Posted: December 5, 2023 - Updated at: December 7, 2023
How to Sew Leather
View Post
  • Needlecraft
  • Sewing

Sewing Leather & Faux Leather Made Easy: A Step-by-Step Guide to Perfection

  • Michelle Rowley
  • Posted: October 24, 2023
How Funny Phrases on Shirts Have Transformed
View Post
  • Craft

The Evolution of Humor: How Funny Phrases on Shirts Have Transformed 

  • Craftbuds Editorial Team
  • Posted: October 23, 2023 - Updated at: October 24, 2023
Craft Organizers for Efficient Storage Use
View Post
  • Craft
  • DIY projects

DIY Craft Organizers for Efficient Storage Use

  • Craftbuds Editorial Team
  • Posted: October 23, 2023 - Updated at: October 25, 2023
4 comments
  1. rachael {imagine gnats} says:
    April 30, 2014 at 8:43 am

    Mary, i LOVE it!!! and i need one just like it 🙂

  2. Marci Girl says:
    April 30, 2014 at 9:27 am

    It turned out FANTASTIC!

  3. Mary says:
    April 30, 2014 at 9:31 am

    Thanks Rachael, you did a great job on the whole package; design, pattern and instructions! It’s been years since I’ve made something for myself and this shirt got me inspired to start doing it more!

  4. Lindsay says:
    April 30, 2014 at 12:45 pm

    Oh my gosh–I love it, too! I have some knit and I might give it a try. 🙂

Leave a Reply

Your email address will not be published. Required fields are marked *

Subscribe

Subscribe now to our newsletter

Art & Craft, DIY ideas and Tutorials – Craftbuds
  • About Us
  • Editorial Guidelines
  • Our Experts
  • Privacy Policy
  • Contact Us
Find fun and creative craft ideas and tutorials across various categories such as Knitting, Quilting, Sewing, PaperCraft, Jewelry Making and much more

Input your search keywords and press Enter.