Art & Craft, DIY ideas and Tutorials – Craftbuds
  • About Us
  • Needlecraft
    • Crochet
    • Knitting
    • Quilting
    • Sewing
    • Embroidery
  • Cricut
  • Jewelry Making
  • Paper Craft
    • Origami
    • Drawing
  • Engraving
  • Collectibles
    • Numismatics
43K Followers
25K Followers
1K Subscribers
Subscribe
Art & Craft, DIY ideas and Tutorials – Craftbuds
  • About Us
  • Needlecraft
    • Crochet
    • Knitting
    • Quilting
    • Sewing
    • Embroidery
  • Cricut
  • Jewelry Making
  • Paper Craft
    • Origami
    • Drawing
  • Engraving
  • Collectibles
    • Numismatics
  • Craft
  • DIY projects
  • Sewing

How to Make a Sink Skirt – Step By Step Tutorial

  • Mary
  • Posted: April 10, 2022
How to make a sink skirt
Total
198
Shares
0
0
198

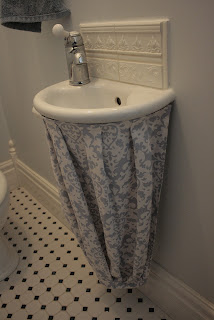
This project starts with a little story. Five years ago my husband and I bought an old historic home. It was built somewhere in the mid-to-late-1800s. The house had been empty for a couple of years and raccoons used it for part of that time. We had this little gross closet (see left photo above) that I wouldn’t store anything in so my dad suggested we turn it into a bathroom.


I’ll spare you the drama of putting in the bathroom, but we ended up with the little beauty in the above right photo! You can see that the pipes under the sink are still visible. My husband planned to route something with his instrument, but I had a better idea, and it involved a SKIRT!

That brings us to this project. A sink skirt was the perfect solution to hide those pipes and add some extra character.

MEASURING:
 
Width: I started by measuring around the top of the sink. I then added 1″ to that measurement so I could hem the sides. I decided to use 5 box pleats around the top. For each pleat I added an extra 4″ (you’ll lose 2″ for each side pleat). This bathroom is 3 feet x 5 feet so that sink is super small. For a larger sink, you may want more pleats.
 
Height: Measured the height I wanted the skirt from the rim of the sink to below the pipes. Added an additional 4″ for hemming.
 
 
SEWING:
After cutting out my fabric I hemmed the left and right sides. Then in the center, I pinned down a box pleat. Each pleat is 2″ wide with 1″ pleats so the folds will almost touch the back. From there I pinned each of the two side pleats. Then I sewed a seam across the top to hold them all in place. I then folded the top back 1″ twice for the hem. The extra-wide and sturdy hem will be where you later place your velcro.
 
I did the same process for the bottom except for making the pleats larger to the point that they overlapped each other.


FINISHING:

After I had the skirt finished, I used sticky velcro squares and attached one side to my sink and one side to my sink skirt. The ones on the sink stuck really well but the ones on the fabric lost their hold when the unheated bathroom reached arctic temperatures. After that, I handstitched the squares to the fabric but the stickiness made it nearly impossible to push the needle through and now my finger is full of holes. You can benefit from my suffering: I would recommend sticky velcro for the sink and nonsticky velcro stitched to the fabric. I used 5 squares, but again, it’s a really small sink so you may need more. Now it’s ready to be attached and you’re all done!

Table of Contents

  • 1 Sink Skirt FAQs
  • 2 What is the purpose of a sink skirt?
  • 3 What material can you use to make a sink skirt?
  • 4 How do you attach a skirt to a porcelain sink?

Sink Skirt FAQs

What is the purpose of a sink skirt?

A sink skirt is a decorative piece that is placed around the base of a sink. It can be used to add color and interest to a bathroom or kitchen, and it can also help to hide plumbing fixtures and pipes. Skirts can be made from a variety of materials, including cloth, vinyl, and tile.

What material can you use to make a sink skirt?

There are many different types of materials that can be used to make a sink skirt. Some common options include fabric, paper, and even vinyl. Each material has its own advantages and disadvantages, so it is important to choose the right one for your needs.

Fabric is a popular choice for sink skirts because it is relatively inexpensive and easy to work with. However, fabric can be easily damaged by water and may require more frequent cleaning than other materials.

Paper is another option for sink skirts. Paper is generally more durable than fabric and can be wiped clean easily. However, paper skirts can be more difficult to install than fabric ones.

Vinyl is a durable material that is resistant to water damage. However, vinyl can be more difficult to work with than fabric or paper. Additionally, vinyl skirts may not look as nice as other types of sink skirts.

How do you attach a skirt to a porcelain sink?

There are a few ways that you can attach a skirt to a porcelain sink. You can use silicone caulk to adhere the skirt to the sink, you can use double-sided tape, or you can use velcro strips. Whichever method you choose, be sure to clean the sink surface thoroughly before attaching the skirt.

If you’re using silicone caulk, apply a bead of caulk around the perimeter of the sink. Place the skirt over the caulk and press it into place. Use your fingers to smooth out any air bubbles or wrinkles. Let the caulk set for 24 hours before using the sink.

For double-sided tape, apply a strip of tape around the perimeter of the sink. Place the skirt over the tape and press it into place. Use your fingers to smooth out any air bubbles or wrinkles. Let the tape set for at least an hour before using the sink.

If you’re using velcro strips, apply a strip of velcro around the perimeter of the sink. Place the skirt over the velcro and press it into place. Use your fingers to smooth out any air bubbles or wrinkles. Let the velcro set for at least an hour before using the sink.


Total
198
Shares
Share 0
Tweet 0
Pin it 198
Related Topics
  • box pleat
  • home improvement
  • house
  • pleated
  • sink
  • sink skirt
  • tutorial
  • velcro
Mary

Previous Article
  • Craft
  • Origami
  • Paper Craft

How to Make a Cone Out of Paper – Photo & Video Tutorial

  • Sanoara
  • Posted: April 9, 2022 - Updated at: September 15, 2023
View Post
Next Article
  • Craft
  • DIY projects

12 DIY Shoe Painting Ideas

  • Lindsay
  • Posted: April 10, 2022 - Updated at: September 22, 2023
View Post
You May Also Like
View Post
  • DIY projects
  • Home

nPhoto – Professional Photo Printing Services for Photographers: Develop Your Brand with Us!

  • Jeremie Berton
  • Posted: January 14, 2025
View Post
  • Craft
  • Outdoor

5 Great Destinations in Costa Rica for Your Next Crafting Retreat

  • Craftbuds Editorial Team
  • Posted: December 16, 2024
DIY Tips for Creative Wedding Decoration Ideas
View Post
  • DIY projects

DIY Tips for Creative Wedding Decoration Ideas

  • Jeremie Berton
  • Posted: April 3, 2024
Why-Professional-Locksmiths-Are-Essential-for-Home-Security
View Post
  • Home

Avoiding DIY Disasters: Why Professional Locksmiths Are Essential for Home Security

  • Jeremie Berton
  • Posted: April 3, 2024
Stay Ahead of Car Hackers Craft a DIY Faraday Bag
View Post
  • DIY projects

Stay Ahead of Car Hackers: Craft a DIY Faraday Bag

  • Petar Dimov
  • Posted: March 21, 2024 - Updated at: April 3, 2024
Putting Together a Wooden Nativity Set for the Holidays
View Post
  • Craft
  • DIY projects
  • Home
  • Outdoor

Putting Together a Wooden Nativity Set for the Holidays

  • Sheila Mae Pedregosa
  • Posted: February 7, 2024
How is AI Impacting Crafting
View Post
  • Craft
  • Tools & Supplies

How is AI Impacting Crafting

  • Craftbuds Editorial Team
  • Posted: December 5, 2023 - Updated at: December 7, 2023
How to Sew Leather
View Post
  • Needlecraft
  • Sewing

Sewing Leather & Faux Leather Made Easy: A Step-by-Step Guide to Perfection

  • Michelle Rowley
  • Posted: October 24, 2023
1 comment
  1. jeaninmaine says:
    May 28, 2011 at 7:50 pm

    I think this is a positively brilliant idea. I had pipes under my sink for the last 20 years and it never once occurred to me to do something like this. Thank you so much for sharing the way you did it.

Leave a Reply

Your email address will not be published. Required fields are marked *

Subscribe

Subscribe now to our newsletter

Art & Craft, DIY ideas and Tutorials – Craftbuds
  • About Us
  • Editorial Guidelines
  • Our Experts
  • Privacy Policy
  • Contact Us
Find fun and creative craft ideas and tutorials across various categories such as Knitting, Quilting, Sewing, PaperCraft, Jewelry Making and much more

Input your search keywords and press Enter.