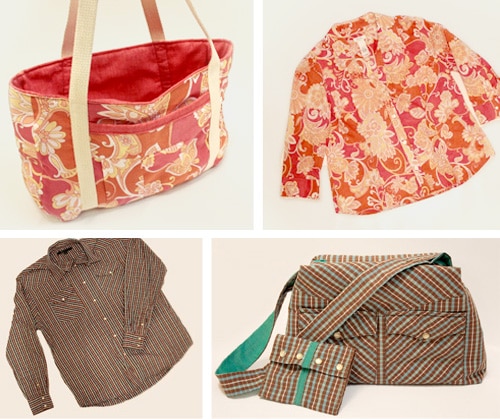
Upcycle a shirt is to take an old shirt of any kind and make it into something new. This is my favorite type of recycling because you get more than one thing out of just one product. Some examples of upcycling are turning the fabric into pillows or pencil cases, and you can even use the sleeves to patch other clothes! I’ll show you how to turn an old shirt into a purse and a Tote bag in this article.
I love all the details you find in clothes: the tiny buttons, pleats, and seams. I wanted to develop a way to use those details to give some thrift shirts a new life. So I designed two purse patterns that use those fun details to their advantage. In this tutorial, I’ll be featuring the instructions and pattern for turning the pink and orange shirt into the tote bag. The shirt I’m using in my pattern is a petite XL. Depending on the shirt you’re using, you may need to scale down the pattern a bit.
Table of Contents
Materials you need to upcycle an old shirt
-
One long-sleeved shirt
-
1/2 yard fusible fleece
-
1/2 yard fabric for lining (I used a heavier weight home dec fabric)
-
82″ canvas strap
Step 1
You’ll cut out all the pieces. The following two photos show all the pieces together and also where each piece came from. The numbers correspond to the list below.
-
Using the free PDF pattern that can be downloaded here, cut two each from the shirt (top and bottom of the backside of the shirt), fusible web, and lining fabric for the main body of the tote. The pattern is 2 pages. You’ll want to print both pages out, line up the dots, and tape them together. In your browser, the PDF preview may show the pages are cropped.
-
Cut one 9 3/8″ x 4″ rectangle from the shirt, fusible web, and lining fabric for the tote bottom.
-
Cut two 13.5″ x 4″ rectangles from the shirt and fusible web, and four from the lining fabric for the sides. I cut the shirt fabric horizontally from the front of the shirt with the button 1/3 of the way in. This piece will become a pocket.
-
Cut off the bottom 8.5″ sleeves including the cuff. Use the slit in the cuff, cut it open into a rectangle, and remove any buttons. Mine is 10.5″ wide, but it will vary by the shirt. Also cut a 8.75″ x 10.5″ rectangle from the liner fabric.


Step 2
Now that you’ve got all your pieces ready let’s prep the outer pocket. Fold over the top 1/4″ of the liner fabric for the front pocket and iron it down. Then with the wrong sides together, stitch the tops together. Then, flip the fabric, so the right sides are together. Line up the bottom of the two fabrics and stitch them together. Then turn it right side out.

Step 3
Next, you’ll stitch together the strips for the sides and bottom of the tote. Line up the strips from the shirt face side down (side, bottom, side). Place the liner strips on top of the two side strips (these will line the side pockets seen in the photos at the bottom of the post) and sew them all together with the right sides together.

Step 4
Then with the right sides together, sew the side/bottom strip to one of the main body pieces. Then sew on the other main body piece (not pictured) and turn it right side out. I found it easier to line up the center and sew from the center out to the top. Then I went back and did the other side.

Step 5
Stitch the pocket along the bottom seam. The pocket will still have raw edges.

Step 6
Iron the fusible fleece to the liner strips for the sides and to the main body pieces. Line up the side strips (side, bottom, side) and sew them together. Then sew that strip to the main body pieces using the same method as the exterior. Trim off any excess material around the seam allowance.

Step 7
Now nestle the liner inside the exterior of the bag. Fold the tops inside 1″ and stitch around the top with a 1/8″ seam allowance.

Step 8
You’re almost done and just need to add the strap! Make sure the strap isn’t twisted and overlaps the edges by 1/8″. Zigzag stitch back and forth over the strap until the raw edges are secured. The strap will now be one big loop.

Step 9
Line up strap with the raw edges of the front pocket. Start by pinning down the zig-zagged seam on your strap to the bottom of the bag. Then pin down the sides. (Before I stitched down the straps, my husband pointed out that the front pocket didn’t stand out so I went back and added the pink strip to the top.) Stitch along both sides of each canvas strap and make an X at the top of each strap.

Step 10
And you’ve made a shirt into a tote! I really like the pleats from the sleeve on the front pocket and the side pockets from the front of the shirt. The side pockets are mostly just for show. In my pattern, they’re too narrow to fit much. If you want them to be more functional, make the side/bottom strips wider.


65 comments
brilliant!
How smart! Your bag is adorable. Thanks for the tutorial!
just shared this on my FB page!
Thanks for sharing the link Mandy!
What a cute concept! Thanks for the tutorial!
these are fabulous!!! makes me want to go to Goodwill…well, at least it gives me a good reason to go!
xo
lynn
I am working up the nerve to make one of these! I think they turn out so cute thanks for the great tutorial. BTW I am a new follower.
Wow! Those look so good. I also love reusing old shirts, and this is a fun way to do it. Thanks for sharing.
That’s fantastic!! I know just what shirt I want to use for it. Does the shirt need to be a certain minimum size?
New follower from Wow Me Wednesday (and you SO did)
This is awesome! Love how pretty it is, it looks like you chose some pretty fabric from a high end store and whipped this up. Love it, sharing this on my blog’s facebook page!
Good question Jordan! The pattern for the main body of the tote is 9.5″ tall by 13″ wide and you’ll cut two of those pieces from the back of the shirt. As long as there’s enough fabric from the back of the shirt to fit the pattern it should work. If the shirt you have in mind is too small you could also scale down the pattern. You’ll have to let us know how it turns out!
WOW these look amazing! What a creative way to reuse a shirt! Love it!
Merci beaucoup pour cette idée géniale
Hi!
Im your new follower!
I really liked your site! Keep up the good work!
Do visit my blog too at https://aliascreativelife.blogspot.com/
very cute and perfect for a summer project – could you post on my linky party? https://the4rsRamblings.blogspot.com
Thanks for sharing the tutorial….
Beautifull work.keep it up!
I love them both! Both so different, but so awesome! I so need to learn to sew! Thanks for linking up with DIY under $5!
Oh Thank you! LOVE, LOVE, LOVE
KAT
I’m following you!
KAT Griffin
Just linked up, thanks for asking!
Such a cool idea. Long ago, I made a purse from a pair of jeans, but I never thought of doing something like that from a shirt. Great idea!
What a great job.
Thanks for sharing your pattern and for the cute idea!!
This is wild! What a great concept. I am so impressed that you figured it all out. Thanks for sharing.
This is great! Thanks for sharing the tutorial.
BRILLIANT!! I love the way you did this – and your tutorial is great too -so clear!
I would love if you came over and linked this project to my weekly Round Tuit party at:
https://jembellish.blogspot.com/
I also have a page of clothes upcycling projects with a long term linky there. There are well over 100 links now with some amazing projects – I would love if you linked up there too!
Have a great week!
Jill @ Creating my way to Success
Thanks Jill! I just linked up to both places.
This is super cool! I might have to try this!
what a great idee!!
idea I mean 😉
This is wonderful! I have a college roommate who would LOVE this–will be bookmarking. Thanks for linking up to {Sew} Modern Monday and have a wonderful week!
Thanks for linking to a Round Tuit!
Hope you have a great week!
Jill @ Creating my way to Success
https://www.jembellish.blogspot.com/
I love this idea. I have a few shirts that fit me kinda snug, I think I found a use for them.
What an adorable and clever purse! Your cute creation will be featured tomorrow at Sweet Peas and Bumblebees! Don’t forget to stop by and grab our button!
~Briana
So Awesome and Clever! I’m going to have to try this soon!
Thanks so much for the feature Briana!
What a genius idea and a great way to upcycle! Who doesn’t need a new purse!
If you don’t mind I would love it if you linked up to my weekly upcycled/stashbusting linky pary (Upcycled Awesome) at http://www.thetshirtdiaries.com or use this link: https://tinyurl.com/upcycled49
Adorei lindo
Just linked up, thanks for letting us know about your linky Robin!
Hello! Just wanted to let you know, I’ve featured your link today on SewHappyGeek!
What a genius idea! Love it!
I would love for you to link it up to my party that is running now. Any linky goes.
https://bacontimewiththehungryhypo.blogspot.com/2011/06/any-link-goes-party-running-now-summer.html
Come strut your stuff.
Thanks for the invite! Just visited your site and added our two most recent tutorials to the list.
this is amazing, thank you for sharing.
great way to re use!!! I made a messanger bag from a buttondown a few weeks ago!!!!
I lined it with a frezzer bag that you can buy at the supermarket… and than you have a cooling messenger bag!!!
wow amazing how something can be something else!
This is really cute. Thank you for the tutorial! I love the way you incorporated the pleat and yoke from the shirt — what a great idea. I have trouble parting with clothes that are unuseable because of a stain or something but still have nicely detailed parts left. This would be great for piecework too.
Again, thanks for your hard work in making up this tute.
what a great idea! Thanks so much for sharing your pattern and instructions. I found you through Infarantly Creative and thought I’ve never been to your blog before, your content looks great…so I’m your newest follower!
very nice! thanks for sharing this. I think the side pocket would be good for my pens that I’m always seeming to lose in the bottom of my purse. I actually made a purse with a small side pocket like this, and ran a seam down the middle of it for two pens. Worked great, and held the pens tight enough that they didn’t fall out.
Wow! Love this. Exactly what I’ve been looking for my old thrift shirts.
Thanks.
CUTE! Great tutorial too!!! Thanks for sharing!!!
I’ve gone crazy making purses – can’t wait to try this one!!
I’m a ‘purse-aholic’ – bought or made myself – & I’ll
definitely be making this one. Thanks so much for
posting the tutorial…
Loving this purse! Now I just need to find an awesome printed shirt to make one myself! 🙂 You should totally enter this project in Craftbaby’s ‘Upcycle Challenge’! https://www.craftbaby.com/contests/3/upcycle-it-sweeps
That was a great idea. I have a lot of cute shirts that I can’t wear anymore and now I can put them to good use. Thanks for the idea!
Am new and just started following great women like you. Will try am following you on twitter Jennifer micheals. I will try this for sure.
I clicked on the link you gave for the plaid shirt, but I was not able to locate the instructions for that one. Help, please.
Thanks for letting us know Karen, I’ve updated the link!
The link doesn’t work on either one of the post or blog pages – I tried both but thanks for the great ideas.
Thanks for letting us know! After some updates with Google Docs, all of our pdf patterns need to be re-linked and it’s been hard to track them all down. I’ll get the links updated tomorrow!
When you tape the pattern together by lining up the dots why isn’t the purse the same shape on both sides? Looks like two different pieces. And on the other purse with the pockets when you line up the dots why is the bottom of the bag not straight; it is on a slant. Confused.
Hi Heidi, Once you line up the dots and tape the two pieces of paper together, cut out the paper pattern along the outside black line. Then fold your fabric in half and where the pattern piece says “fold”, place that along the fold of the fabric. For both patterns, once you cut out the fabric you’ll have a symmetrical piece of fabric the same on both sides that will look like the fabric pieces in the photos (the side is the slanted line on one purse, and the curved line on the other). Hope that helps clarify!
These purses look gorgeous! Few of my old shirts are going to look much better recycled into such lovely purses.Thank you fort the inspiration!
I had to cut about 2″ off the sides (“pockets”) to make it fit, my printer is not printing to the “one inch”.
Is it not 9.5 wide and 13″ wide? I am having a hard time with the size of the main body part my printer is not printing the right size.