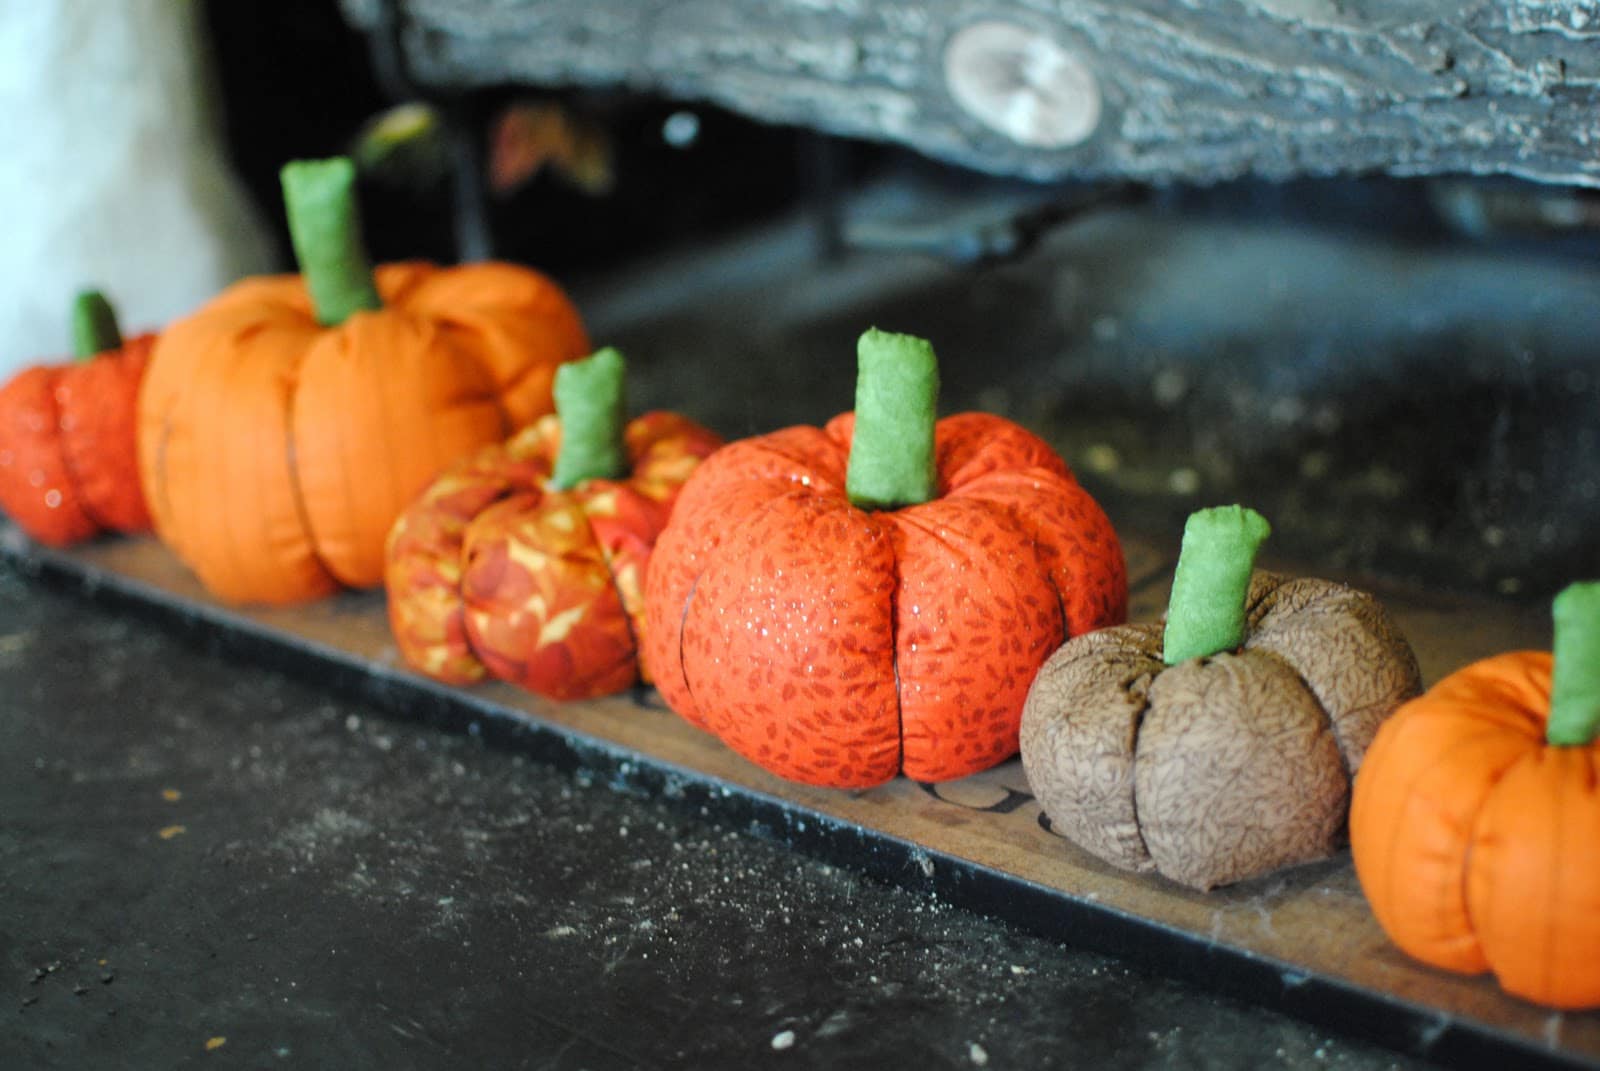
Are you looking for an easy DIY pumpkin? Look no further! Here’s a cute way to make them out of fabric. You could even have an older child make or help make them.

To get started, you’ll need orange fabric (cutting instructions below), leaves cut from green fabric (felt or fleece would be ideal), 2″ piece of stick, embroidery floss, heavy-duty thread, and needle, a glue gun, brown or tan raffia, and a sewing machine (optional).
1. Cut your orange fabric into a rectangle. For a rounder pumpkin, the length should be 2 times the width (ex. 10″ wide by 20″ long). For a slightly squattier pumpkin, the length should be 2.5 times the width (ex. 10″ wide by 25″ long).
2. Fold the orange fabric lengthwise with the right sides together. Use a sewing machine or hand stitch along the open edge.
Related: 8 Best Pumpkin Painting Ideas – You Must Try These!

3. With right sides still together, gather up the fabric at one of the openings and tie securely with embroidery floss. A rubber band rather than floss could also work but may not be as durable over several years.

4. Turn the pumpkin’s right side out. Loosely hand stitch around the opening of the pumpkin with a 3/8″ seam allowance with stitches around 1/4″ wide. Use a heavy-duty thread, so it doesn’t break when you pull it in step 6. Leave loose tails hanging off at the beginning and the end, and don’t tie any knots.

5. Fill the pumpkin with stuffing until it is fairly firm.

6. Pull the ends of the thread stitched around the top until the opening is closed or nearly closed, and tie several knots. Trim off the long ends of the thread.

7. Take your embroidery floss and tie a tight circle around the pumpkin and leave around a 6″ tail. (For reference, I needed about 4 feet total of embroidery floss for a pumpkin that used the fabric measurements of 10″ x 20″).

8. Next, wrap the long piece of the embroidery floss twice around the pumpkin diagonally from your first line so there are six total segments. Tightly tie the string to the tail left from step 7.

9. Use your glue gun to make a large glue dot in the top center of the pumpkin. I’m using white glue so you can see it in the photo, but clear would be best. Press your stick into the hot glue.

10. Use the hot glue gun to attach your leaves.

11. To finish, wrap a piece of raffia around the base of the stem to hide any excess glue.

12. After this step, you can call it finished, or you (or kids!) could cut jack o’lantern faces out of felt and hot glue them to the pumpkins.


42 comments
Very cute and great tutorial!
Great tutorial and awesome pumpkins! 🙂
Super cute!
This would be perfect for my daughter to make! Thanks!
super cute & pretty easy to make! nice!!
Great Tutorial. I’d love for you to link it to my party:https://trophyw.blogspot.com/2011/10/linky-11-will-craft-forinspiration.html
So simple and cute! Great tutorial!
How cute is that? Love it.
I love these, they are so cute! And they look easy too!
~JamieS
These are super cute. I always run away when I see needle and thread, but maybe… I should try…
~ Meredith From A Mother Seeking Come find me on my blog, A Mother Seeking…
I pinned this!
These look great!
I stumbled this post!
I would love it if you would link this to my link party, and any others you may have. Thanks, It just started 🙂
https://diycraftstomake.blogspot.com/2011/10/whacha-got-weekly-linky-party.html
These are so cute! Thanks for the step by step tutorial, have a great weekend!
I love them! I have started these and need to finish them:) Thanks for the little nudge! Have a fabulous weekend!!
Good morning!! You got a Saturday Shout Out over at Sassy Sites! Come on by and grab a button!! XOXO!
Wow, too cute, I’ll be making a few of these myself. This need to be shared, Would you post at my Sunday’s Best party going on now, http://www.my1929charmerblog.com. I want everyone to see these!
These are soo adorable.. and I just love the simplicity of making them.. I think even a sewing like myself could master these! Thanks so much for sharing with the Pink Hippo party!
Very cute!!
Hi! I spotted your pumpkins on a linky party. Very cute, my dear! Stop on over Dazed for a visit! 🙂
The perfect simple craft for Halloween! The pumpkins look fabulous!
Thanks for linking to a Round Tuit!
Hope you have a great week!
Jill @ Creating my way to Success
https://www.jembellish.blogspot.com/
love these and I made some this weekend! Hope you’ll check them out, I linked back to this post!
https://kristastitched.blogspot.com/2011/10/fabric-pumpkins-and-jack-o-lanterns.html
these are BEAUTIFUL..
These are just plain adorable! 🙂
I’d love for you to link up to my pumpkin party:
“Pumpkinspiration Party!
Just wanted you to know that I think your tutorial and end result is the best one out there on the web! I’d pinned your to my fall board a couple of days ago, but just got around to trying it out today. Thank you so much for sharing!!! 🙂
Thanks for the invite! Tutorial just added. 🙂
Love! I just cleaned out my fabric will have to try with some of the orange I have!
What a fantastic tutorial – I now know what my daughter and her friend will be doing tomorrow at her play date. Thanks for posting this!! I will post on my blog and link back this weekend :-))
oops, I left the wrong web address, silly moi. It is http://www.whimsicalmermaid.blogspot.com . The girls are so looking forward to making these tomorrow!
That is so cute, i’m going to make a few for my craft room!!!
Thanks
Thanks again for the tut – I posted a pic, and a link back to this post today – along with a fat quarter giveaway that I am hosting – we had an absolute blast making these pumpkins!
Hello!
I’m very fond of your pumkins!!! Yes!!!
Enjoy a nice day.
Friendly yours.
My birthday is on Halloween and I love all things fall. Looking forward to making some of these pumpkins! Thanks for info
These are so adorable I wish it were fall again!
Thank you for this! A former coworker made them years ago and I’ve been looking for a pattern.
Thank you for a very cute idea!
These are so cute! I just had to share them on my latest post along with a link back to this page.
Thanks so much for sharing, Terri!
Made these with various burlap colors and they turned out so cute! Thanks you!
Thank you so much for sharing. These turn out cute and still look good if you have to piece your rectangle together. I made fatter pumpkins by going about 1:3, for example 10″ x 30″.
Also, in Step 3, you can use a rubber band to hold the gathers together while you wrap the embroidery floss (I used button-carpet thread) around the bottom of the pumpkin.
Great ideas, thanks for the tips Merry!
Kids Made this today from felt in Bible school when I was desparate for a craft. They loved it!!