The brown tissue paper on which many patterns come printed is not very durable. When you purchase any sewing pattern, it’s a good idea to transfer it to paper before cutting, so you can create the pattern in multiple sizes if needed and make adjustments. Transferring a pattern to freezer paper offers some critical advantages to other methods.
Inexpensive and found at many grocery stores, freezer paper is waxy on one side and can be ironed to fabric many times without losing this quality. It does not stick permanently to fabric and is durable, making it an excellent medium for copying sewing patterns. Although there are many ways to use sewing patterns, I will teach you my favorite way to transfer a sewing pattern with freezer paper.
Recommended Supplies:
- Sewing Pattern
- Clear Ruler
- Rotary Cutter or scissors
- Mat
- Pencil
- Scotch Tape
- Freezer Paper >> Buy it here on Amazon
Before you begin, read your sewing pattern to see if it is printed in the actual size, or if you’ll need to enlarge it on a photocopier.

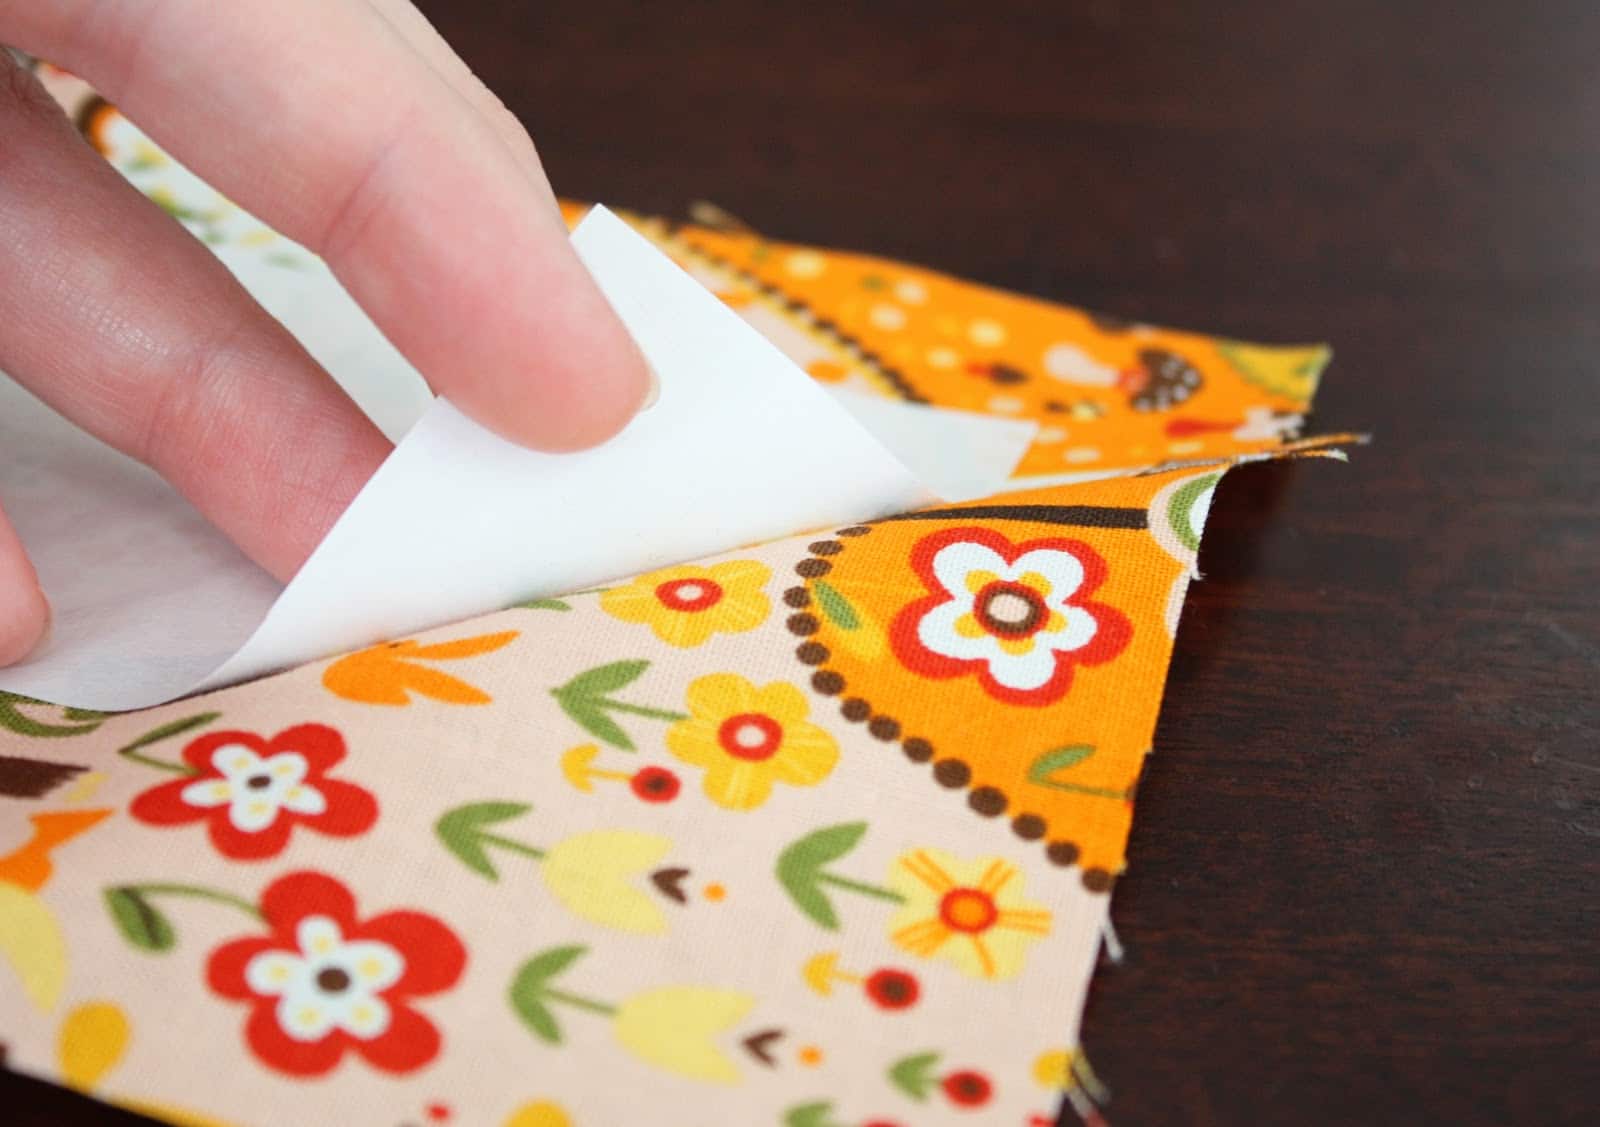
Roll out freezer paper to completely cover your printed sewing pattern. With the shiny side of the freezer paper facing down, use a pencil and ruler to trace the outline of your pattern on the freezer paper. Drawing on the matte side, you can faintly see the pattern lines through the freezer paper, but you may want to hold it up to a window to get a clearer view.
Note: If you use a “nested” sewing pattern with multiple sizes, ensure you find and follow the line that corresponds with your size.

Cut out all pattern pieces and label them with your pattern’s name (mine is the Shearwater Kaftan) and the name of each piece (such as “top of the sleeve”). This labeling will be helpful the next time you make the pattern. If the pattern has markings such as “cut on fold” or dots signifying how the garment should be sewn, mark these on each piece.

Tape together pattern pieces that match up, such as the sleeve top and sleeve bottom, using the original pattern as a guide. Once your freezer paper pieces are ready, iron each piece on your fabric (shiny side down). Your pattern will tell you how to arrange the pieces on your fabric for the best fit. Press with your iron for 10 to 15 seconds and remove.
The freezer paper pattern temporarily adheres to the fabric, and you can now cut around the pattern without shifting. With this technique, I don’t need to make any markings directly on the fabric. Make sure to align pieces on a fold if the pattern says (like the “placket piece” above). I like to use a rotary cutter and ruler to cut fabric quickly and accurately.
I sewed the Shearwater Kaftan by Make it Perfect. I made the shirt in an inexpensive fabric to test out the fit. This is called “making a muslin.” Because I didn’t want to spend a lot of time making a shirt I would not end up wearing, I used a fabric that would still be wearable, which makes this a “wearable muslin.”
From my wearable muslin, I chopped off about four inches from the shirt length and hemmed again. Because I noticed gaping in the back, I sewed a long vertical dart below my neck to create a better fit. Since I created a freezer paper pattern, I can easily cut the same length off my pattern pieces and adjust the back width to change the fit for the next shirt I make (which will be in a more “breezy” fabric). This is one of the benefits of transferring your pattern!
Do you have any tips or tricks for transferring a sewing pattern? If freezer paper is not readily available where you live (I know it can be hard to come by in the U.K.), check out Amazon and buy the largest roll you can find. You can also use freezer paper to make custom-painted tees and paper-pieced quilt blocks.


25 comments
What a fantastic idea! Thank you so much – I never would have thought of this but it is brilliant!
I’ve always been curious how to do this! Thanks so much, so helpful!
Fab idea, thanks for sharing!
This is neat! I’ve actually been ironing the tissue pattern directly to the freezer paper – its permanent and, as a newbie sewer, means I can’t ruin a pattern. I’ve discovered I can use clothesline to hold the fabric on top of the pattern and cut that way – works for the things I’m doing now, but I know your way is going to be much more useful in the long run. Thanks for sharing!
Great idea! How do you store the now thicker freezer paper patterns?
I think the whole pattern, including my new pieces and the original envelope, will go in some freezer size Ziploc bags. 🙂
That’s a great idea. 3 cheers for freezer paper!
The shirt turned out so cute! And the freezer paper is a great tip! I found you through Fireflies and Jellybeans. Thanks so much for sharing!
Such a cute shirt! 🙂
I too use to transfer my patterns to freezer paper. But now I take the original to the office store and have a paper copy made. They have copiers for very large items that usually is used by builders for plans and things. But anyone can use them and Staples does it for you. I then iron my pattern (like someone else posted) to the freezer paper. To trace the pattern is very time consuming so doing it this way saves a lot of time and I am still preserving the pattern. And I can still make copies from the office store should anything happen which to date nothing has. (-‘
What a great tip! I just bought a pattern to make my daughter some shorts and capris and I was wondering what I could do to be able to continue to use the pattern as she grows. Now I know!
I have not tried freezer paper for clothing patterns. I usually use thick plastic (not the flimsy drop cloth plastic). I buy it at Lowe’s (or Walmart). I put the plastic over my pattern and use sharpie permanent markers to trace my size. Maybe I will try this next. Thanks!
I too use freezer paper to trace my patterns but I never thought of ironing them on to the fabric prior to cutting. That’s a great tip! I like your shirt too.:)
I haven’t transferred with freezer paper but I make all my bag patterns on brown craft paper. You can punch a hole in one side and hang them on one of those hangers they make for rulers!
This is a fantastic idea, thanks for sharing.
Very cute and great idea with the pattern transfer! Thanks so much for linking up to Make Yourself Monday!
Jamie
For Love of Cupcakes.com
Great tip! I always wondered how this was done!
Thanks for linking to a Round Tuit!
Hope you have a fabulous week!
Jill @ Creating my way to Success
https://www.jembellish.blogspot.com/
Great idea! I have a special sewable pattern paper I get from Nancy’s Notions. You trace your pattern, bast it up, try it on and you can adjust the fit on the sewable paper, take it apart and add the adjustments and then use it as your pattern. It’s called sewable pattern fabric I think.
Perfect timing. I just made my first garment (for myself) in a really long time, tracing the pattern onto wrapping paper. It worked, but was kind of a pain. Freezer paper would cure at least some of that pain. thanks!
That’s a great idea, I hate cutting patterns apart and I’ve never been able to transfer the pattern exactly to the fabric. Now I can. Thanks!!
i have got to try this.thank you
This sounds good. I can’t wait for my first lesson with you, but before then I will buy the freezer paper and try it before we meet next month.
I still can’t find the pattern yet. I have checked Hancock website it is not there. If I have to go to the store, what is their address. Thanks
Grace
Thanks for the tip!
By shiny side, do you mean plastic film? Does the matte side stick as well, or does that peel off? How do you remove the freezer paper from the fabric afterwards?
I live in the UK, and wondering if I should get some, or just use baking (parchment) paper instead.“““`
I’m not sure that freezer paper is widely available in the U.K. A friend of mine asked me to bring her some when visiting Ireland from the States! You can try parchment paper, but I can’t guarantee that will have the same effect as freezer paper…it’s pretty magical! Maybe you can buy it online.