Art & Craft, DIY ideas and Tutorials - Craftbuds
  • All Craft
  • Needlecraft
    • Crochet
    • Knitting
    • Quilting
    • Sewing
    • Embroidery
  • Jewelry Making
  • Paper Craft
  • Engraving
  • Collectibles
43K Followers
24K Followers
357 Subscribers
Subscribe
Art & Craft, DIY ideas and Tutorials – Craftbuds
  • All Craft
  • Needlecraft
    • Crochet
    • Knitting
    • Quilting
    • Sewing
    • Embroidery
  • Jewelry Making
  • Paper Craft
  • Engraving
  • Collectibles
  • Craft
  • Sewing

Pleated Boxes Pillow: How to Pleat

  • Lindsay
  • March 9, 2012
Total
0
Shares
0
0
0

Welcome back to the Pleated Boxes Pillow Sew Along!

Today I am going to show you how to add those lovely pleats to the rows of your pillow front. It’s not as difficult as you might think. Let’s get started! Did you get your free PDF pattern?

Add Messy Pleating

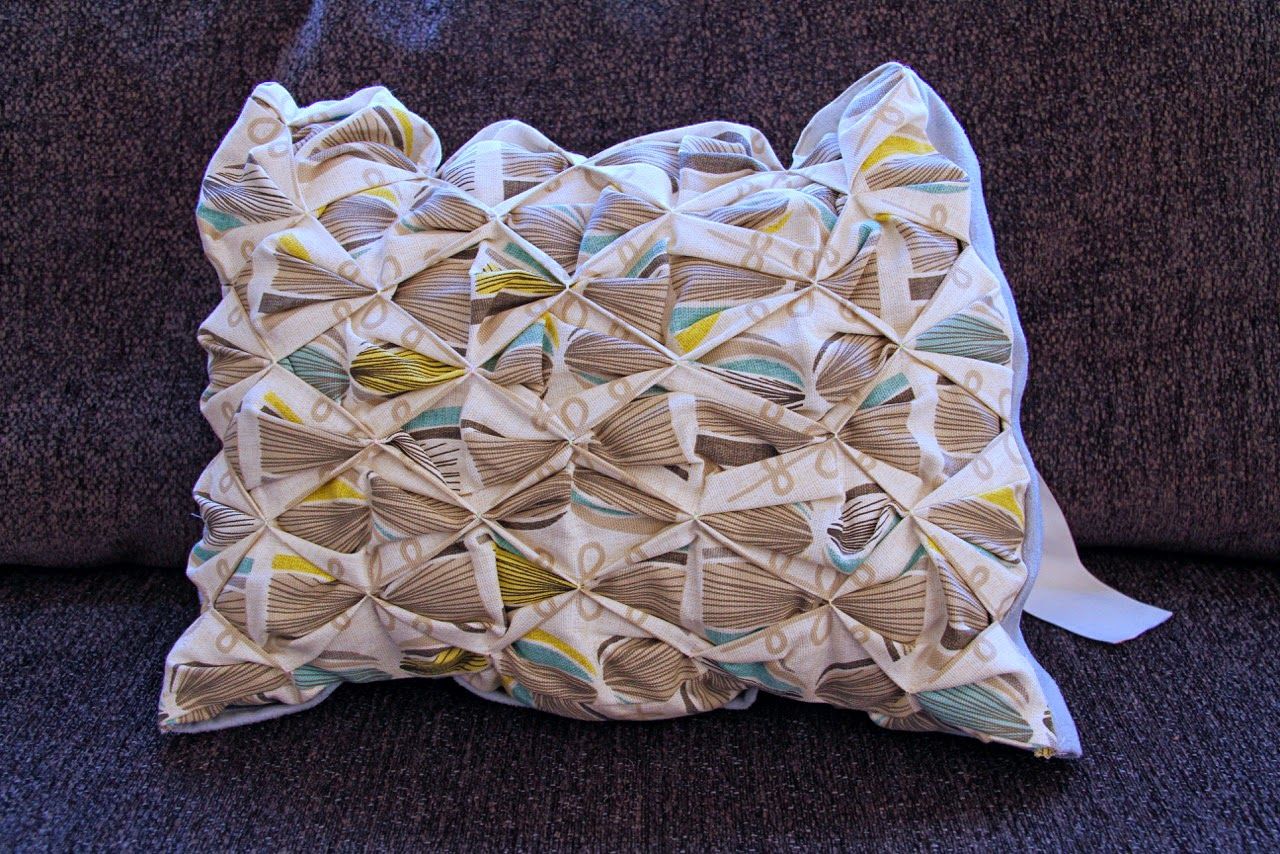
1. Along each of the background fabric rows you just added, take a 5” section of the row and add 3 to 4 horizontal folds.

Hold in place and press.

Repeat with the next 5” section until you’ve pleated the whole row.

2. Pin gathers in place, at the patterned box intersections, so that the pleated rows are about 1” to 1.25” wide. You can measure the first one and approximate the rest.

3. Starting at the right-most patterned box intersection, stitch a vertical line from the top to bottom of the row, just between the box corners. Remove pin as you sew and use your fingers to carefully guide fabric through, retaining the pleats. Backstitch at both ends.

4. Without cutting your thread, release your presser foot and lift your pillow front so you can stitch the next vertical line. Again, stitch between the patterned box intersections and backstitch at both ends. When finished with the row (six vertical lines), trim threads. This will save you lots of starting and stopping!

5. Repeat process for other two rows. To keep the pleats on outer edges of pillow front from shifting, stitch across each row with 1/8” seam allowance from the edge, so stitching is not visible when pillow is assembled. (See below: Left pleated edge is stitched close, and right is still open.)

6. Trim threads. Your pleated pillow front should measure about 14” x 18”.

And that’s a wrap! There are some lovely pillow front popping up in the Flickr group, so pop on over if you are still wondering what fabrics to use. You still have two full weeks to get in on this sew along and enter to win prizes!

Craft Buds Pleated Boxes Pillow Sew Along

Schedule

  • Friday, 2/24:  Supplies + Prizes
  • Thursday, 3/1:  Cut and Arrange Squares
  • Monday, 3/5:  Join Rows
  • Friday, 3/9:  How to Pleat
  • Monday, 3/12:  Envelope Pillow Back + Make Pillow Form
  • Friday, 3/16 (through 3/23):  Link Up Your Pillows!
  • Saturday, 3/24:  Sew Along Winners Announced
Total
0
Shares
Share 0
Tweet 0
Pin it 0
Related Topics
  • envelope pillow back
  • lindsay sews
  • patchwork pillow
  • pillow pattern
  • pillow tutorial
  • pleated boxes pillow
  • pleated pillow
  • Sew Along
  • sew pillow
Lindsay

Hi, I’m Lindsay Conner, an author, modern quilter, editor, and founder of the Lindsay Sews blog. I’m a Baby Lock ambassador and Stash Books author who loves writing modern sewing and quilt patterns for beginners and weekend sewists! I live in Indianapolis, Indiana with my husband, son, and two loveable cats, Murph and Chloe. I’ve been crafting for as long as I can remember. As a kid, I saved my dollar bills for trips with my mom to Jo-Ann Fabrics, where I’d find new floss for friendship bracelets or mini cross-stitch kits. Because my mom has always shared my love for crafting, she bought me my first sewing machine, a Hello Kitty Janome.

Previous Article
  • Craft
  • Sewing

Pleated Boxes Pillow: Join Rows

  • Lindsay
  • March 5, 2012
View Post
Next Article
  • Craft
  • Sewing
  • Uncategorized

Pleated Boxes Pillow: Envelope Pillow Back + Make Pillow Form

  • Lindsay
  • March 12, 2012
View Post
You May Also Like
Best Wig Sewing Machine
View Post
  • Needlecraft
  • Sewing

Best Wig Sewing Machine In 2023: Top 6 Picks 

  • Lindsay
  • January 16, 2023
Air-Dry Clay Ideas
View Post
  • Craft
  • Craft with Kids
  • DIY projects

15 Amazing Air-Dry Clay Ideas To Get Started

  • Lindsay
  • December 30, 2022
Best 3D Printers Under $500
View Post
  • Craft
  • Engraving

Best 3D Printer Under $500 – 6 Models to Consider in 2023

  • Sheila Mae Pedregosa
  • November 25, 2022
Best Sewing Machines for Beginners
View Post
  • Product Reviews
  • Sewing

Best Sewing Machines for Beginners – 7 Top Models in 2023

  • Lindsay
  • November 24, 2022
What Can I Make With A Cricut Machine
View Post
  • Craft

What Can I Make With A Cricut Machine? 15 Ideas For All Levels

  • Mahnoor Malik Awan
  • November 23, 2022
Foiled Business Cards
View Post
  • Business
  • Craft

How To Make Business Cards On Cricut? The Complete Guide

  • Mahnoor Malik Awan
  • November 23, 2022
Best Laptop For Cricut Maker
View Post
  • Craft

Best Laptop For Cricut Maker – 5 Top Picks Reviewed

  • Mahnoor Malik Awan
  • November 19, 2022
What Does Flatten Mean On Cricut
View Post
  • Craft

What Does Flatten Mean On Cricut? All The Answers

  • Mahnoor Malik Awan
  • November 19, 2022
2 comments
  1. Janelle says:
    March 9, 2012 at 4:11 pm

    I am loving my pleats..!!

    Reply
  2. Baye says:
    March 11, 2012 at 8:32 am

    I love you “messy” pleats. I was too careful trying to keep to about an inch and a half wide and ended up with mostly uniform pleats. I may be the only sewer who has to practice being less accurate:-}

    Reply

Leave a Reply Cancel reply

Your email address will not be published. Required fields are marked *

Social Links
Facebook 43K Followers
Pinterest 24K Followers
YouTube 357 Subscribers

Subscribe

Subscribe now to our newsletter

Art & Craft, DIY ideas and Tutorials – Craftbuds
  • Privacy Policy
  • About
  • Contact
Find fun and creative craft ideas and tutorials across various categories such as Knitting, Quilting, Sewing, PaperCraft, Jewelry Making and much more

Input your search keywords and press Enter.