When it comes to cutting your fabric, you want to make sure it is clean and safe. Whether using regular scissors, an electric fabric cutter, or a rotary cutter, make sure they are sharp before you begin. You can even use this time to do quick maintenance on your tools; often, the blades will need to be replaced over time due to wear and tear.
There are many ways to cut fabric straight. To start, lay your fabric on a flat surface. For this, I recommend using a craft mat. If you do not own a mat, use a craft table or the floor and a yardstick to measure the length and width of what you want to cut. You can then mark where you want to cut with chalk or pins.
You may also want to place another piece of fabric underneath (or above) your fabric for easier cutting and minor fraying. This is especially useful for those who don’t have enough money for those expensive rotary blades because now you only need scissors instead of those high-maintenance blades.
If you want to get some fun practice, make sure to check this easy tutorial > How to Cut Charm Squares from Fabric
Table of Contents

What are the best tools for cutting fabric?
Fabric cutting Brands
A few brands of fabric cutters are popular for sewists and quilters, like Olfa, Fiskars, Dritz, and Clover. I’ve used both Olfa and Fiskars, and I’d have to say that I find them to be about the same in quality. Tip: The Olfa and Fiskars blades are interchangeable, so you can buy one or the other for your cutter, whichever is on sale!
A yardstick
This is a long ruler with measurements on it. It must be at least 30 inches long so you can line up your first cut without having to worry about your first mark being too big or small. $5-$10. Find it here
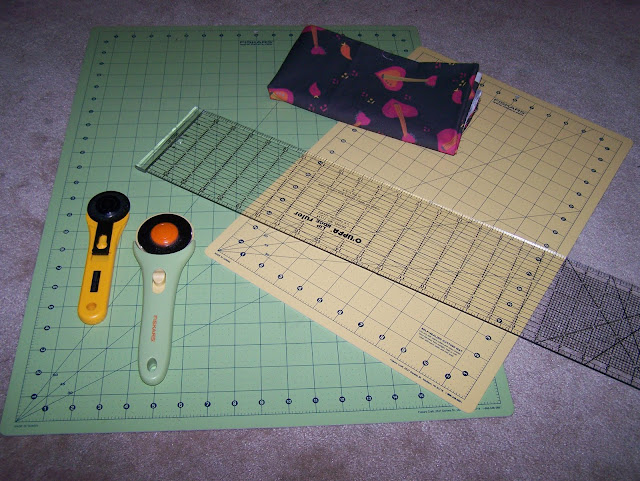
Mats
When you choose your mat and ruler, I recommend the largest size you can afford. This will save you lots of time when cutting a yard of fabric or more because you won’t have to adjust the fabric as much on the mat. Again, this is a matter of preference on my part. The mat will also have markings you can use to line up your fabric. Smaller mats and rulers help travel with you to sewing meetings, but I don’t find it necessary to have a smaller size. The mat I use regularly is 24 inches long, which is excellent for cutting a yard of fabric into charm squares. $25-$35 Find it here
Chalk Pen
this is not chalked like what you use on sidewalks; instead, it’s more like a pen with chalk inside it. The marks it leaves are noticeable and easy to see for future reference when you can use the chalk to help guide you and ensure that your cutting is straight. $2-$3 Find it here
A clear ruler
It is like a yardstick, but instead of writing measurements, it has all kinds of other markings, such as measuring tapes, square shapes, etc. If part of your fabric needs trimming, you can measure how much to cut or whatever else you need to do. $8-$10. The clear ruler should have sightlines or markings to help you line up your fabric. I use an OmniGrip ruler with a Lip Edge, which is great because it hooks onto the edge of the cutting mat to keep the ruler from slipping while you cut. Find it here
Rotary Cutters
My favorite tool for cutting fabric is not scissors but my Olfa 60 mm rotary cutter. Rotary cutters look a lot like pizza cutters and come in several sizes. The smallest is 18mm or 28mm, the most common is 45mm, and the largest is typically 60mm. The 60mm rotary cutters on the packaging say they are for thicker fabrics or cutting up to six layers of cotton fabric at a time. The smaller blades are useful for cutting around curves.
If you can only buy one size of rotary cutter, I’d say a 60mm is the way to go, but many people use the 45mm size. So did I, for a long time, and they work perfectly fine! You’ll also notice that the handle styles are often different, which is another preference. You’ll want to buy some replacement blades, which usually come in a pack of five. It’s best to change out the blade when you notice that your blade is becoming dull and isn’t making very sharp cuts. Generations Quilt Patterns has some great tips for when to replace a rotary cutter.
You may also consider an electric fabric cutter.
Scissors
Although I love my rotary cutter, I sometimes use scissors to cut fabric. When you buy scissors, make sure they are heavy-duty and are meant for cutting fabric. Nothing will ruin your fabric faster than a dull, awful pair of scissors from the dollar store. Investing in a pair of quality scissors will make your sewing much more enjoyable! scissors are the easiest way to cut fabric straight because all you have to do is line your fabric up with the edge of the scissors and just push down on them, cutting through the cloth so that it looks perfectly even and smooth. $10-$35 Find it here

Types of Scissors
A smaller pair of scissors, called point scissors or micro scissors, is also helpful for detailed cutting. Another tool you may find handy is pinking shears! Pinking shears have a saw-tooth or zig-zag edge for cutting fabric. You may wish to cut fabric charms with a pinked edge, for instance, to prevent fraying. Pinking the edge of the fleece fabric along joined seams will make the seam less bulky. Or, you might use this edge on fabric scraps for a ticker-tape quilt.
Caring for Scissors
To care for your scissors, make sure you only use them to cut fabric. Cutting paper with them will dull the blades. Also, try not to open and close the scissors unless you have the fabric in them because this will also wear down your blades. When your scissors aren’t cutting very well anymore, you can often take them to a craft store for sharpening. Ask your local craft store if they have a special knife or scissors sharpening day.
Pinking shears are great for cutting fabric straight because they have a serrated edge that easily cuts through the material and leaves behind a zigzag cut instead of a flat line where the scissors pass over the top of the cloth. The zigzag marks it leaves help you determine exactly where your first cut should be, kind of like how chalk markings work. However, these are a little more permanent and a lot simpler to use, only requiring one hand to use effectively instead of other methods where both hands were required. The downside is that it does cost quite a bit more than regular scissors since they can usually only be purchased from specialty shops or online websites. $10-$15 Find it here
Pins & chalk
everyone doesn’t necessarily do this method, but some people find it helpful in getting their work done and finished faster than usual and without having to worry about wasting material because they can correct any errors they make along the way after pinning where they want things placed onto their main piece of fabric. This way, it’s not a big deal if you make a mistake because all you have to do is make sure the pins are removed from your extra cloth, and everything will be fine. In addition, since pins leave small markings on the fabric when moving them around, you can reuse them by brushing them with chalk so that it leaves behind a faint marking that can guide you in your cutting process. $3-$5
Conclusion
Among all the fabric cutting equipment and tools available, scissors are by far the most useful for anyone around their house because they can do many different things, including cutting fabric straight. In comparison, other devices such as rulers or chalk markers only work well for certain types of cutting jobs. In contrast, other methods like pinking shears work great but aren’t as practical if you’re on a budget because they cost more than regular scissors. However, no matter which method you decide it’s best to be safe when cutting anything that requires precise measurements so that you don’t accidentally ruin your cloth with any cut marks that could cause weak spots in your material where it might tear or rip open.


6 comments
I didn’t know Olfa and Fiskar blades were interchangeable! Thanks for letting me know!
Also, I have a tutorial on how to change a rotary blade here (https://sewingnovice.com/2011/04/08/changing-a-rotary-cutter-blade/)on my site if anyone is interested.
Thanks for the info about Olfa and Fiskers being interchangable! Now I’ll watch for sales for both!
National Sewing Month…..what an interesting tidbit! I’ll have to celebrate somehow. Let’s see, perhaps spend more time in the studio and actually FINISH a project! Now that would be a party in my book!
Mats: Be careful on hot days because they WILL distort if they sit in a non-flat position in your car! I know from personal experience, unfortunately.
Thanks for the tips about rotary blades- I have to swap mine out!
Such a useful post. I have been using scissors to cut my bunting flags for far too long… i think its time for a rotary cutter.