Art & Craft, DIY ideas and Tutorials – Craftbuds
  • About Us
  • Needlecraft
    • Crochet
    • Knitting
    • Quilting
    • Sewing
    • Embroidery
  • Cricut
  • Jewelry Making
  • Paper Craft
    • Origami
    • Drawing
  • Engraving
  • Collectibles
    • Numismatics
43K Followers
25K Followers
1K Subscribers
Subscribe
Art & Craft, DIY ideas and Tutorials – Craftbuds
  • About Us
  • Needlecraft
    • Crochet
    • Knitting
    • Quilting
    • Sewing
    • Embroidery
  • Cricut
  • Jewelry Making
  • Paper Craft
    • Origami
    • Drawing
  • Engraving
  • Collectibles
    • Numismatics
  • Uncategorized

Felt Flowers Button Snake

  • Lindsay
  • Posted: April 9, 2012 - Updated at: May 10, 2022
Total
0
Shares
0
0
0

Button Snake Stack

This is a quick tutorial for a “button snake” toy to help kits with their buttoning skills. In case the word “snake” sets fear in the heart of your child or yourself, try calling it a button caterpillar!

For supplies, you’ll need felt scraps in a variety of colors, two buttons (1-inch and 1.5-inch across), about 18 inches of grosgrain or thick ribbon, scissors, a needle and thread. I used a die cutter to cut the felt flower shapes and some nail polish to secure the buttons and thread. I also created this project entirely with supplies from my stash, so it can be very inexpensive.

Button Snake Supplies

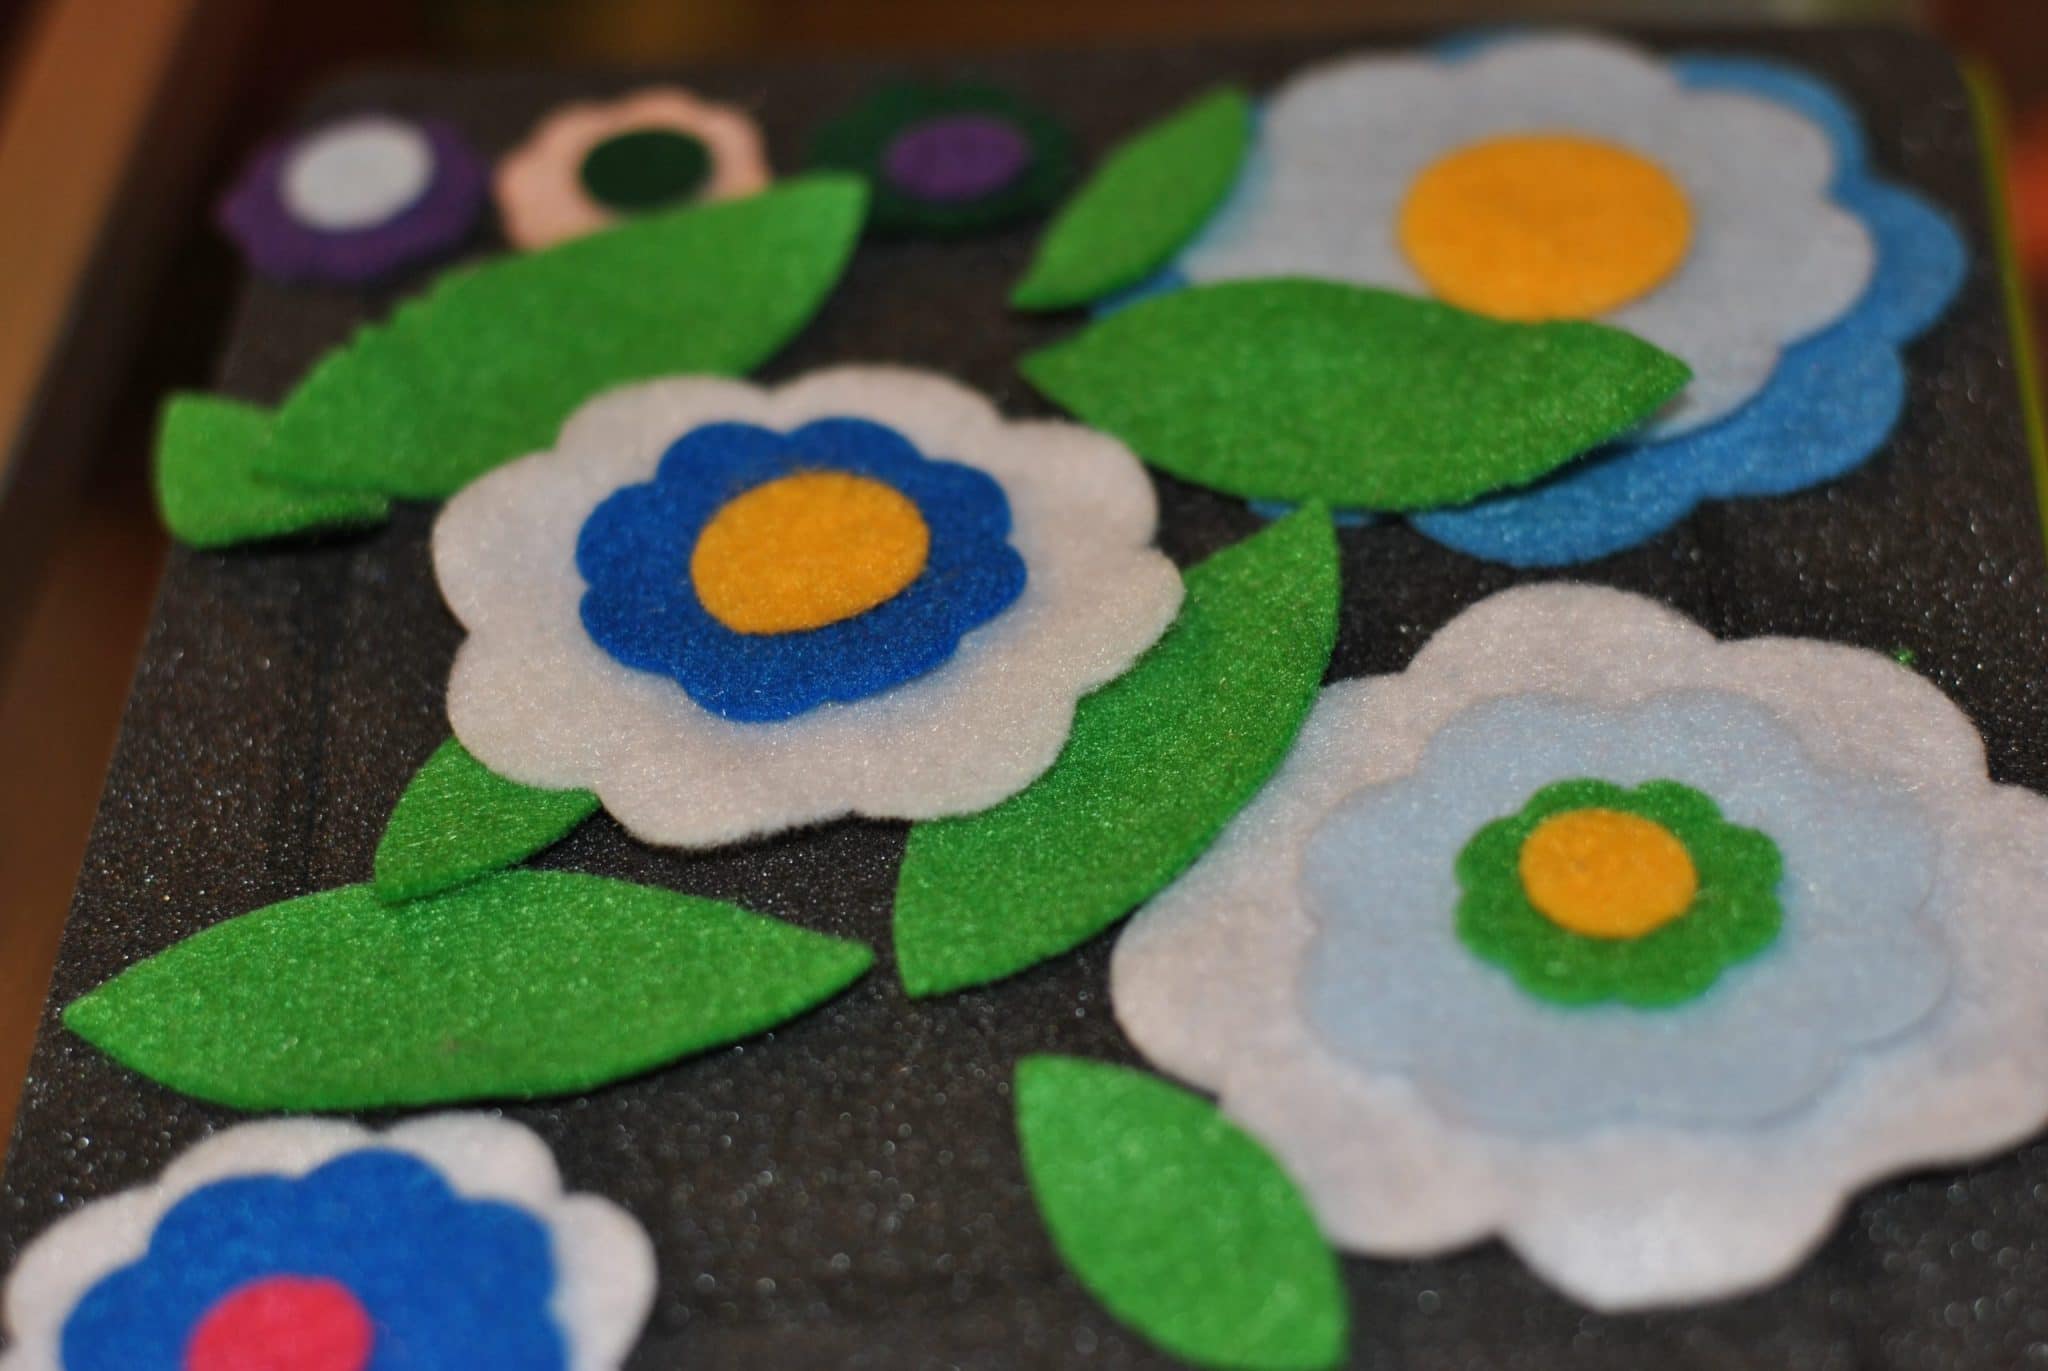
First, cut out several squares of felt in a rainbow of colors. I used 16 colors, but you can adapt this pattern to use whatever you have on hand. Use scissors and a circular template (like a drinking glass) to trace and cut circles out of felt. Instead of cutting circles, I used my Accuquilt GO! Baby and the Rose of Sharon die to cut out the largest size of felt flowers, which are about 3-inches in diameter.

Felt Flowers

Use your scissors to cut a slit in the middle of each felt shape, large enough for the smaller button to go through easily (but not the larger button). I cut my slits about one inch wide.

Button Hole

Next, hand sew the smaller button onto the top side of your ribbon end, repeating on the other end with the larger button. Secure button several times with your needle and thread, so the buttons don’t pop off with frequent use.

Hand-sew buttons to ribbon

I used a bit of nail polish (you can use clear if you’ve got it) to paint the thread to the back of each button as an extra measure of security. Make sure to keep a close eye on your kids when using this toy, so they don’t put anything harmful in their mouths.

Nail Polish

Note: If you are worried about buttons being unsafe for your children, you can leave off the buttons entirely and just sew a circle of felt perpendicular the bottom of the ribbon (example here) to use as a stopper for all of the other felt shapes.

Button Snake

Once the buttons are secure, use the smaller button to guide each flower onto the ribbon. The larger button will act as your stopper. Young kids can be engaged for hours with this simple toy, as they practice putting on and taking off the felt flowers.

Button Snake Finished

It’s also small enough to stash with you in your toddler’s “busy bag” to take in the car, the waiting room or anywhere they need to be entertained!

Dahlia and the Ribbon SnakeDahlia and the Button Snake (Thanks Suzy!)

If you make this or any of our tutorials, we’d love to see them! Just comment with the link or add the photos to the Craft Buds Flickr group.

Total
0
Shares
Share 0
Tweet 0
Pin it 0
Related Topics
  • accuquilt go tutorial
  • busy bag
  • button snake
  • button snake tutorial
  • button toy
  • cheap craft
  • diy toy
  • easy craft
  • felt button snake
  • felt flowers
  • felt toys
  • flowers
  • handmade toy
  • kids activity
  • kids toy
  • quiet time
  • ribbon snake
  • rose of sharon
  • toddler game
  • toddler toy
Lindsay

Hi, I’m Lindsay Conner, an author, modern quilter, editor, and founder of the Lindsay Sews blog. I’m a Baby Lock ambassador and Stash Books author who loves writing modern sewing and quilt patterns for beginners and weekend sewists! I live in Indianapolis, Indiana with my husband, son, and two loveable cats, Murph and Chloe. I’ve been crafting for as long as I can remember. As a kid, I saved my dollar bills for trips with my mom to Jo-Ann Fabrics, where I’d find new floss for friendship bracelets or mini cross-stitch kits. Because my mom has always shared my love for crafting, she bought me my first sewing machine, a Hello Kitty Janome.

Previous Article
  • Product Reviews

Book Review: Modern Basics

  • Lindsay
  • Posted: April 5, 2012 - Updated at: January 9, 2022
View Post
Next Article
  • Craft
  • Food
  • Paper Craft

Cookie Dough Frosted Brownies with Lifestyle Crafts Big Top Shapes

  • Mary
  • Posted: April 10, 2012 - Updated at: July 31, 2020
View Post
You May Also Like
View Post
  • Uncategorized

4 Tips For Starting Your Own Home Craft Business

  • Lindsay
  • Posted: March 27, 2019 - Updated at: April 14, 2023
View Post
  • Craft
  • Uncategorized

Sign up for the Mod Bee online quilting conference!

  • Lindsay
  • Posted: February 1, 2019 - Updated at: July 9, 2020
View Post
  • Uncategorized

DIY Acoustic Speakers For Your Mobile Phone

  • Lindsay
  • Posted: June 28, 2017 - Updated at: July 10, 2020
View Post
  • Uncategorized

How to Grocery Shop and Cook More Efficiently

  • Lindsay
  • Posted: September 16, 2016 - Updated at: July 11, 2020
View Post
  • Uncategorized

Sporty Strap Pack Sew Along – Post #3: Finishing the Bag

  • Lindsay
  • Posted: May 11, 2016 - Updated at: July 11, 2020
View Post
  • Uncategorized

Quick & Easy Printable Valentines! Mini Bubble Flags

  • Lindsay
  • Posted: February 11, 2016 - Updated at: January 9, 2022
View Post
  • Uncategorized

‘Machine Quilting with Style’ Book Review + Giveaway!

  • Lindsay
  • Posted: January 12, 2016 - Updated at: January 9, 2022
View Post
  • Uncategorized

Leather Photo Frame Ornament with HP Envy

  • Mary
  • Posted: November 30, 2015 - Updated at: June 5, 2020
16 comments
  1. Shiloh says:
    April 9, 2012 at 1:37 pm

    What a great idea! i love this for a busy bag! I’m definitely pinning this to try later.:)

  2. Kathy Davis says:
    April 10, 2012 at 8:51 am

    I made one similar to this for my autistic student. Great for self help skills, hand-eye coordination and fine motor skills…plus it is fun. Yours is much cuter than mine though.
    Kathy Davis
    [email protected]

  3. Jill says:
    April 10, 2012 at 6:20 pm

    What a great idea for the kids!

    Thanks for linking to a Round Tuit!
    Hope you have a fabulous week!
    Jill @ Creating my way to Success
    https://www.jembellish.blogspot.com/

  4. Amy says:
    April 11, 2012 at 6:11 pm

    I LOVE felt…and I love your felt flower button snake. What a great idea and so beautifully executed.

    amy @ whilewearingheels.blogspot.com

  5. Crafty Cousins says:
    April 12, 2012 at 10:49 am

    What an awesome idea! The colors are fabulous, too! I’d love for you to link it up to Crafty Cousins!

    https://crafting-cousins.blogspot.com/2012/04/what-i-wore-sunday-week-11.html

    ~Natalie @ Crafty Cousins

  6. Maureen says:
    April 12, 2012 at 9:17 pm

    I made a button snake for my daughter a few weeks ago, but the felt flower idea is GENIUS. Way more exciting than the squares I made her.

  7. Marta mama Nikusia says:
    April 13, 2012 at 12:37 pm

    Very cool idea 🙂

  8. Eileen says:
    April 13, 2012 at 3:38 pm

    What a clever idea! Thank you.

  9. Erin says:
    April 13, 2012 at 6:32 pm

    Very cute. Going to have to give it a try!

  10. Hannah says:
    April 14, 2012 at 4:03 pm

    What a great idea!! Here is my Too Cute Tuesday’s post.. https://likemamalikedaughter.blogspot.com/2012/04/how-to-tuesday-bunnys-birthday-dress.html

  11. Anji* says:
    April 14, 2012 at 6:59 pm

    What a great idea for toddlers! Love it 🙂

  12. Amie @ Pinkapotamus says:
    April 16, 2012 at 5:19 am

    Hi Lindsay! This is soo stinkin adorable and it looks like your little lovey had a great time playing. Just wanted to let you know that I featured it at this week’s Pink hippo Party.

  13. Tara@Tales of a Trophy WIfe says:
    April 17, 2012 at 7:53 am

    What a fun way to keep little ones quiet and busy.

  14. Pickle-Lily says:
    July 5, 2013 at 12:02 pm

    I have blogged about your tutorial today, as I think it’s a great idea. Jo x https://www.lifewithpickle-lily.blogspot.co.uk/

Leave a Reply

Your email address will not be published. Required fields are marked *

Subscribe

Subscribe now to our newsletter

Art & Craft, DIY ideas and Tutorials – Craftbuds
  • About Us
  • Editorial Guidelines
  • Our Experts
  • Privacy Policy
  • Contact Us
Find fun and creative craft ideas and tutorials across various categories such as Knitting, Quilting, Sewing, PaperCraft, Jewelry Making and much more

Input your search keywords and press Enter.