Welcome to this step-by-step tutorial on making your own paper fortune teller! Remember these from your childhood? They’re fun to play with and super easy to make. Whether you’re crafting with kids or reliving nostalgic memories, this guide has got you covered. In just 16 straightforward steps, you’ll turn a 15x15cm square paper into a fun and interactive fortune teller. Let’s get started!
Table of Contents
- 1 Paper Fortune Teller Steps:
- 1.1 Step 1: Start with the Right Paper
- 1.2 Step 2: Create an Initial Triangle
- 1.3 Step 3: Unfold the Triangle
- 1.4 Step 4: Another Corner-to-Corner Fold
- 1.5 Step 5: Unfold to Square
- 1.6 Step 6: First Corner to Center
- 1.7 Step 7: Bring All Corners to the Center
- 1.8 Step 8: Flip It Over
- 1.9 Step 9: Right Corner, Meet Center
- 1.10 Step 10: All Corners to Center Again
- 1.11 Step 11: Fold The Bottom Half Upward
- 1.12 Step 12: Fold The Right Half to the Left
- 1.13 Step 13: Open Up the Right Flaps
- 1.14 Step 14: Open All Remaining Flaps
- 1.15 Step 15: Activate Your Fortune Teller
- 1.16 Step 16: Your Fortune Teller is Complete!
- 1.17 More Origami Tutorials
- 2 How to Use an Origami Fortune Teller: A Brief Tutorial
Paper Fortune Teller Steps:
Step 1: Start with the Right Paper
Begin by taking a 15x15cm square piece of paper. It should be a clean, flat piece to ensure the best results.

Step 2: Create an Initial Triangle
Fold the bottom corner up to meet the top corner. You’ll end up with a triangular shape.

Step 3: Unfold the Triangle
Gently unfold the paper, reversing the fold you just created.

Step 4: Another Corner-to-Corner Fold
Now, fold the right corner over to the left corner.

Step 5: Unfold to Square
Carefully unfold the paper back into its original square shape.

Step 6: First Corner to Center
Fold the bottom corner to align with the paper’s center.

Step 7: Bring All Corners to the Center
Fold the remaining three corners so they meet at the center point.

Step 8: Flip It Over
Carefully turn over your craft to work on the other side.

Step 9: Right Corner, Meet Center
Fold the right corner to align it with the center of the paper.

Step 10: All Corners to Center Again
Fold the remaining three corners toward the center, just like you did before.

Step 11: Fold The Bottom Half Upward
Fold the bottom half of the paper upward, then carefully unfold it.

Step 12: Fold The Right Half to the Left
Fold the right half of the paper over to the left side, then unfold it back.
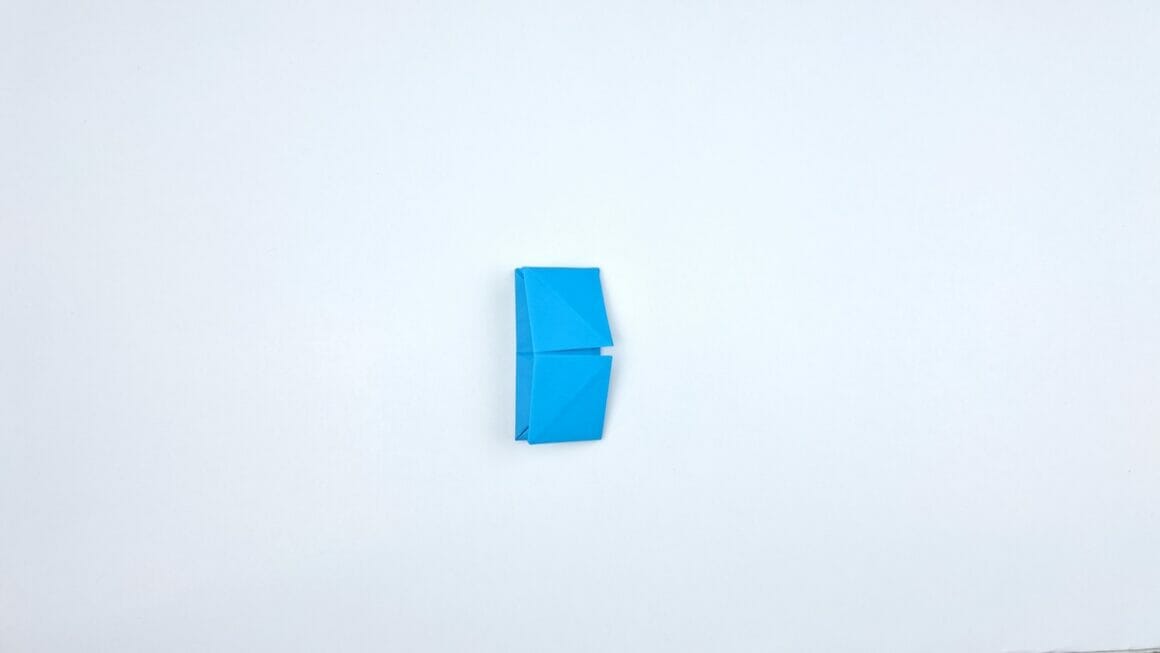
Step 13: Open Up the Right Flaps
Locate the flaps on the right side and open them up.

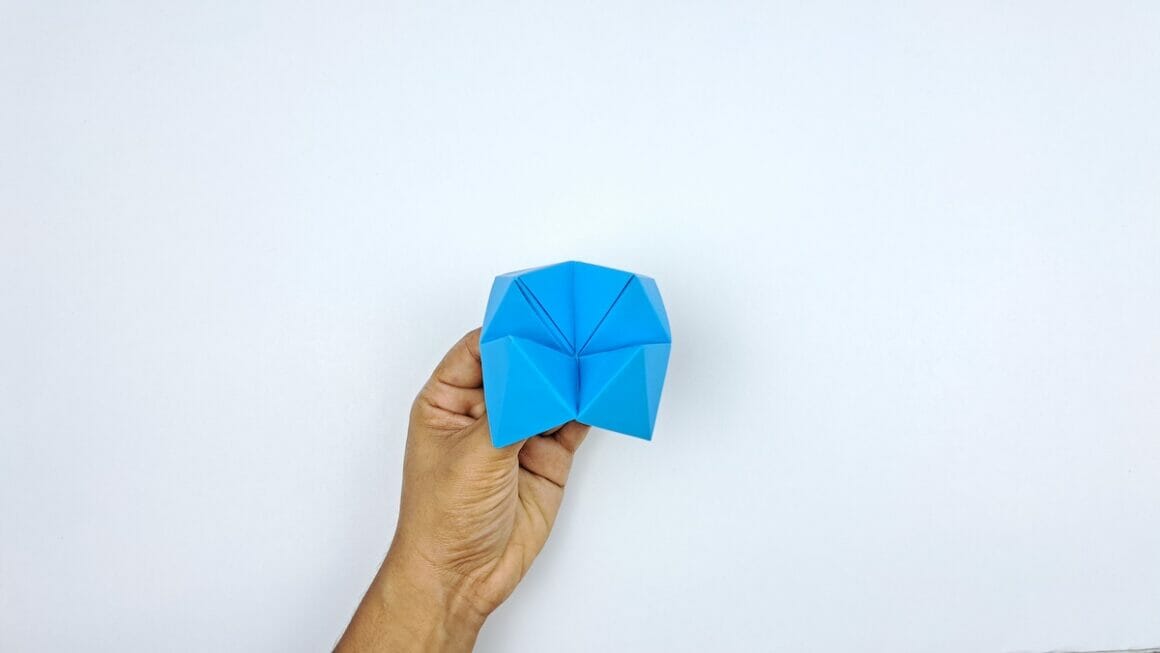
Step 14: Open All Remaining Flaps
Open up the flaps on the other sides. Insert your four fingers into these flaps to prepare for the fortune-telling fun.

Step 15: Activate Your Fortune Teller
With your fingers inserted, push them together and then apart to show how the fortune teller will operate.
Step 16: Your Fortune Teller is Complete!
Congratulations, your paper fortune teller is now ready for action! Write fortunes, questions, or fun activities inside the flaps, and have a great time using it.
And there you have it—a fascinating, homemade fortune teller that’s ready for playtime. Thank you for following along, and may your fortunes be ever in your favor!

More Origami Tutorials
- How To Make An Envelop
- Origami Owl
- Origami Butterfly
- Origami Crane
- Origami Ninja Star
- How To Make a Paper Dragon
- Origami Frog
- Origami Paper Box
- The Art of Origami – A Complete Guide
How to Use an Origami Fortune Teller: A Brief Tutorial
So you’ve just crafted your very own origami fortune teller—congratulations! Now, let’s dive into how to use it to reveal mysterious fortunes or playfully predict the future.
Step 1: Write Fortunes
Open the flaps and write small fortunes, questions, or challenges inside each segment. This is where the fun starts—be creative!
Step 2: Insert Fingers
Insert your thumbs and index fingers into the four pockets you find at the bottom of your folded fortune teller. You should be able to move the flaps in and out and side to side.
Step 3: Ask a Friend to Choose
Hold the fortune teller so that a friend can see the outer segments. Ask them to pick a number or a visible color.
Step 4: Operate the Teller
Suppose your friend chose a number open and close the fortune teller that many times. If they chose a color, spell it out while opening and closing the teller for each letter.
Step 5: Choose Again
After you finish, ask your friend to choose again from the visible numbers inside.
Step 6: Reveal the Fortune
Lift the flap corresponding to the second choice and reveal the fortune or answer the question written inside.
Step 7: Have Fun
Repeat the process for as many friends as you like or until all fortunes are revealed!
That’s it! You’ve mastered the art of fortune-telling—well, at least the origami part of it. Enjoy your newfound powers of prediction!