Art & Craft, DIY ideas and Tutorials - Craftbuds
  • All Craft
  • Needlecraft
    • Crochet
    • Knitting
    • Quilting
    • Sewing
    • Embroidery
  • Jewelry Making
  • Paper Craft
  • Engraving
  • Collectibles
43K Followers
24K Followers
357 Subscribers
Subscribe
Art & Craft, DIY ideas and Tutorials – Craftbuds
  • All Craft
  • Needlecraft
    • Crochet
    • Knitting
    • Quilting
    • Sewing
    • Embroidery
  • Jewelry Making
  • Paper Craft
  • Engraving
  • Collectibles
  • Quilting
  • Sewing

Quilt Top with Darcy of Modern Cozy: Mosaic Tiles Quilt Along

  • Mary
  • January 14, 2014
Total
0
Shares
0
0
0


Hi everyone! Today is my day on the Craft Buds Mosaic Tiles Quilt Along and I’m so happy that you’re here. After seeing all the fabulous projects that everyone has been contributing I felt like I wanted to do something a little different and make Amy’s great design more of a “grown-up” quilt. I’m thrilled with how it turned out – let me share how I did it.

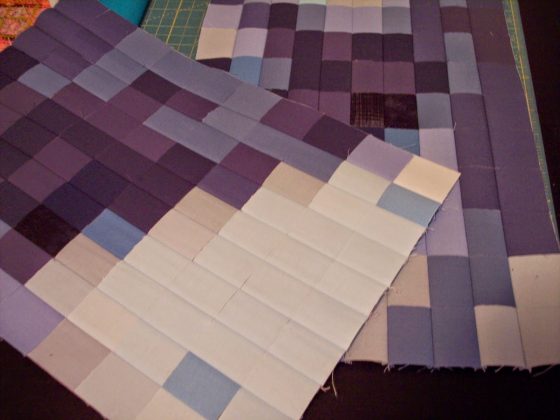
I doubled the size of the original block measurements and I inverted the color scheme, using Kona Snow for my centers and a variety of greens for my outer blocks. This method takes either a FQ or a regular qtr. yard of fabric and one 10″ square PER block.

To make the new, re-pieced blocks you need 2.25 of the original blocks. So starting with this size original block I needed 21 to make my 9 larger re-pieced blocks. (I hope this makes sense as I am in NO way a math whiz. Or math competent most days. If you need clarification please let me know!).

So doubling the original individual block measurements gave me a new block size of 17″.

Then I cut in half vertically at 8.5″…

and again horizontally at 8.5″. Then the fun began of re-assembling the cut up blocks to make the new larger re-pieced blocks. I played around with using three fabrics per new block or using all different fabrics and honestly I liked them both! Using both in my design allowed me to use the all the pieces without “wasting” any.

The new blocks finished at a whopping 24″ square. I love big blocks! They make a big visual impact and they go together super quickly. I finished this top in 3 nights of a couple hours cutting/sewing each night, which made it very doable for a busy schedule. This finished at a generous 73″ square – one more row and I think it would be a queen size-ish quilt!

Of course after traipsing around in the mud and the cold, looking like a crazy woman to all the people out for lunch the shot I like best came from my phone. Murphy’s law 😉

If you try this version I’d love to see it! Thanks to Lindsay of Craft Buds for writing this awesome book and hosting this quilt along and to Amy for designing such a fun and versatile pattern. You can find all the other posts HERE as well as entering your own Mosaic Tiles project in this great giveaway!

Darcy of Modern Cozy

Mosaic Tiles Quilt Along
This post is part of the Mosaic Tiles Quilt Along, which you can read about here! You can enter your project any time between now and February 14, 2014 for a chance to win some great prizes. We hope you’ll join us in this beginner-friendly and stress-free quilt along.

Total
0
Shares
Share 0
Tweet 0
Pin it 0
Related Topics
  • darcy
  • modern bee
  • modern cozy
  • mosaic tiles
  • patchwork quilt
  • quilt along
  • quilt top
Mary

Previous Article
  • Quilting
  • Sewing

Marni’s Table Runner: Mosaic Tiles Quilt Along

  • Lindsay
  • January 6, 2014
View Post
Next Article
  • Quilting
  • Sewing

Kim’s Sew Sweetness Aeroplane Bag: Mosaic Tiles QAL

  • Mary
  • January 15, 2014
View Post
You May Also Like
Best Wig Sewing Machine
View Post
  • Needlecraft
  • Sewing

Best Wig Sewing Machine In 2023: Top 6 Picks 

  • Lindsay
  • January 16, 2023
Best Sewing Machines for Beginners
View Post
  • Product Reviews
  • Sewing

Best Sewing Machines for Beginners – 7 Top Models in 2023

  • Lindsay
  • November 24, 2022
Sewing Machine Tension Chart
View Post
  • Embroidery
  • Needlecraft
  • Quilting
  • Sewing

Sewing Machine Tension Chart – The Ultimate Guide

  • Lindsay
  • October 14, 2022
Sewing Classes In Chicago
View Post
  • Needlecraft
  • Sewing

Sewing Classes In Chicago: Top 10 Schools And Classes

  • Lindsay
  • October 14, 2022
Best Sewing Machine For Kids
View Post
  • Craft with Kids
  • Indoor
  • Needlecraft
  • Sewing

Best Sewing Machine For Kids – Top 5 Picks in 2023

  • Lindsay
  • October 9, 2022
Pfaff Sewing Machine
View Post
  • Embroidery
  • Needlecraft
  • Quilting
  • Sewing

Pfaff Sewing Machine – Complete Guide & Top 4 Models

  • Lindsay
  • October 9, 2022
View Post
  • Embroidery
  • Needlecraft
  • Quilting
  • Sewing

Best Computerized Sewing Machine in 2023

  • Lindsay
  • October 4, 2022
View Post
  • Needlecraft
  • Quilting

Best Longarm Quilting Machine in 2023: Top 6 Picks

  • Lindsay
  • September 26, 2022
3 comments
  1. Becky M says:
    January 14, 2014 at 11:09 am

    This is a really great top! love the colors and the ‘texture’ created by them!

    Reply
  2. Katy says:
    January 14, 2014 at 4:25 pm

    Fun idea to blow them up and switch them round 🙂

    Reply
  3. Catherine says:
    January 17, 2014 at 4:35 pm

    I love your idea to swap the solid & print. It feels like a totally different quilt.

    Reply

Leave a Reply Cancel reply

Your email address will not be published. Required fields are marked *

Social Links
Facebook 43K Followers
Pinterest 24K Followers
YouTube 357 Subscribers

Subscribe

Subscribe now to our newsletter

Art & Craft, DIY ideas and Tutorials – Craftbuds
  • Privacy Policy
  • About
  • Contact
Find fun and creative craft ideas and tutorials across various categories such as Knitting, Quilting, Sewing, PaperCraft, Jewelry Making and much more

Input your search keywords and press Enter.