
This weekend, I finished up a Diamonds Mini Quilt I’ve been working on and posted it on my other blog, Lindsay Sews. There was some interest in a tutorial, so I whipped one up and decided to share it with Craft Buds readers as well! For this tutorial, I focus mostly on how to construct the quilt top, but for tips on quilting in general, check out this awesome series, Quilt Class 101 at Chasing Cotton. You’ll learn about cutting fabric, choosing batting and thread, binding techniques, and more.
On a side note, I have just put another article together with 3 free baby quilt patterns. Have a look and enjoy!
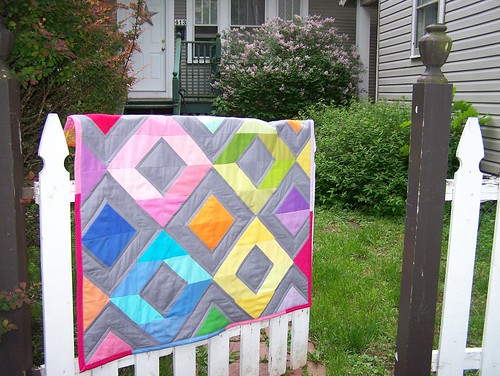
For this quilt, you can go bright with rainbow solids as I did, or focus on prints. Choose masculine colors, girly colors, or whatever you like. Once you learn the basic technique of sewing half-square triangles, the options are endless!
Materials:
- 1 Kona Solids Charm Pack: Brights, 43 charms (5×5 squares)
- 2 extra solids charms (5×5 squares), pick any color (You can use scraps–these can even be the same color if needed)
- 7/8 yard solid gray quilting fabric (such as Kona medium gray)
- Binding, batting, backing fabric to fit
- Usual tools to cut the fabric
Finished Size: 36.5″ x 40″
How to quilt Diamond pattern?
Step 1
Cut gray fabric into 5-inch wide strips, them 5-inch wide charm squares. (See charm squares cutting tutorial) This makes 48 charm squares, and you will use 45 of them.
Step 2
You will need one Kona Brights charm pack, but I also used additional colors that were not in my pack. Choose some solids scraps and cut two squares (5×5) to add to the colors in your charm pack. It’s not that important which colors you choose, because you’ll be able to find a place for all of them later.
Step 3
Pair one colored charm with a gray charm, and sew/cut a Half Square Triangles unit. You now have two half-square triangles featuring the same solid.
Step 4
Repeat for the rest of your charms until you have 90 finished half-square triangle blocks.
Step 5
Group blocks together by color family. (Blues, reds, greens, pinks, purples, etc.) Take your biggest stack, and arrange 12 blocks (6 solids, 2 blocks each) in a diamond formation. Matching HSTs should be next to each other, creating a larger triangle or parallelogram. (See pink diamond, below, for example).

- Take your next largest color stack, and arrange 12 blocks (6 solids, 2 blocks each) in another large diamond formation. (See green diamond above, for example.) Repeat until you have your 4 large, colorful diamonds. (I chose yellows, greens, pinks, and blues for mine.)
Step 6
Now, look at your available blocks and choose pairs that are similar colors (2 solids, 2 blocks each). Use these to make a total of 6 small diamonds (mine are purple, orange, blue, red-orange, teal, and red.) Place around your large diamonds, matching the grays so large gray diamonds are created.
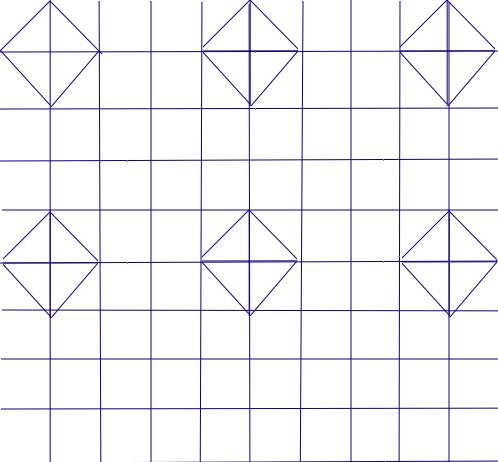

Only four large diamonds are colored, and the center large diamond is gray.
Step 7
Use your remaining half-square triangle blocks to fill in the edges, creating small diamond halves. (These will help “frame” out some more large gray diamonds.) This is where you’ll be able to use colors that don’t match any of the others. You’ll have 9 of these, total.

For me, it’s easiest to just use the actual blocks to work out the pattern.
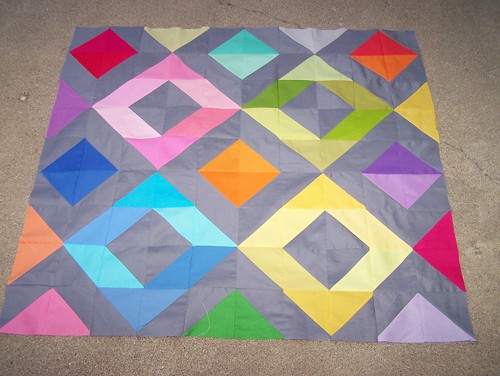
Step 8
Are you happy with your color arrangement? Rearrange color groups until you get the rainbow effect you like. This is a good time to check that all of your diamonds are facing the way you want them to (see the small red-orange diamond in the first photo, which I turned clockwise before sewing).
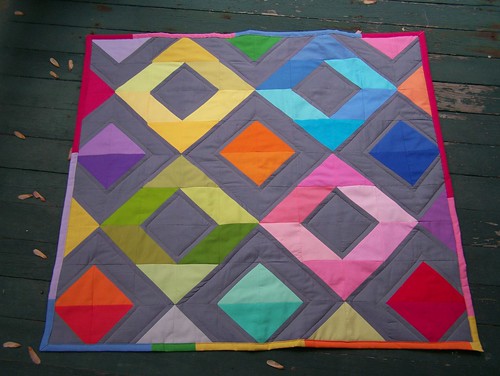
Step 9
Sew together blocks, starting with large diamond formations. It’s important to make sure they line up correctly. Once you’ve sewn a large diamond section together, work on the next section, until you have four large sections. Join the pieces together to complete the quilt top.
Step 10
Piece together a quilt back and prep batting. To quilt this, I used contrasting thread (pink and yellow), and set my quilting machine to its widest seam allowance setting, tracing around the colored diamonds (large and small) and sewing only on the gray. Gray thread works too! My binding was pieced together from Kona solids scraps, and I chose pink thread.


16 comments
Beautiful quilt. I love the simplicity of the colors. It is very calming to look at 🙂
That’s awesome! I love quilts with solid colors!
i love it!
this is gorgeous!!!!! Love it, thanks for posting directions. I might even be able to do this, lol.
~Kimberlee
{Accuquilt Giveaway}
SUPER cute! I’m a beginner quilter. 🙂
Hey… Gorgoues Quilt!! Thanks for the boost for the QUIlt Class… You SHould DEF link this baby up!!! Its gorgoues!!! I bet the readers would love to pop over and check it out…xx Thank you!! xx Bec @ Chasing Cottons xx
and sorry about the spelling… I write quicker than i should. GORGEOUS! xx
Done! Thank you so much!
this is so beautiful
I love this. I just did got 400 squares from a rainbow fabric swap. I am doing to use this. Thanks.
Lucky you! Thanks for stopping by! If you make one, please come back and share the link!
This is so pretty! Thanks for posting!
I love your quilt and the colors are so bright and pretty! Thanks for linking up, I’ll be featuring your quilt this weekend. Thanks for stopping over, and I hope you come back again to show more things!
Exquisite! Both the design and the color choices! I have made only one quilt top but not quilted it yet. Your beautiful quilt encourages me to finish my first so that I can begin this beautifully designed and executed quilt. Keep up the good work!
Hi,
Beautiful quilt which I am making for my young grandson.
A question though. If you press open the half square triangles towards the darker side you end up with a thick piece of fabric at one end when you join 2 of them together. I thought about pressing the seams open but that will show the darker grey material through any lighter materials.
What did you do?
Thanks
This is just lovely! My sewing group makes baby quilts for little ones on their baptismal day and we’re always looking for pretty patterns that can be for a boy or girl. This one’s a gem and just perfect.
Thank you for sharing the pattern.