I find that the car is never more cluttered than when filled with wrappers, empty drink bottles, and waste from a summer road trip. I try to pick up all the trash I can when I can, but sometimes straw wrappers, bottle caps, and food receipts literally take over.
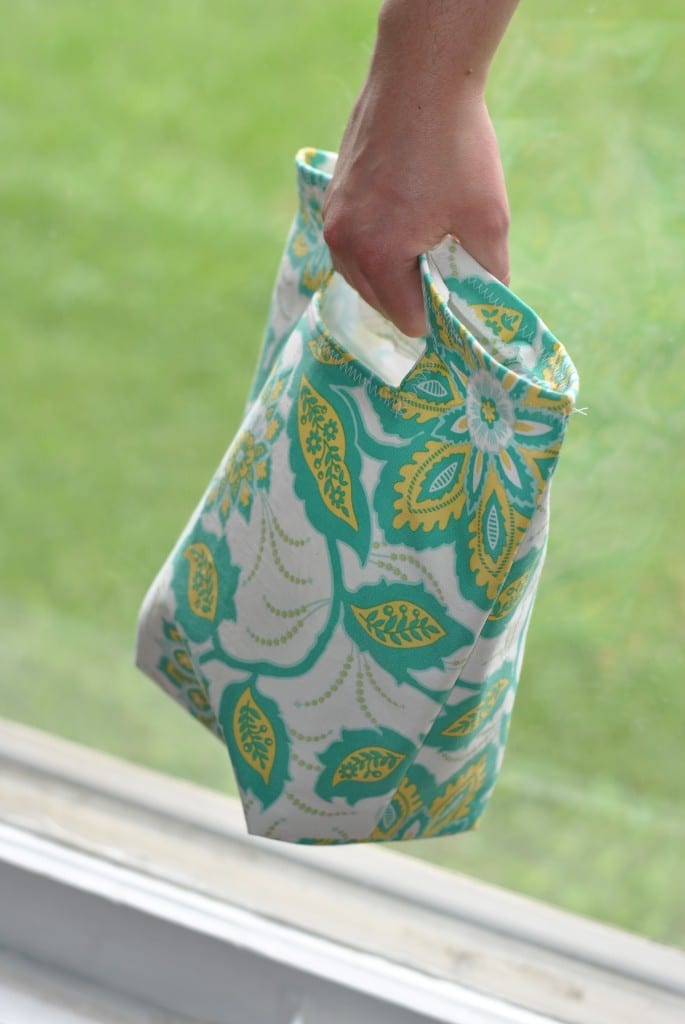
Enter the car trash bag! The sturdy bag is built to carry odds and ends, so you can just fill it up and dump the contents when you stop to refuel. The trash bag is unlined (see note below if you’d like to add a lining) with the interior covered in interfacing for durability. Simply toss the bag into the washing machine when it’s ready to be cleaned.
Table of Contents
Materials need to make the bag:
– 1/2 yard Amazon home decor weight fabric
– 14″ cut of medium-weight fusible interfacing (Pellon 808) >> Buy it here on Amazon
– Matching thread, iron, scissors, sewing machine, and pins

Step 1
From both fabric and interfacing, cut two pieces 14″ x 11″ and remove a square 2.25″ x 2.25″ from the bottom two corners of each piece. Adhere interfacing to lining with iron.

Step 2
From fabric, cut two pieces 11″ x 6″ for handle lining. Place the one handle lining fabric on top of the bag fabric, right sides facing. Use a ruler to mark dots 2″ from the top of the bag at the 3.5″ and 7.5″ marks. Move the ruler down to 3″ from the top of the bag and again mark dots at the 3.5″ and 7.5″ marks. Connect dots into a rectangle for the bag handle.

Step 3
Pin pieces together and stitch on top of line to create handle. Use scissors to snip almost into the corners and down the center line through all layers of fabric.

Step 4
Now for the magic part. Push the handle lining fabric through the slot you just created and pull it through the other side. Press and pin handle lining flat against inside of tote. Secure with zig-zag stitch, and trim excess fabric away from handle lining (see below).
Attach the handle to other side of bag.
Note: If you’d like to make a lining for the bag, cut lining fabric in the same dimensions as your outer fabric, follow the same instructions to make handles and sew the lining, then refer to Tote Bag Tutorial for instructions on inserting your lining. Line up handles of outer and lining fabric and hand-stitch together.

Step 5
Next, pin bag front and back right sides together, avoiding the corners or the top of the bag. Stitch 1/4″ from the edges along left and right sides of bag and bottom (center only, not corners yet).

Step 6
Pinch together the corners of your bag, so the seams on the bottom and sides of the bag line up. I like to iron my seams open.

Step 7
Pin together the matching edges and stitch 1/4″ from edge. (You can see more photos of this method on our Tote Bag Tutorial).

Step 8
Turn bag right side out and push out corners. To finish top edge, use pinking shears or zig zag stitch along top edge to prevent fraying. Then fold top edge down so it lines up with handle cutout without being visible from the outside. Pin fold in place along top edge of bag, and use zig zag or straight stitch to fix top fold in place.

And there you have it–just grab your bag and go! The car trash bag also doubles as a reusable lunch bag in a pinch. Or, fill it with summer essentials like a snack and sunscreen for trips to the park, beach or playground.

If you use this tutorial, we’d love to see your bag in the Craft Buds Flickr pool. This post is part of the Summer Sewing Contest, so check out the blog hop for more projects inspired by the season and enter your own June 10-17 at at Ellison Lane Quilts for a chance to win prizes!


15 comments
Very nice! Love the fabric and this looks easy enough for me to pull off, which says a lot 😉
Love those handles. Thanks for the how-to and photos.
Do you give permission to make and sell items from your directions/patterns? Would love to market these car trash bags at my craft shows!
Hi Sandy! Sure, you can make these to sell at craft shows. I do ask that if you make any and post online (blog, Facebook, Flickr), that you link back to the tutorial. Thanks for asking!
Great tute and lovely bag.
Thank you for this tutorial,I had absolutely no difficulty following the steps and the size of this bag is perfect! I do not have a car so I will be using my new bag to carry my lunch to university.
Lovely clear instructions and a lovely bag
I LOVE this design, wrote a little blurb on my blog about it with a link back to you guys. At some point I am hoping to sell a version of this (with your permission) but will absolutely give you ALL the credit for such easy instructions and great design.
https://growingupkiddos.blogspot.com/2013/10/lunch-bag.html
Thank You!
B
This is such a fine-looking bag to replace the ‘highfalutin’ grocery bags I’ve been using for so long! Now, ie. sooner than later, I might-even replace my stretched-out wheel-cover, to match or contrast this bag. Knowing me, I’ll need to make a vinyl liner, & FINALLY use some of the ‘Recycle/Go Green!’ fabric from my stash! Thanks for sharing.
We just got a new car, this is just what it needs! Thanks!
Help!
I just tried making the handles and I get pointy triangles on the inside.
How did you get nice full rectangles after turning your fabric through the opening? It seems impossible when I see that you cut straight across and diagonally into each corner.
I tried to insert a photo but it doesn’t work, sorry.
Thanks, Julia
Hi Julia! Before cutting your straight line and triangles, did you sew an 11″x 6″ handle lining to the bag sides? (2nd photo under “Materials) If you have triangles on the inside, it’s possible you forgot this step. Once I pushed the lining through my opening (the “magic” step!), the triangles get layered between the bag and handling lining, which I then trimmed into a rectangle in the photo you see later.
Thank you for replying Lindsay.
I looked for more tutorials last night and realized that I had not pushed the entire piece of handle fabric through to the wrong side. Once I pushed it all through it worked perfectly. I’m a beginner and almost need to see photos of every stage. Your tutorial is good, I was the weak link.
BTW, the bag looked wonderful!
Thanks again.
Hi Julia,
Can I download this in a nice PDF?
Thanks,
Suzy
Right now, we don’t have it available as a PDF. You can copy and paste into a Word document, and then change the font size to your desired print size, however. 🙂