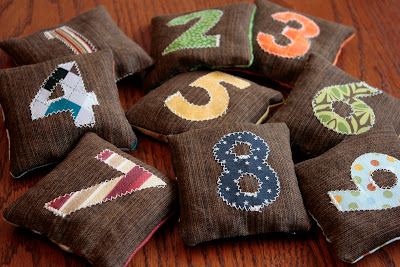
My friend’s son turned 5 yesterday, and I wanted to make him something that a boy or girl could enjoy playing with. I’ve seen variations of counting bean bags for toss games on different blogs and decided to develop my version. This set has nine beanbags plus a matching drawstring tote bag. You can find the matching tote bag here!
To make these, you’ll want to download the pattern here. I didn’t use a number zero, but my husband was concerned that someone might like it, so it’s included in the pattern.
If you’re looking for a bean bag tossing board to play with your new creation, you’ll find lots of great options here on amazon.
Table of Contents
What size are bean bags for bean bag toss?
For the purists among us, players of the classic outdoor backyard game “bean bag toss” typically use bags that measure around 6 inches by 6 inches. While this may be a general rule, different sizes and weights can affect how players play the sport.
Sizes and Weights of Bean Bags
Bean bags typically weigh between 3 to 5 ounces, but some brands offer bags that weigh as little as 1 ounce or as much as 10 ounces. In addition, many companies sell half-size bags weighing around 2.5 ounces or as much as 5 ounces. I recommend the 2.5 ounces for kids.
How to make bean Bags for toss Game
Step 1
First, print out the pattern and cut out all the paper numbers and 9 fabric squares for the beanbag fronts, and 9 for the backs. I did brown for the front and different colors and patterns for the numbers and backs.
Step 2
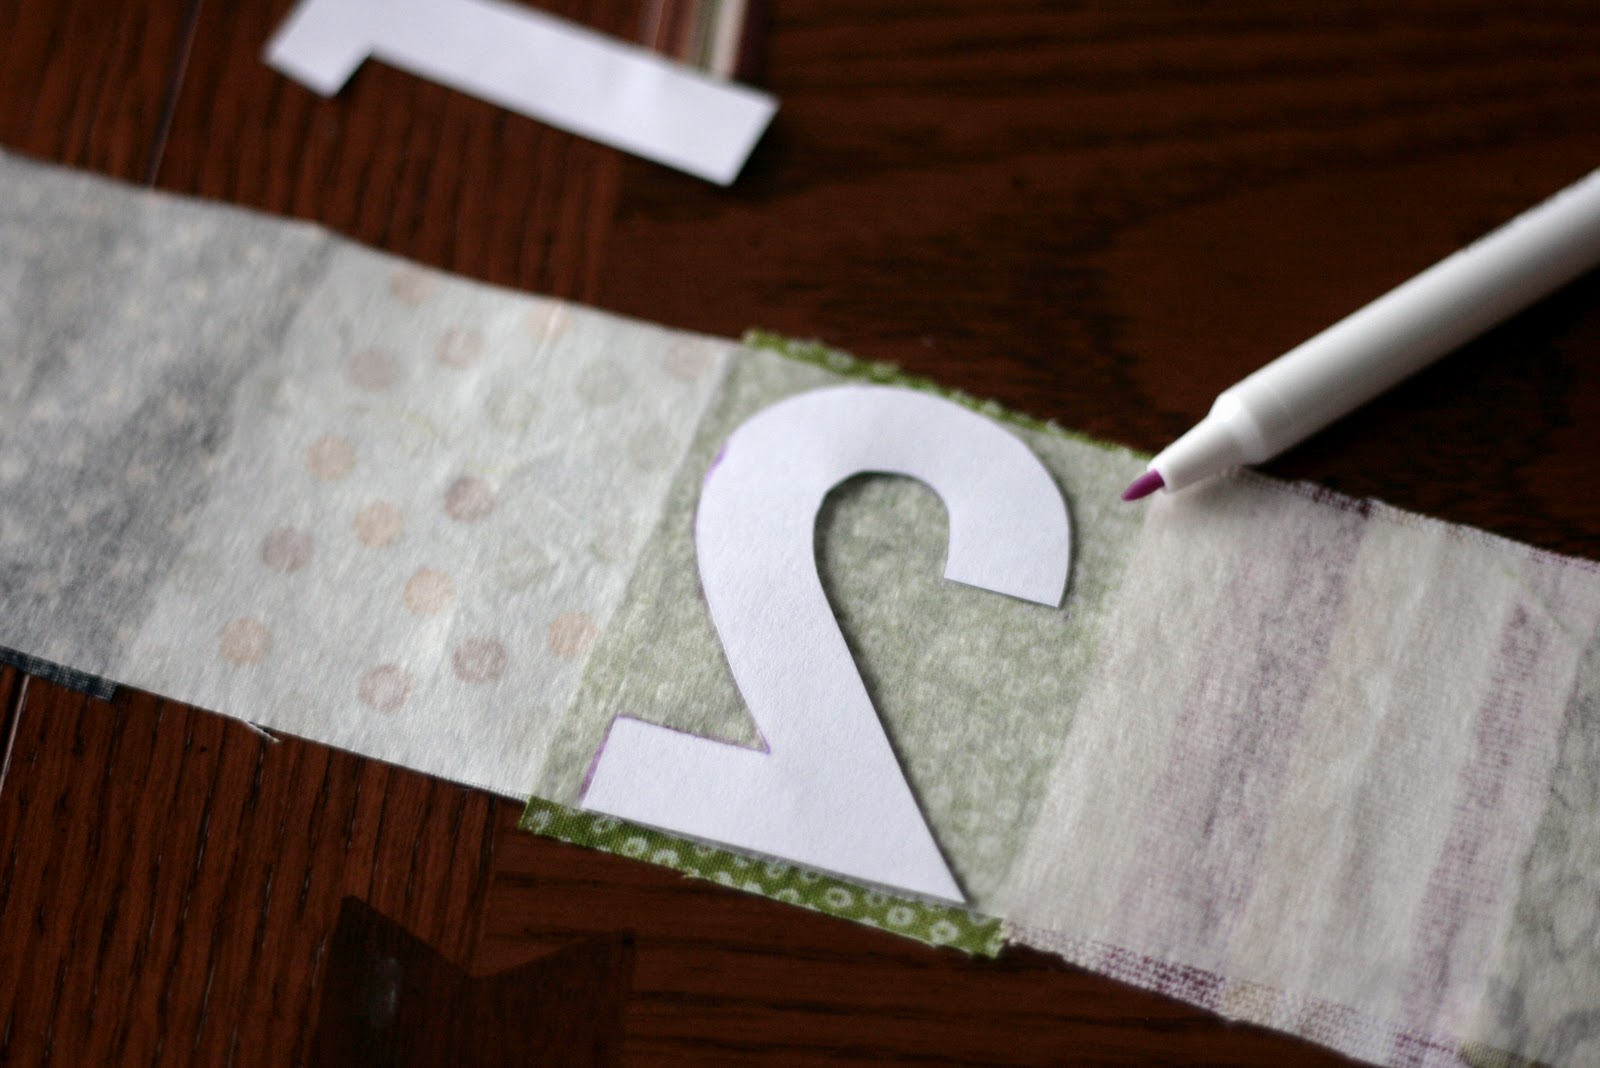
Next, cut out nine fabric rectangles a little larger than your numbers. Iron those to a strip of fusible web. On the back, trace each number backward, then cut out each number.


Step 3
Peel the backing off the fusible web and iron the numbers to the centers of your beanbag fronts. If you want more details on making the number appliques, you can see my post on appliques here.

Step 4
Then I did a loose zig-zag stitch with my sewing machine around each number. The curves got tricky, so I had to slowly turn the handwheel in some parts and stitch. Next, put the right sides together of your beanbag fronts and backs and stitch them up, leaving a 2″ opening at the bottom. When you are done stitching, turn them right side out.

What do you fill the bean bag toss with?
You could use corn, pellets, sand, and possibly rice. I tried to fill these with a funnel, but my funnel opening was too small, so I filled each bag with black beans. I filled each bag until it was 3/4 full and used a pound and a half total for all nine bags.

Step 5
Next, I sewed the openings up using a slipstitch. A slipstitch is a (mostly) hidden seam. To do this, you’ll first fold the raw edges inside. Then knot your thread, and starting at one end of the opening, you’ll alternate between the inside folds of the fabric, stitching about 1/16″ inch of fabric on each side, then pull tightly.

Beanbags are now finished and ready to be played with!

And, as I mentioned earlier, you can also make a matching drawstring tote to keep them in.


33 comments
I love it!! I’m going to try and make this for my 2+ year old grandson. Thank you so much for the tutorial.
Visiting from the blog hop. I love these, they are so cute. I really wish I could sew I am so jealous of all these sewing projects I see.
Danielle
I really like the look of these! And great tutorial, thanks! I’d love for you to submit this to the M&T Spotlight at https://www.makeandtakes.com/spotlight
Will do Laurel, thanks for the suggestion!
I love these bean bags. I think they would be really cool with a child’s name on them too – especially names with lots of letters. The possibilities are endless! How fun!
These are so cute! I am a new follower and I would love if you linked this up to my Made by Little Hands linky party tomorrow! Thanks so much!
Michelle
http://www.delicateconstruction.blogspot.com
Hi! New follower visiting you from Michelle’s Made by Little Hands party. This is such a FAB idea and they look great.
Those are really neat! My daughter would love them!
They look really nice and would make a great gift indeed. Thanks for sharing.
These are super cute! I have been wanting to make some number bean bags but I can’t decide it I want to make some like yours or if I want to make the ones that are in the shape of the number…
SO cute!! Great idea for a gift…oh I’m totally making these. Thank for the great idea! I found you through Paisley’s linky party. I linked my felt fish I-spy bag!
These are too darn cute! I love the colors you used too.
I love it! My little guy is just about to turn one, and this would be such a great idea to make for him! I’m your newest follower, you should go check out my new blog when you have a minute(maybe if that’s okay). Thanks so much!
Krystine
Following you Krystine! Thanks for stopping by. 🙂
Love it!
These bean bags are so genius!! I featured this post on my Wednesday’s Wowzers. Here is the link:
https://oopsey-daisy.blogspot.com/2011/04/wednesdays-wowzers-almost-time-for-egg.html
Thanks for the inspiration!
~Alison
I saw this tutorial at 504 Main and loved it! What a cute idea–and pretty easy–even for a non-sewer like myself. I posted this project over at my Friday Favorites post today! I’m really enjoying your blog! Thank you!
So excited to try to make these for my 18 month old son and hope to use them also, as great gift ideas for my many nieces and nephews. HOWEVER, after many attmepts I’ve been unable to print the number template successfully. It doesn’t print the whole page. Any suggestions? Thanks!
Hi MrsK! For me, I was able to download and print the template by doing the following. Click on the link in the article, which opens the file in Google Docs. Use your mouse to click on File (left side of screen), then choose “download original.” Now try printing–it should print the whole page in the correct scale!
THANK YOU SO MUCH, LINDSAY!!! Wow, that is so easy, can’t believe I missed it. Ugh! I’m excited to make a set of these for my son and hope they turn out ok b/c it may be my new “go to” gift for toddlers’ birthday parties. (My true talent in the craft world is crocheting, not sewing, so I’m hoping I can pull these off!!)
I have heard that it is a good idea to double bag each beanbag for safety. I guess you could put the beans in a muslin bag and then sew it into the cute colored fabric. Right? pat
The double bag with muslin inside is a great idea! Thanks for the tip Pat! This would be great to make them more durable, and especially good for toddlers who might eat the insides if they spilled out.
Deb @ Mountain Musings, (I think she may be your first ‘commenter’ above!) featured these on her blog a little while ago and included your link that I’d bookmarked until ready to begin this cute project for my step-grandchildren this Christmas. The stencils printed fine from Google Docs. I just wanted to personally ‘thank you’ for your stencil, pattern, instructions and photos.
That’s something I wonder… I want to make these (and stackable fabric cubes) for my baby, but I’m afraid he’ll just nosh on them making the beans inside turn soft. That will definitely = stinky bags! Do you notice this at all with your son? He’s probably way past the putting everything in his mouth stage.
I probably wouldn’t recommend this for kids that would still chew on them just in case they break open. My son is old enough he’s never chewed on them. But lining them like the suggestion above could work, and you could even use a waterproof fabric like oilcloth or PUL to prevent saliva from getting in!
These are SO cute!!! I am going to sew some up for my daughter’s Kinder class. Thanks!
I’ve just completed two sets for my step-grandchildren and posted on them today at my blog https://pieceworktreasures.blogspot.com/ linking back to your instruction posts. Your pattern was well-written and the photos were great! I personalized the tote bags with each boys’ name appliqued to ‘match’ the numbers and the whole thing turned out so cute. Thank you again for sharing with us.
As a preschool teacher, I love this idea. I totally plan on making a set or two… Or more as birthday presents for my students.
Thank you for the great idea!!!
Hi!!! HOW FUN ARE THESE!! I can definitely see my son playing with these now that he knows his numbers! We would love it if you’d come share these tomorrow at our “Homemade gifts for babies and kids” weekly linky party (15 weeks, 15 different themes) come link up any of your homemade gift ideas for kids! Hope to see you there!
https://justsimplychristmas.blogspot.com/
For whatever reason, I cannot view/download your tutorial, even using Chrome. Is there a technical problem?
Thank you,
Bonnie
Thanks for letting us know Bonnie! After some updates with Google Docs, all of our pdf patterns need to be re-linked. I’ve updated the link and it should work now. Just let me know if it doesn’t work!
Thank you Mary it works now!
Bonnie
ohh..I love your tutorial. Love to sew it for my son. Thank You!!