Clay bracelets are not new to the fashion and beauty world. But nowadays, they are becoming more popular. They are not limited to any age or gender; anyone can wear them per their preference. Also, they are colorful enough to lend you a cheerful vibe.
Not only this, you can make them as you want. This is a very creative and entertaining activity to perform with kids or anyone. For example, you can have this activity at a birthday party, where all children make these bracelets and can have them as a return gift.
Many couples also wear them nowadays because they can match them with their loved ones by adding their name’s first letter to the bracelet.
And if you want to explore more clay bead bracelet ideas, this article is for you. Below is everything you need to know from the material, process, and vibrant ideas to start. If you want to push your clay interest further, check my latest article on air-dry clay project ideas to get you started.
How Do You Make a Clay Bead Bracelet?
Making a clay bead bracelet is no rocket science. But, of course, you must be aware of the fundamental processes and the materials required to craft these bracelets. This ensures you do not commit any mistakes, only to start over.
Gather the following materials to make an essential clay bead bracelet.
- Elastic Beading Cord
- Clay Beads
- Jewelry Glue
Here are the tools required for making the bracelet.
- Beading Tray
- Large Eyeing Beading Needle
- Bead Stopper
Once you’ve got all of these, follow these steps.
- To ensure your clay bead bracelet comes out perfectly and doesn’t feel tight or loose, measure your wrist first. Then, cut the cord twice the length of your wrist with an additional 12 inches for improvisation, if any.
- Make sure the cord is pre-stretched. Fold it in half so that the cord will be of double length.
- You’ll have to secure the ends of the cord with the help of a bead stopper.
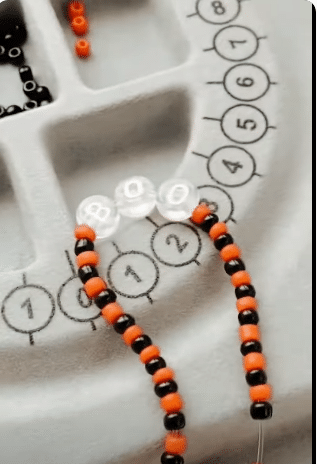
- Next, arrange the beads in the beading tray per your requirement or the design template. If you don’t have a design template, you can try out different designs on the side and figure out the best.
- As the next step, string the beads into the cords with the help of a needle or your hands, whichever you are comfortable with.
Related: Matching Bracelets Ideas & Meanings: All You Need To Know
- Don’t forget to check the length of the cord by winding it around your wrist.
- Once you are done adding the beads, remove the bead stopper. If you’re using a needle, remove it as well.
- Make a loop with one of the free ends through the folded one. Free ends needed to be pulled so that the folded ends came closer to the beads.
- Tie these ends together with a square knot.
- Hold the beads away from the knot for a few seconds and apply the glue to the knot. Slide the adjacent beads over the knot before the glue completely dries off.
- Now, wait for the glue to dry completely. This will take anything from a few hours to 24 hours maximum.
- Once dried, cut off the extra cord with the help of scissors.
Related: Things To Make Out Of Clay: 8 Ideas For All Levels
How Many Clay Beads Make A Bracelet?
Knowing how many clay beads are required for a bracelet is essential, as you can only complete the bracelet; otherwise, you’ll be short of beads. You cannot calculate the exact number of beads required for one particular bracelet. But still, you can guess the total number of beads that will be required.
Following are the typical measurements of a single clay bead:
- Diameter: 6 mm
- Hole: 2 mm
Considering the bead’s size and other factors, it can be concluded that at least 100 beads are required to make a single bracelet. But on the safer side, I recommend stocking at least 140 beads, as extra won’t harm, but less can!
Related: 10 Cool Friendship Bracelet Patterns – For Beginner To Advanced Crafters
What String Do You Use For Clay Bead Bracelets?
There are different kinds of strings you can use for your clay bead bracelets. However, I recommend an elastic thread. It’s easier to handle and requires no clasps or closure pieces.
Related: 10 Rubber Band Bracelet Ideas – Easy & Unique
Are Clay Bead Bracelets Waterproof?
Yes, clay bead bracelets are mostly waterproof. This is because the materials such as clear polyurethane or acrylic sealer used over the clay beads create a waterproof coating over the beads, thus making them water-resistant.
You can wear your clay bead bracelet during the shower or any activity that might expose you or the bracelet to water. It won’t harm your bracelet anyway. However, note that not all clay bead bracelets are waterproof.
Hence, it would be best to skim through the packaging to know whether the product is water-resistant.
Related: Chinese Staircase Bracelet: Patterns & Meaning
How Do You Finish Off A Clay Bead Bracelet?
The process of making a clay bead bracelet is pretty straightforward. All you need to do is measure your wrist and cut the cord to the required length. And start inserting the clay beads. But finishing a clay bead bracelet can be pretty tricky. The whole bracelet will fall off if the finishing isn’t perfect or loose.
To finish off a clay bead bracelet, follow the given steps.
- Once you finish adding the clay beads to the cord, remove the stopper and needle.
- Form a loop with one free end through the folded end.
- Pull the free ends, so that folded ends come closer to the beads.
- Tie these ends together with your choice of knot. Note that the knot should be strong enough to hold it, such as a square or surgeon’s knot.
- Apply a small quantity of glue to the knot. Make sure to keep the beads away from the knot during this process.
- Wait for the glue to dry completely.
- Your clay bead bracelet is ready.
Related: Alpha Bracelet Patterns: How Are They Different From Typical Bracelet
8 Amazing Clay Bead Bracelet Ideas
Here are the 8 unique hard-to-resist clay bead bracelet ideas. Check these out below.
1. Fancy clay beads bracelet
No one likes dull bracelets with old-school designs. If your bracelet looks classy and fancier, you can add golden beads between the colorful beads. For example, you can make a bracelet with two colors, red and black, and divide the pairs into two halves.
And in between these halves, insert four to five golden beads. This will make the bracelet a little classier. This bracelet is an ideal choice for both formal and informal occasions.
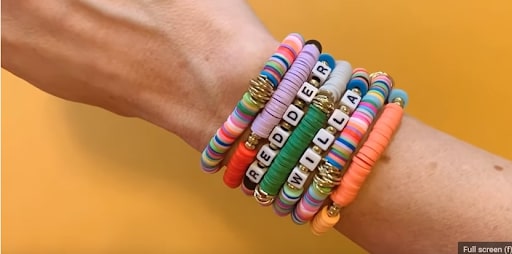
2. DIY alphabet clay beads bracelet
If you’re planning to gift the bracelet to your friends, it’s recommended to add alphabet beads to the bracelet. For example, you can add letter beads of their name. And to make them more attractive, you can add golden or silver colored beads in between the letter beads. This will make it look more attractive and eye-catching.
3. Clay bead bracelet with pearls
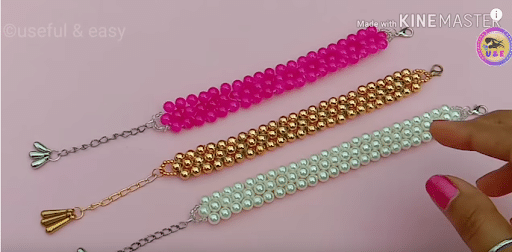
Source: https://youtu.be/UbYPXtqqVWA
Indeed you love wearing pearls. Actually, who doesn’t? And with clay beads, you can add pearls to the bracelet, making it more elegant. This will make it look good and classy with a touch of colorful beads. You can choose neutral color beads with pearl beads; this will enhance its beauty.
4. Emoji-themed clay bead bracelet
You can make a happy bracelet with a theme of emojis or emoticons. For this, you can add beads of emojis or emoticons in between the colorful beads. This will give you a cheerful and happy vibe.
The bracelet can be worn anytime, especially during the day. You can customize the bracelet by trying out other emojis such as happy, grinning faces, hearts, etc.
Related: String Bracelet Patterns for All Levels and Their Meaning
5. Themed clay bead bracelets
Source: https://youtube.com/shorts/S1NwUSNuL0A?feature=share
You can make theme bracelets, for example, if you are planning a birthday party and the theme is unicorns. You can choose colors similar to the unicorn, such as pink, purple, white, etc. This will be a good present for children as well as for adults. Or you can also make a sunset-themed bracelet with red, yellow, and orange beads.
6. Match your bracelet with your outfits
If you want to make a bracelet specifically for a particular outfit, you can choose the color of the beads to match the outfit. You can add silver or golden beads between them; they look beautiful and go with the outfit. You can also make a bracelet that is in contrast to your outfit. And it will be the best accessory.
7. Clay bead bracelets that hold memories
If you want a bracelet that reminds you of someone and doesn’t want to add the letter beads, you can add different colors, assigning each to a different person. Say, green to one friend, blue to another, red to another. You can separate these colors with silver, golden, or flower-themed beads. By this, you’ll never forget the people with these colors.
Related: How To Make An Adjustable Bracelet? Create Your Own Custom Fit Bracelets
8. Make your bracelet look colorful
Lastly, you can always go with funky and colorful bracelets. Choose random colors for the bracelet and arrange them in such a pattern that they come out as you’d expect.
Such a bracelet will go with any outfit. You can add as many colors as possible and in random order. These bracelets give happy and cheerful vibes.
Conclusion
So, here you go. That’s all you require to know about clay bead bracelets. They are entertaining to make, especially if you are a creative person, and promote environmental sustainability, as these beads are clay-based.
Thus, they are more eco-friendly. And it’s not a hidden fact how much we need to make efforts to make more eco-friendly things.
You can also have other ideas, as there is no limit to what you can use to create bracelets. Be it a cord to make a macrame bracelet or other types of beads, the choice is yours.


2 comments
Lovely ideas! Such a beautiful piece of bead bracelets. I really like this. Thanks for sharing and please keep sharing.
Comments are closed.