Your sewing machine does so much for you. Why not give it a little present?
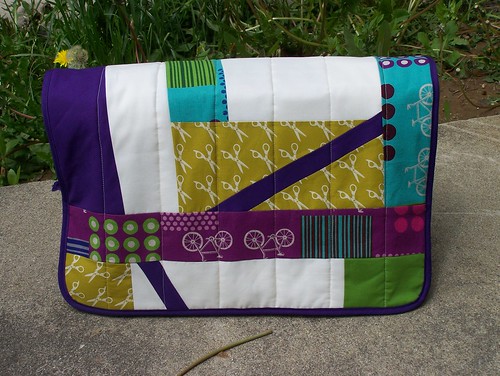
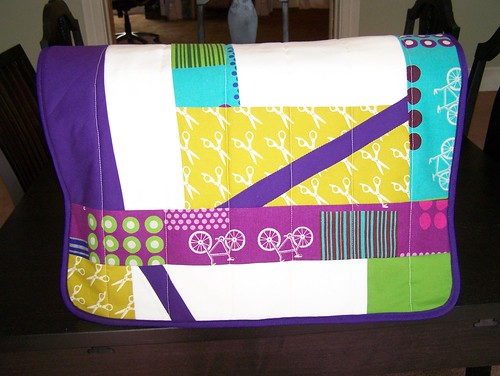
I made a reversible sewing machine cover in some of my favorite fabrics, including Japanese Echino (the bicycles print), Momo’s Wonderland (the scissors print), and some Kona solids. This is an intermediate to advanced sewing project that incorporates machine quilting and working with fusible Fleece and bias tape. The front includes improvisation piecing, and the back is a bold plus-sign design.

Want to make a little jacket for your sewing machine?
Yes! A sewing machine is one of the most expensive tools, if not the most expensive one you will buy! Your sewing machine needs to be covered when it isn’t used because dirt and dust love to settle and stick on your machine, which can damage it over time! There are many different sewing machine covers on the market, each offering a slightly different version of protection for your device. The good news is that you don’t need to worry about buying a new cover since I’ll show you here how to make your own!
How much fabric do I need for a sewing machine cover?
- Fabric Scraps
- Fusible Fleece (1 yard, or 30 inches if you’re buying from the bolt). You can also use regular quilt batting, but you’ll need more pins to hold it in place.
- Rotary Cutter, mat, and ruler
- Electric fabric cutter (optional)
- 1 package of Extra-Wide Bias Tape (3 yards) or make your own bias tape
- Matching Thread
- Sewing Machine
- Iron
- Sewing pins
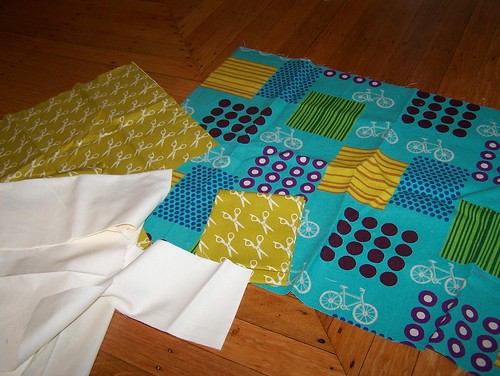
Choose coordinating fabrics. You’ll want a couple of pieces that are a quarter-yard or a little larger and some scraps to liven up the design.
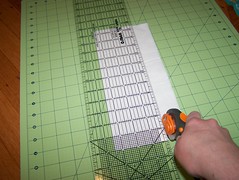
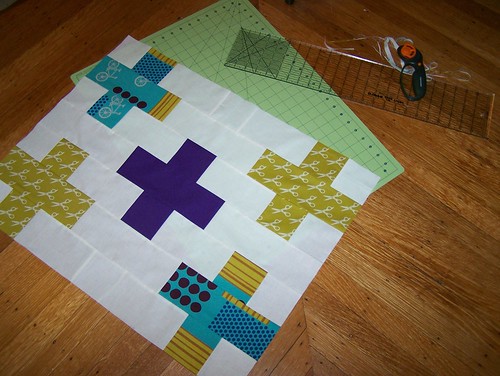
For the plus-sign design, cut your pieces as follows:
Fabric A (off-white): 10 (3.5″ x 3.5″), 8 (6.5″ x 3.5″), 4 (9.5″ x 3.5″)
Fabric B (bicycles print): 2 (9.5″ x 3.5″), 4 (3.5″ x 3.5″)
Fabric C (scissors print): 2 (9.5″ x 3.5″), 4 (3.5″ x 3.5″)
Fabric D (purple): 1 (9.5″ x 3.5″), 2 (3.5″ x 3.5″)

Step 1
Arrange your pieces with the purple plus sign in the middle and the other plus signs to each corner. Fill in the blank spots with solid white.
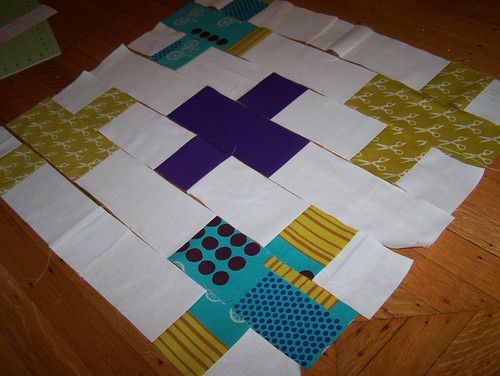
Start sewing together each long row on your machine. Once the rows are joined, pin together and sew each row side by side, starting at the center (purple plus-sign). Trim your edges.

Your finished block should look like this.
You’ve finished one side! Now on to the other side, which uses an improvisational piecing technique.
Step 2
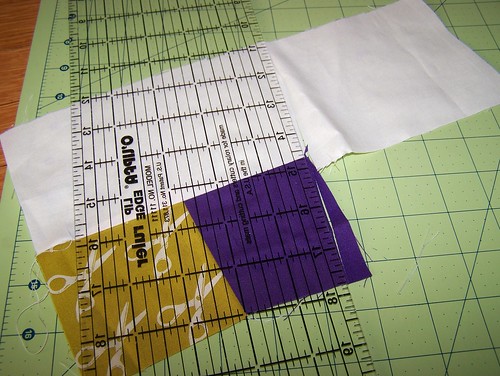
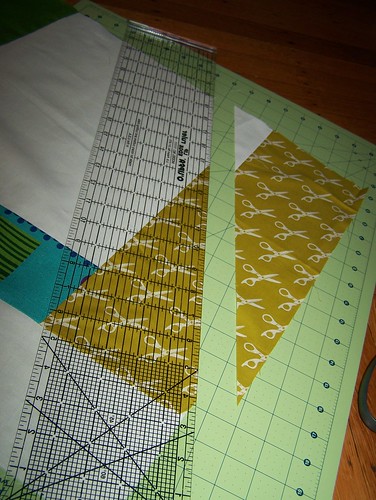
Start piecing a few blocks together, and machine stitch right sides together along one edge. Use your rotary cutter to trim off rough edges and add another piece. It’s okay to make diagonal cuts, which increases the wonkiness of the design. (Here, I pieced the scissors and purple prints, then added the white to one edge before trimming.
Step 3
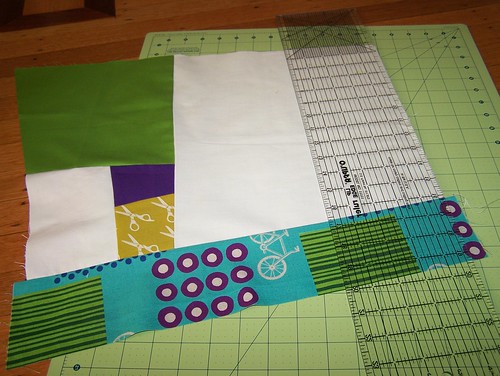
Next, I added a large green block. Then I added white along an entire side and trimmed.

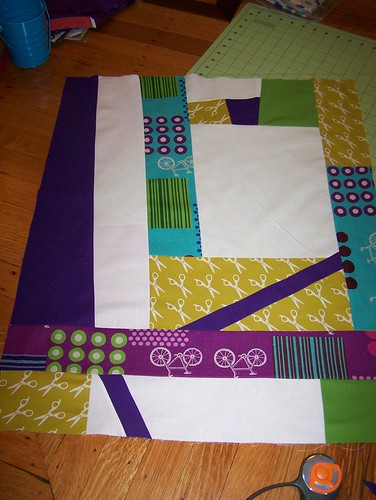
Keep adding pieces until your block is the same size (or a little larger) as the plus-sign piece.
Step 4
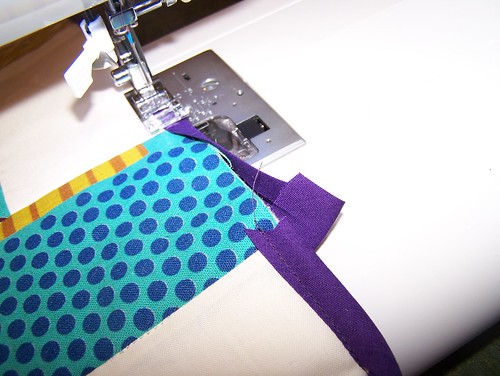
To make the design more interesting, you can slice right through some of the blocks you’ve sewn together. Add in a strip of another color (I chose purple), stitch along both sides, and trim edges.
Eventually, you’ll end up with something like this:
Step 5
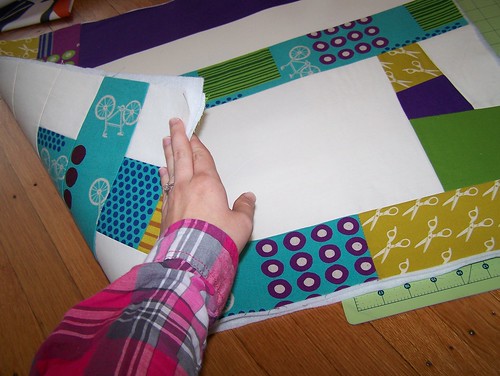
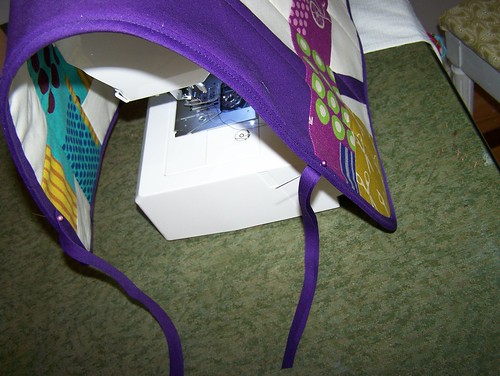
Please test it out on your sewing machine and see how it fits. (When you quilt the layers together, it will naturally “shrink” just a bit, so start with a piece that’s a few inches longer than the machine.)
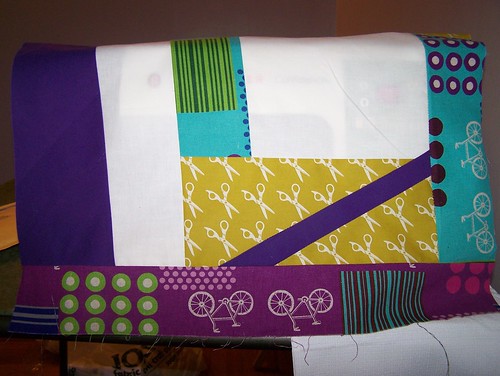
After I trimmed the edges, both pieces have the same size.

Step 6
Next, you’ll want to cut a piece of fusible Fleece to the size of one patchwork rectangle. Follow the manufacturer’s directions to iron on the Fleece to the back (wrong) side of the plus-sign piece, making sure no stray threads are sandwiched between the layers (these may be visible through the white on the finished product if you leave them in). Repeat with the improv pieces side.
Step 7
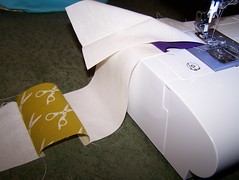
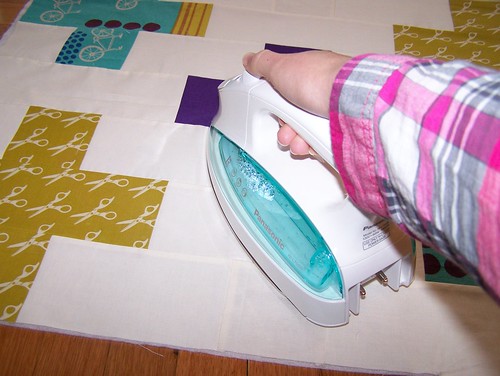
Once you’ve ironed the Fleece to both patchwork pieces (wrong sides), stack the two pieces with fleece sides together, like this. Trim sides to match.]
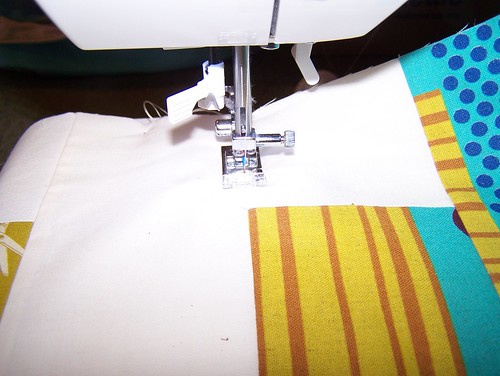
Pin together the two sides and begin to machine quilt long, straight lines down the seams of the plus-sign side.
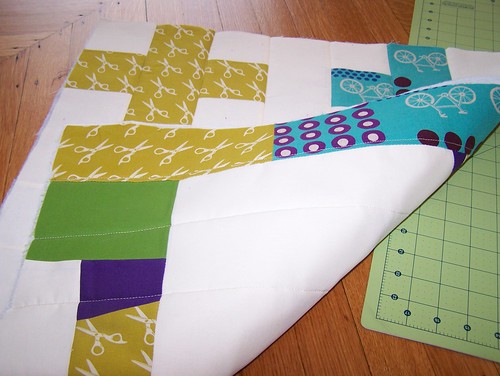
This is what the quilted cover looks like now. Next, you’ll add bias tape to finish the edges. Make sure you buy the extra wide, double fold type.
Step 8
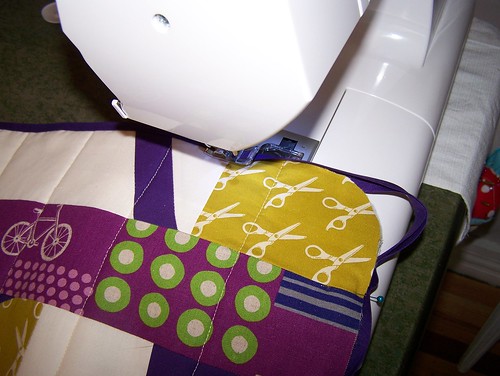
Begin to pin the bias tape to the edges of the cover, sandwiching all raw edges inside the bias tape.

I rounded the corners of my cover by using a drinking glass and my rotary cutter. Machine stitch the binding around the edges. I used my fingers to hold the bias tape taut and didn’t rely solely on the pins to hold it in place. This is especially true around the corners, where you’ll want to stitch slowly.
Step 9
When you get to the end, fold under one edge of the bias tape, and hold tightly to sew a smooth finished edge. Turn the project and sew a perpendicular stitch to fasten down the flap all the way to the edge.
Step 10
Next, you’ll want to make the ties. With the remaining bias tape (several inches), open and cut in half length-wise, then cut both in half width-wise. You should now have four pieces of the same length.


Step 11
Sew a wide zig-zag stitch on these single-folded ties to keep them from unraveling.
Place the cover on your sewing machine, and mark the strap placement with pins. Fold under the edge and sew ties in place with a forward and backward stitch.
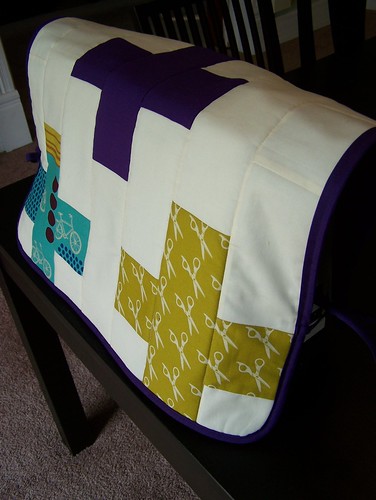
You’re done! Here’s the plus-sign design facing out.
Here’s the back of the improv pieced side. I like how the detail in white looks like a mod sewing machine.
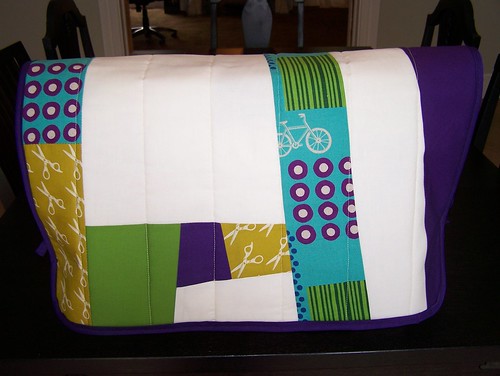
Here’s the front of the improv pieced side. This is my favorite overall look, and yours can be personalized and unique if you follow my basic steps of improvisation piecing detailed above.
Side view:
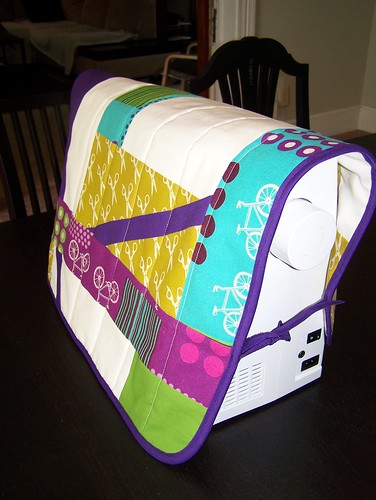
The great thing about this sewing machine cover is that you can change the look with your mood. Simply slip off the cover and fold it inside-out!

Please share a link to your project in the comments or add to our Flickr group if you use this tutorial. We’d love to see it!


22 comments
That is so attractive! I really need to make one for my machine and serger!
Love this! Making a sewing machine cover has been on my to-do list for a while! This might just be the motivation I needed!
I’ve wanted to make a machine cover for a long time now. Perhaps your tutorial can give me that ‘kick’ I need to actually do it!
What a cute sewing machine cover. I don’t own one, but I’d want this if I did 🙂
Very cute! And your tutorial directions are great! Makes me feel inspired…
Thanks for sharing!
I love that it is reversible. Great tutorial!!
You’re so talented! That is one stylish sewing machine cover. Very straight-forward tutorial too!!
I love, love, love your machine cover! I’ve been wanting to make one for a while and the fact that you also included a tutorial just made my day. Thanks!
This cover is fantastic! I love the colours you chose – and so nice that it’s reversible!
Thanks for linking to a Round Tuit!
Hope you have a great week!
Jill @ Creating my way to Success
https://www.jembellish.blogspot.com/
This is great – my machine sits on the table near the kitchen so it would be nice to have a special cover for it !! Love the fabrics you have used.
Oh this is so neat! Love it!
I needed this tute. Thanks so much!
This is awesome! Now I only need a sewing machine 🙂
So cute – and simply with ribbon on the sides. I could do this!
Stopping by from Fabric Tuesday. My link is https://carolburris.com/knitting/rainy-days-projects-finished/
That is very nice! I love the idea of making it reversible.
Love your cover! How fun is that?!?! My machine is in a cabinet and doesn’t need a cover right now… but hopefully that will be changing in the next year. Keeping this tutorial in mind for the future.
~Kimberlee, http://www.thespunkydiva.com
I need one of these! Much cuter than the plastic/vinyl cover I have now!!
Very cute! I’ve registered for a sewing machine for my wedding… I must learn how to sew with it so I can make it a cover, haha 🙂
Thanks for linking up to Your Whims Wednesday!
Great job on the sewing machine cover! Thank you for linking up last week at Sew Woodsy. We hope you’ll join us again this week!
This is great! I could really use something like this for mine to keep the dust out. 🙂
I stumbled across this from your linkup on HIH. I LOVE this idea, and what a great way to use up scraps! I am going to have to do this myself one of these days!
Amber
Hi I Really Like your great tutorials!!!
I Link to you on my Blog,
https://paneamoreecreativita.it/blog/2011/07/raccolta-di-progetti-di-cucito-creativo-per-lestate
Thanks for sharing 🙂