Are you using Cricut’s Design Space and unsure what “Flatten” means? Let me explain its meaning and application to spare you the effort of attempting to figure it out!
While using Cricut for DIY stickers, you’ve to deal with multiple layers. Not just for stickers, multiple layers are a prerequisite for tons of other projects. But have you ever thought about how these layers are transformed into a single layer before the printing stage?
That’s where Cricut’s incredible Flatten tool comes into the picture. For your information, the Flatten tool does more than just flattening layers.
Ready to discover Cricut Design Space Flatten in detail and its usage instructions? You’ll learn all there is to learn about the Flatten tool from this in-depth blog post.
Related: How To Unweld On Cricut – Follow These Quick Steps
Table of Contents
- 1 What Does Flatten Mean On Cricut?
- 2 Some Important Things To Remember While Using The Flatten Tool On Cricut
- 3 How To Use The Flatten Tool On Cricut?
- 4 What Can You Do With The Flatten Tool In Cricut?
- 5 Why Does My Image Disappear When I Flatten In Cricut Design Space?
- 6 What Does Flatten Mean On Cricut (FAQs)
- 7 Conclusion
What Does Flatten Mean On Cricut?
One of the most fundamental design tools in Cricut Design Space that enables you to work with levels is the “Flatten” tool.
The Flatten tool’s basic concept is to combine several pictures into a single Print layer to prepare them for the Cricut “Print Then Cut” function.
The forms are “squished” into one layer, all internal cut lines are removed, and they are set as a single Print picture that will be cut out across the collapsed shape’s perimeter.
This implies that you must print the image on your printer before cutting it out with your Cricut. And this is precisely how stickers are made!
Related: Cricut Maker Vs. Cricut Maker 3 – A Detailed Comparison
Some Important Things To Remember While Using The Flatten Tool On Cricut
Keep these things in mind when experimenting with the Flatten tool on Cricut.
-
The Flatten Tool Operates On A Visible Layer Or Layers
The option will turn “gray” or unavailable if you have no viewable layers chosen. So, mind this.
-
You Can Apply It To Flatten Both Single Layers And Groups Of Layers
While doing so, a single Cut layer will become a single Print layer when flattened. A single Print layer will be created by flattening several Cut layers.
Related: How To Make Business Cards On Cricut? The Complete Guide
-
The Separate Layers Aren’t Any Longer Changeable After Using Flatten
This means that none of the component layers of the Flattened design can have their color, size, font, etc., changed.
-
Whether The Layers Are Contiguous Or Not, Flatten Will Still Function
Images that overlap will be separated into separate pieces. Images that do not overlap will be taken out separately.
In the next section, let’s now understand how to use this fantastic tool.
Related: Best Laptop For Cricut Maker – 5 Top Picks Reviewed
How To Use The Flatten Tool On Cricut?
The basic steps for utilizing the Cricut Flatten tool are as follows.
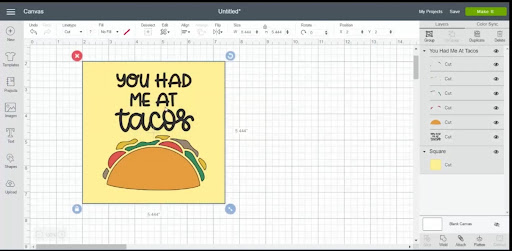
- Launch Cricut Design Space. Then, begin a fresh project. I don’t recommend using an existing one to avoid complications. Place 2 or more layers in a row on the Design Space canvas.
- Make a selection of the layers you would like to flatten. The chosen layers would be displayed in the “Layers” panel and a gray bounding box would appear around the photos. The Flatten button will go to black and turn on.
- Select “Flatten” from the menu. On a desktop, the Flatten button is located at the bottom of the Layers panel. When you’re using the Cricut iOS or Android app, it can be found in the Actions list at the bottom of the screen.
View your outcomes. Once you select the Flatten option, the photos will combine into a new layer. The action title for the new layer will read “Print Then Cut,” and it will have the name “Flatten.”
As with any other image layer, you can now rotate, resize, or modify this layer.
Related: What Can I Make With A Cricut Machine? 15 Ideas For All Levels
What Can You Do With The Flatten Tool In Cricut?
What can I do with this “Flatten” tool in Cricut? After reading so many exciting things about the tool, you must have started to wonder what you can do with it. So, below are a few cool things to answer this.
1. Create Your Downloadable Labels Or Stickers
Use the Flatten tool on your Cricut to combine several “Cut” files into a single “Print Then Cut” image to create stickers or labels for business or personal uses.
2. Create A Single Print Then Cut The Image Out Of Multiple-Layered Images
When printing numerous images piled on top of one another, the Cricut Flatten tool makes it possible without cutting along the inside lines.
3. To Enable Cutting, Unflatten A Printable Picture From The Cricut Library
The Cricut Flatten tool may be used in unique ways, including not using it at all! Yes, you read that right.
Instead, use the “Unflatten” tool when using an already flattened image from the extensive Cricut library.
Why Does My Image Disappear When I Flatten In Cricut Design Space?
Does your image disappear when you flatten it in Cricut Design Space? If so, there are two primary explanations for this. First, there isn’t a “background layer” underneath your flattened picture for it to be flattened down on.
And second, certain portions of your image weren’t flattened as they should have been.
Ensure the process was “print and cut” for each component, including the form (top left of the canvas).
In such a scenario, flattening shouldn’t be necessary.
Related: Sublimation vs. Vinyl: The Ultimate Printing Showdown
What Does Flatten Mean On Cricut (FAQs)
-
What Does “Attach” Mean On Cricut?
Ans: “Attach” maintains the relative positions of your cuts so that pictures on the cutting mat are organized precisely as they are on the canvas. You can add text and photos to the project and organize them however you choose or the project demands.
Tip: Choose the photographs you want to cut out in a specific order.
-
What Does “Slice” Mean On Cricut?
Ans: Another widely used tool on Cricut is “Slice.” You can cut one picture from a different image using this Cricut Design Space feature called Slice. Simply put, it divides two overlapping images or passages of text into separate pieces.
Slice produces three or more entirely new shapes by cutting new routes from two photos. The “Layers” panel will display each of the new forms as a separate layer.
-
What Does “Print Then Cut” Mean On Cricut?
Ans: You may print your graphics on your home printer using the “Print Then Cut” option in Cricut Design Space. Post this, and your Cricut Maker or Cricut Explore will carve it out precisely without the need for scissors. Isn’t this time-saving and effortless?
This makes it simple to make your favorite stickers, decals, and even easily cut circle images.
Related: How to Engrave with Cricut Maker? Acrylic, Wood, Metal
-
What Does “Group” Mean On Cricut?
Ans: To make numerous layers, pictures, or pieces of text move and resize together on the canvas, Cricut features the “Group” option. This won’t impact how images are organized on the cutting mats.
This tool/option maintains organization on your canvas but doesn’t preserve position after cutting.
Tip: Remember that “Attach” is for the mat preview, and “Group” is for the canvas.
Conclusion
So, here you go. I hope this piece clarifies everything you have wondered about the “Flatten” feature in Cricut’s Design Space.
It’s a fantastic tool that allows you to explore multiple editing techniques and create things at home. To summarize, the Flatten tool flattens any multi-layered item (text, images, etc.), into a single layer. Then you can then use the other tools to work from.
However, it’s worth noting that Flatten isn’t the same as other tools, such as Group and Attach, as discussed above.

