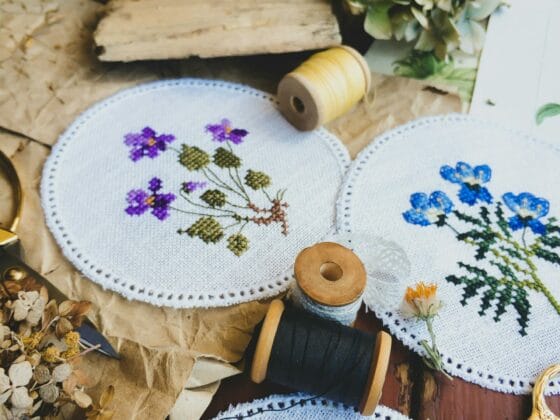
Embroidery is a timeless craft that allows you to transform plain fabric into exquisite works of art using just a needle and thread. In this article, we will delve into the world of hand embroidery and explore why it’s a skill worth mastering. Learning various stitches is not just about creating beautiful designs; it’s about unlocking endless possibilities for creativity and personal expression.
We will introduce you to the basics of hand embroidery, highlighting the importance of mastering different stitches and providing an overview of the 20 essential stitches we will cover to help you confidently embark on your embroidery journey.
Table of Contents
- 1 The Importance of Stitches in Embroidery
- 2 20 Essential Embroidery Stitches Demonstrated
- 3 Combining Stitches for Artistic Expression
- 4 20 Essential Embroidery Stitches Full Video Tutorial
- 5 Resources and Tools
- 6 Conclusion
The Importance of Stitches in Embroidery
Embroidery stitches are the essence of this craft, determining texture, design, and creativity. They breathe life into plain fabric, allowing artisans to transform it into intricate artworks. Each stitch carries a unique character, making it crucial for crafting beautiful and expressive embroidered pieces.
Stitches As the Building Blocks of Embroidery
Stitches are like the bricks in a construction project, forming the foundation of every embroidery piece. They determine texture, shape, and design, making them essential for creating intricate and beautiful artworks.
Keeping your stitches consistent, even in length and spacing, is important to give your design a polished look. Also, pay attention to your tension; do not pull too tight to prevent puckering or distorting the fabric. Finish your stitching by weaving the thread through the back of your stitches or by making a small knot and then trimming any excess thread.
Like any skill, practice is key. Start with simple designs and gradually tackle more complex patterns as you gain confidence. Like any skill, practice is key. Start with simple designs and gradually tackle more complex patterns as you gain confidence.
Different Types of Embroidery Stitches for Different Purposes
Embroidery stitches have a few categories: outline stitches for defining shapes, decorative stitches for adding intricate patterns, loop stitches for creating textured effects, filling stitches for covering larger areas, and specialty stitches for unique and specific design elements. Each stitch type serves a different purpose in creating beautiful and detailed embroidery designs.
20 Essential Embroidery Stitches Demonstrated
There are many embroidery stitches, and we have compiled essential embroidery stitches, each offering unique techniques and creative possibilities for your crafting journey.
Basic Stitches for Beginners
The basic embroidery stitches serve as the foundation for creating stunning needlework. These foundational stitches, like the running stitch and backstitch, form the core of embroidery techniques. They pave the way for intricate designs, allowing beginners to master the art while offering endless creative possibilities. Here are some basic stitches every beginner should know.
1. Embroidery Running Stitch
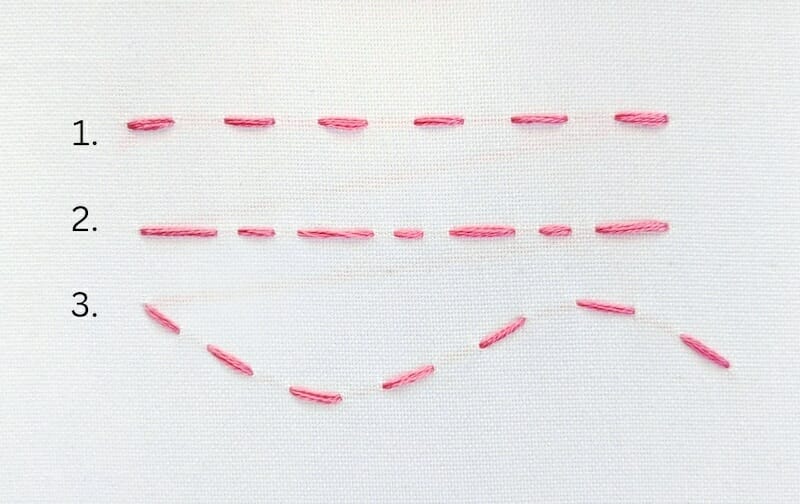
Running stitch is a basic sewing and embroidery technique that makes small, straight stitches along a line or a shape. It is one of the easiest and most versatile stitches to learn and easy to apply for outlining, filling, darning, gathering, and more.
Running Stitch Video Tutorial
2. Embroidery Backstitch

The back stitch is best for creating strong and durable seams, outlines, or details. It has the name back stitch because it involves sewing backward to the direction of the stitching line. Backstitch also applies to crafts such as embroidery, knitting, and quilting. In embroidery, the back stitch is best for outlining shapes or making letters.
Embroidery Running Backstitch Video Tutorial
3. Straight Stitch
A straight stitch is a sewing stitch that creates strong and durable seams, outlines, or details. The name straight stitch is because it involves sewing in a straight line. Straight stitch is the most common stitch used for most sewing projects, adjusting the length of the straight stitch to suit your needs. For example, you can use a short straight stitch for delicate fabrics or a long straight stitch for basting or gathering.
Embroidery Straight Stitch Video Tutorial
Stitches for Outlining
Outline stitches are basic embroidery stitches used to create the outline or contour of a design. They are typically simple, often done using a single strand of thread. Common outline stitches include the backstitch and stem stitch. These stitches are essential for defining the shape and structure of the embroidered design. Here are some outlining stitches you should try.
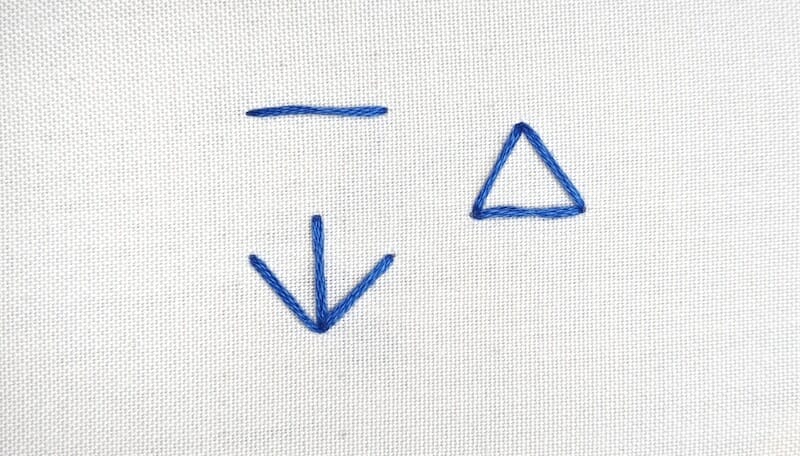
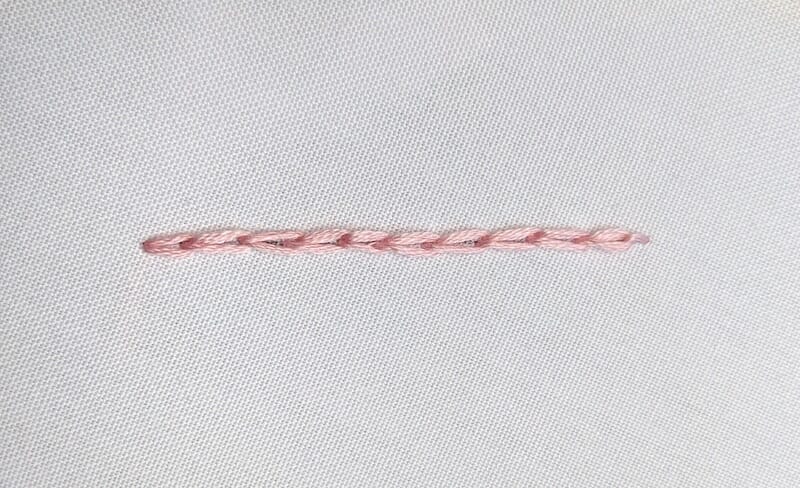
4. Embroidery Stem Stitch
Stem stitch is an embroidery stitch that creates thin, smooth lines, curves, or outlines. The name stem stitch is because it is often used in embroidery to make flower and plant stems. Stem stitch is easy to learn, and there are different ways of achieving the look, such as sewing, stabbing, or backstitching. The basic idea is to make overlapping stitches along a line, keeping the working thread either above or below the stitching line.
Embroidery Stem Stitch Video Tutorial
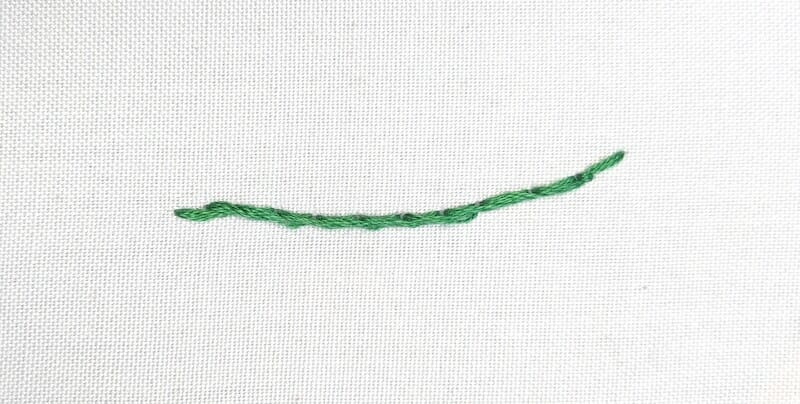
5. Embroidery Chain Stitch
A chain stitch is an embroidery and sewing stitch that creates a series of looped stitches that form a chain-like pattern. It is one of the oldest and most versatile for making outlines, curves, letters, or decorative effects.
Embroidery Chain Stitch Video Tutorial
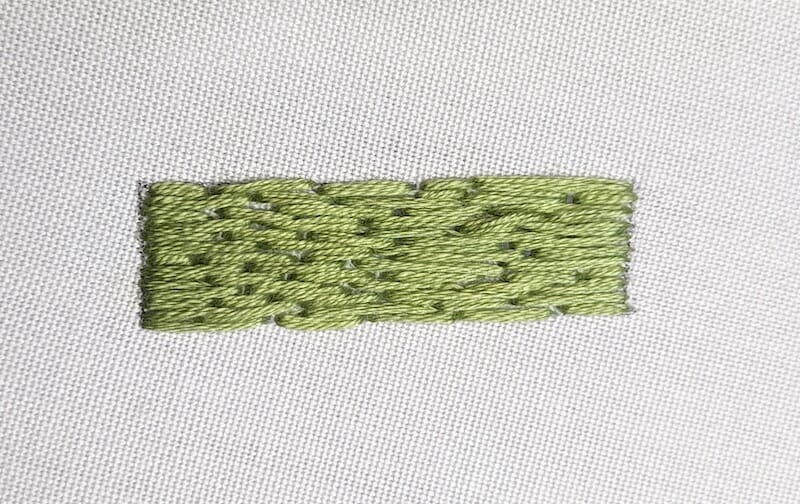
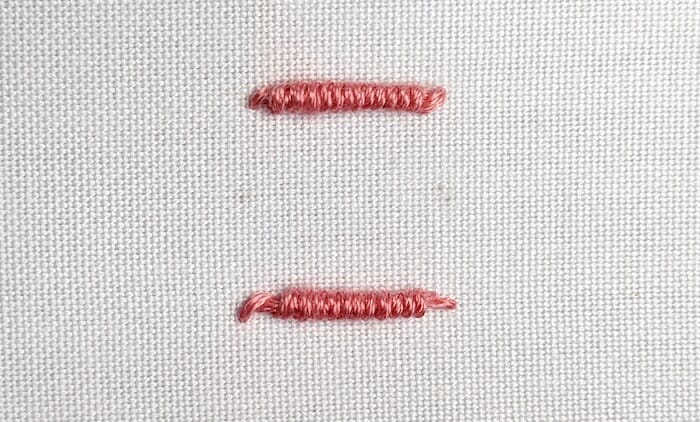
6. Embroidery Satin Stitch
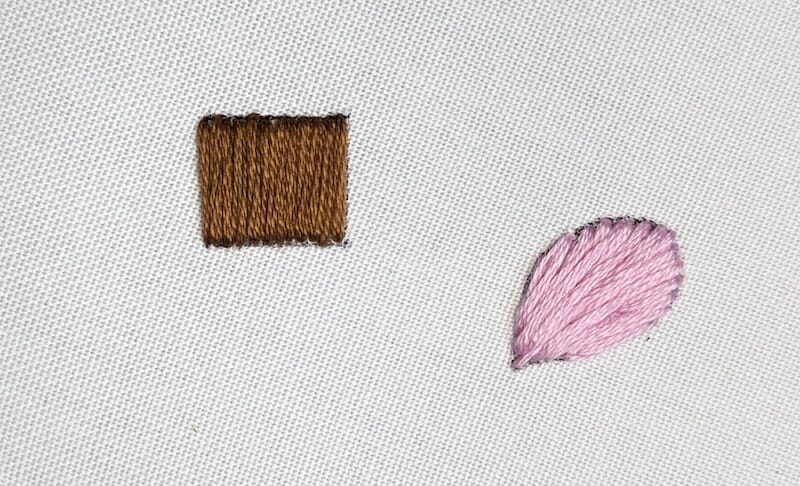
A satin stitch in sewing and embroidery forms a sleek, glossy surface by closely aligning straight stitches to cover a portion of the fabric. This technique works well where one needs to fill small shapes, letters, and outlines, resulting in a polished and shiny appearance on the fabric.
To achieve a satin-like finish, ensure the threads lie flat and cover the fabric completely. You may need multiple layers of stitches for a richer texture.
Embroidery Satin Stitch Video Tutorial
7. Embroidery Split Stitch
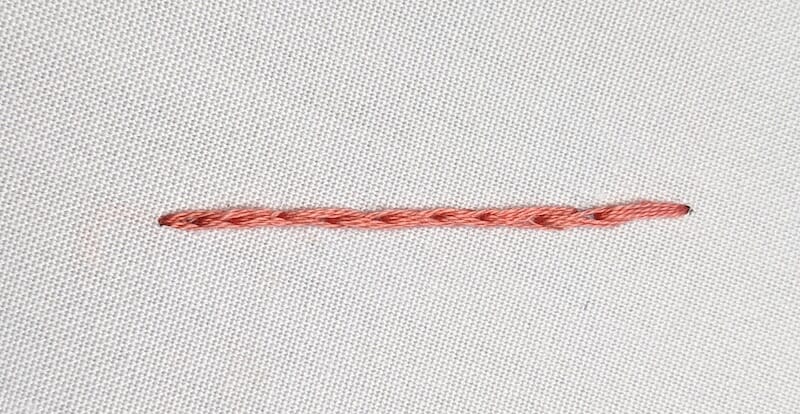
Split stitch, a fundamental embroidery technique, is beginner-friendly and adaptable. It is excellent for outlining patterns and creating densely packed lines for filling. In this stitch, one end divides the thread of the preceding one.
To create the signature “split” effect, bring your needle up through the middle of the previous stitch, dividing the thread, resulting in a textured appearance. Try to split the previous stitch in the same spot each time for a uniform look.
Embroidery Split Stitch Video Tutorial
Filling Stitches
Filling stitches are used to fill in larger areas of the fabric with a pattern or color. They are designed to cover space evenly and can vary in complexity. One of the simplest filling stitches is the running stitch, while more intricate ones include the seed stitch and long and short stitch. Filling stitches are essential for adding depth and dimension to an embroidered design, and here are some you can try.
8. Embroidery Long and Short Stitch
Long and short stitch, a technique in hand embroidery often used for thread painting, consists of rows of alternating long and short stitches. The short stitches are half the length of the long ones. This stitch is ideal for filling in larger shapes, enabling seamless color transitions for a blended effect, making it perfect for covering substantial areas in embroidery projects.
Embroidery Long and Short Stitch Video Tutorial
9. Embroidery Seed Stitch
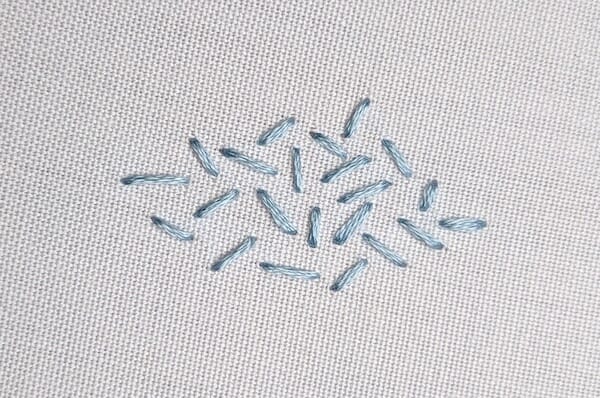
A seed stitch is an embroidery stitch used to fill spaces between threads. It is a series of straight stitches that are even in size and spaced apart but going in random directions. Seed stitches are typically stitched in all different directions, making a random pattern. It is common for projects like monograms or hatbands, where you want the stitches to be small and uniform.
Embroidery Seed Stitch Video Tutorial
Loop Stitches
Loop stitches are embroidery techniques for creating thread loops on the fabric’s surface. These stitches are known for their three-dimensional texture. A common example is the French knot, which creates a raised, coiled loop. Here are some loop stitches ideal for creating flowers, curls, or any design element requiring a raised textured effect.
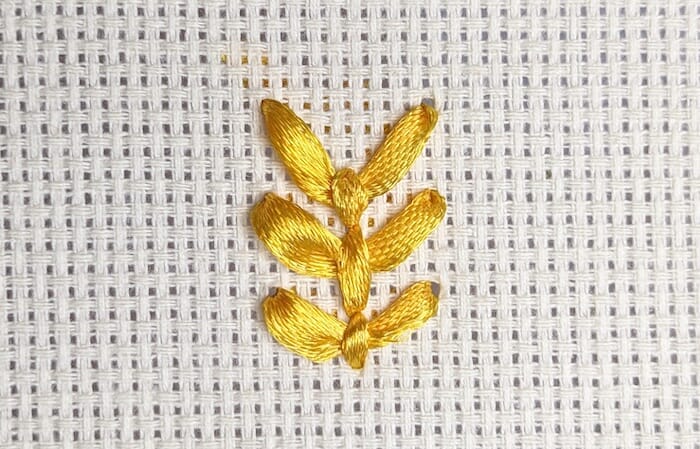
10. Embroidery Lazy Daisy Stitch
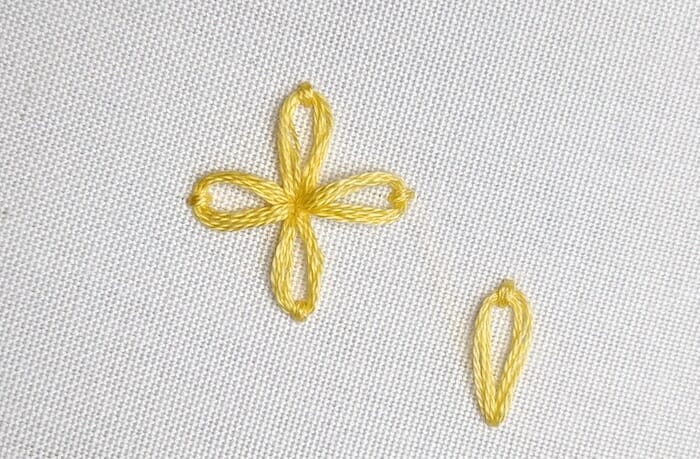
As per its name, lazy daisy is arguably the simplest stitch for embroidered flowers. Also known as the detached chain stitch, the stitch is a simple loop arranged in groups to create flowers, combined in a line to make a chain stitch, or worked individually to create leaves.
Embroidery Lazy Daisy Stitch Video Tutorial
11. Embroidery French Knot Stitch
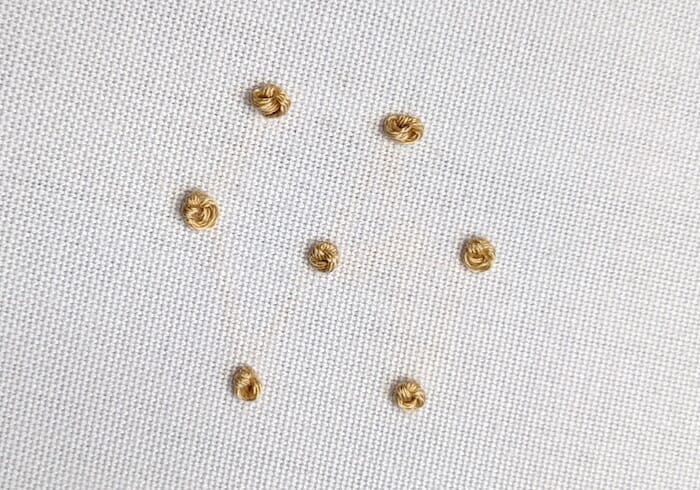
A French knot is a type of decorative stitch in embroidery. It is created by winding embroidery thread around the needle and then inserting it back into the fabric close to where it came out. The result is a small, raised knot on the fabric’s surface, often used to add texture and detail to embroidery designs.
French knots can vary in size depending on the times one wraps the thread around the needle and the type of thread used. The stitch is common for embellishing flowers, eyes, or other small elements in embroidery projects.
Embroidery French Knot Stitch Video Tutorial
Decorative Stitches
Decorative stitches are more complex and add intricate patterns and details to the fabric. These stitches go beyond basic outlining and are for aesthetic purposes. Examples of decorative stitches include the herringbone, blanket, and fly stitch. They are best used to fill in areas of the design or create textured effects. Here are some decorative stitches to try.
12. Embroidery Herringbone Stitch
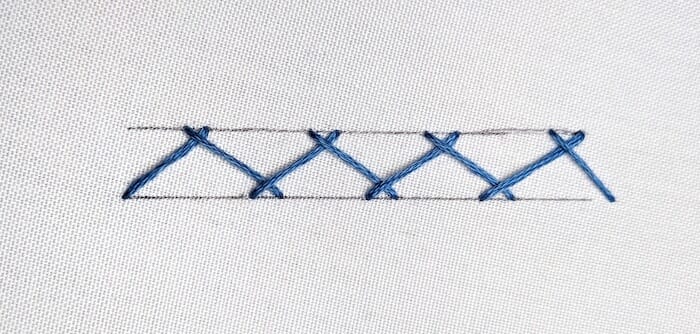
Herringbone stitch in embroidery is a decorative stitch that creates a pattern resembling the bones of a herringbone fish skeleton, and that’s how it gets its name. This stitch will add texture and interest to embroidery projects.
Embroidery Herringbone Stitch Video Tutorial
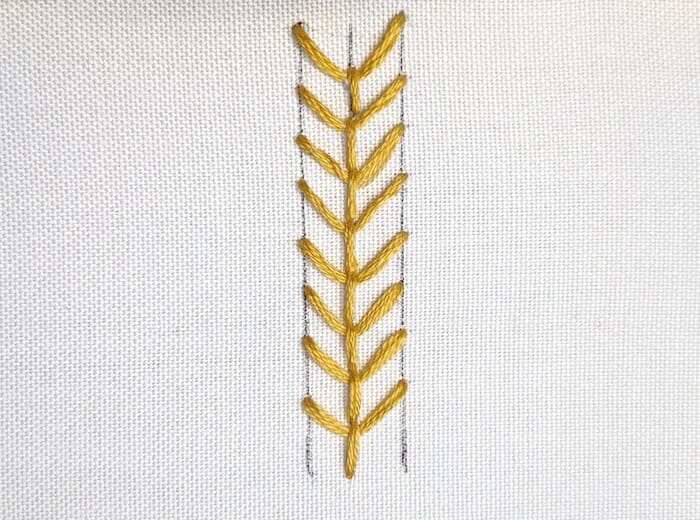
13. Embroidery Feather Stitch
A feather stitch is a decorative embroidery stitch that, as its name suggests, resembles bird feathers’ delicate and feathery appearance. It is a versatile stitch for creating decorative borders, floral stems, or adding a decorative element to your embroidery projects.
Embroidery Feather Stitch Video Tutorial
14. Embroidery Couching Stitch
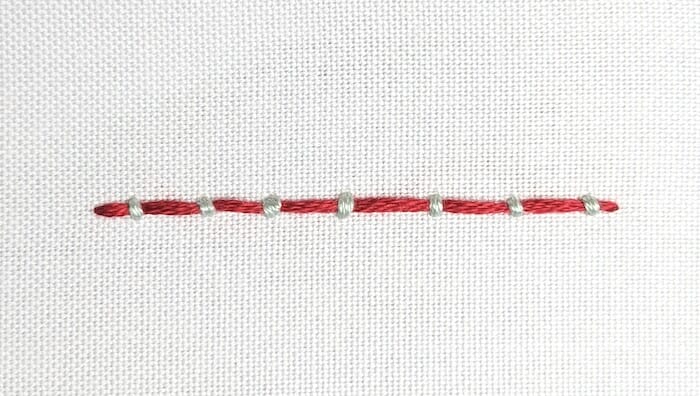
Couching is an embroidery technique where one thread is laid flat on the fabric surface and then secured by sewing over it with another thread. This stitch creates intricate and decorative designs, especially when using specialty or thicker threads that may be challenging to work independently.
Embroidery Couching Stitch Video Tutorial
15. Embroidery Blanket Stitch

The blanket stitch is a versatile and widely used embroidery stitch that is decorative and practical for edging and finishing fabric edges. It creates a neat, looped edge and can be used to secure the edges of the fabric, prevent fraying, or as a decorative border.
Embroidery Blanket Stitch Video Tutorial
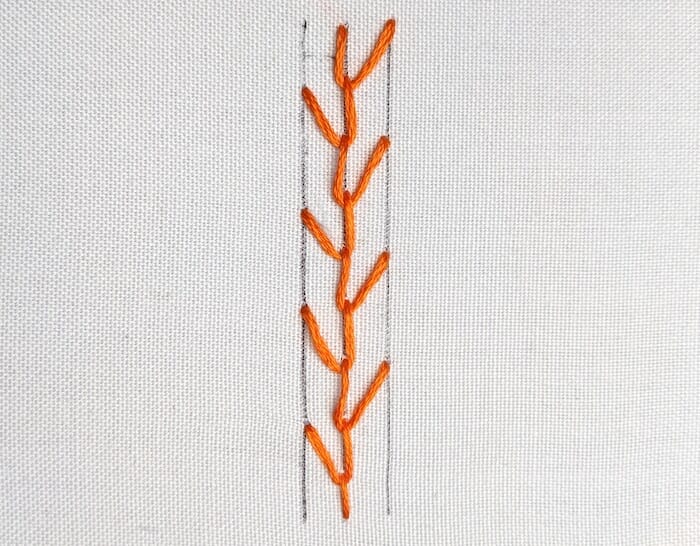
16. Embroidery Fly Stitch
The fly stitch is an embroidery stitch that creates a “Y” or “V” shaped pattern, resembling the wings of a fly, hence its name. It is a versatile stitch used for various purposes in embroidery.
To master the fly stitch in embroidery, create an anchor stitch at the starting point. Bring the needle up from the back of the fabric, then loop it back down, creating a V-shaped stitch. Ensure that the needle passes through the loop before pulling tight. Maintain even spacing for an attractive, textured look. Experiment with variations, like the open and closed fly stitch, to add depth to your embroidery designs.
Embroidery Fly Stitch Video Tutorial
Specialty Stitches
Specialty stitches are unique and less commonly used embroidery techniques that create specific effects or patterns. These stitches are a choice for their distinct visual impact. Examples of specialty stitches include the bullion knot, Cretan, and fishbone stitch. They are perfect for use when a design element requires a specific look that one cannot achieve with basic stitches alone. Check out these specialty stitches.
17. Embroidery Bullion Knot
A bullion knot in embroidery is a specialized stitch that creates a raised, cylindrical shape, often used to depict fine lines, coils, or realistic elements like flower buds, caterpillars, and more. It resembles a twisted rope or a smooth coil of thread.
To make the bullion knot stitch in embroidery, start with a secure anchor stitch, threading a long, fine needle with your chosen embroidery floss. Then, wrap the thread around the needle multiple times, creating a coil-like knot. Insert the needle close to the starting point and pull it through while holding the coils. Secure with a small stitch. Perfecting tension and wrapping consistency is key.
Embroidery Bullion Knot Video Tutorial
18. Embroidery Fishbone Stitch
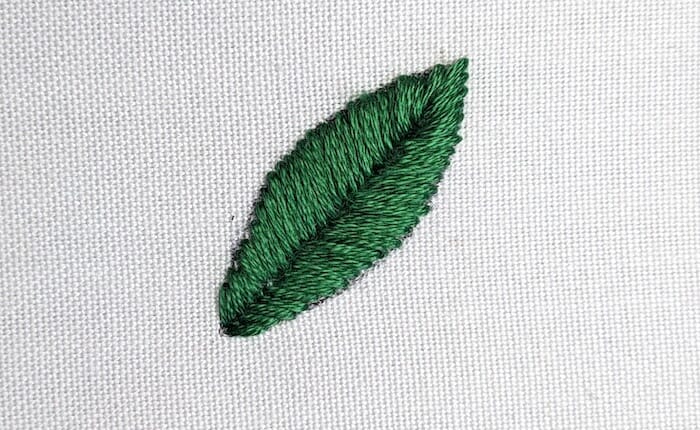
Fishbone stitch in embroidery is a decorative stitch often used to create a pattern resembling fishbones, hence its name. It’s particularly useful for filling in leaves, feathers, or other elongated shapes in embroidery designs.
When working on the fishbone stitch, begin with an outline of the shape you want to fill. Insert the needle near the shape’s center and bring it to one side. Create a diagonal stitch that covers half the shape, then return to the center and repeat on the opposite side.
Keep stitches neat and close together to achieve a leaf-like or feathered effect. Regular practice will help refine your technique, making this stitch ideal for adding texture and dimension to your embroidery projects.
Embroidery Fishbone Stitch Video Tutorial
19. Embroidery Cretan Stitch

The Cretan stitch is an embroidery stitch characterized by a series of diagonal stitches forming a herringbone-like pattern. It is a versatile stitch for creating decorative borders, textured lines, or filling in shapes in embroidery designs.
When working with the Cretan stitch, start with a guideline on your fabric. Bring the needle up at one end of the guideline, then take it down diagonally, crossing over the guideline. Repeat on the opposite side, creating a V-shape. Ensure uniform spacing and maintain tension for a neat, textured effect—experiment with varying the angle and width for different effects.
Embroidery Cretan Stitch Video Tutorial
20. Embroidery Ribbon Embroidery
Ribbon embroidery is an embroidery technique that uses ribbons, usually silk or satin, instead of traditional embroidery threads. This technique involves creating three-dimensional floral and decorative designs using ribbons, making the embroidery look lush and textured. Ribbon embroidery gives the best results on a cloth with a lower thread count, such as Aida cloth.
Start by anchoring the ribbon at one end, then bring it up along the guideline. Cross the ribbon over the guideline and insert it back down, creating a V-shape. Maintain consistent spacing for a textured look. Practice on spare fabric to perfect your ribbon technique, and use this stitch for creating delicate floral and vine-like motifs in embroidery projects.
Embroidery Ribbon Embroidery Video Tutorial
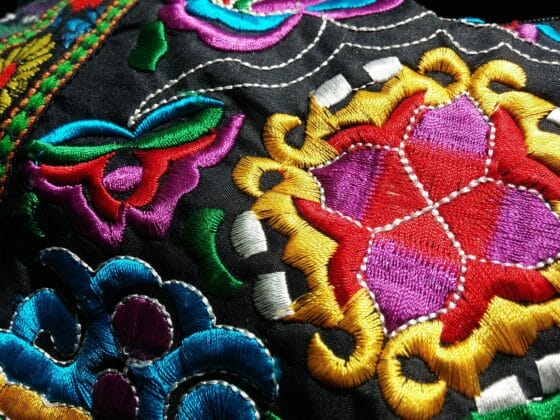
Combining Stitches for Artistic Expression
Combining different embroidery stitches is like mixing colors on a canvas; it adds depth and complexity to your designs. By using a variety of stitches, from simple outline stitches to more intricate decorative ones, you can create visually captivating and artistic embroidery pieces.
For instance, mixing outline stitches with filling stitches can make your design pop, providing a clear shape while filling it with vibrant colors or textures. Adding loop stitches for dimension or specialty stitches for unique accents further enhances your artistic expression. It is a bit like using different brushstrokes in painting, resulting in a richer, more engaging embroidery that tells a unique story through thread and fabric.
20 Essential Embroidery Stitches Full Video Tutorial
More Embroidery Articles
- Best Embroidery machines for beginners
- Best Embroidery Machine For Hats And Shirts
- What Stabilizer to Use for Embroidery?
- Embroidery Machine For Hoodies
Resources and Tools
For beginner embroiderers, the world of resources and tools can be exciting and overwhelming. It is crucial to seek further information to build a strong foundation. Here are some resources we recommend to help you discover techniques and tools that suit your style and project and set you on a path toward successful embroidery.
- If you are looking for supplies, check out this embroidery kit with 30 different stitches and all the supplies you need to start your embroidery journey. It is suitable for adults and kids.
- Get this A – Z of Embroidery Stitches, a book for beginners and even advanced embroiders who want to become experts in the skill.
- Check out this course, Embroidery 101: How to Embroider, which takes you through the supplies you need to start embroidery and 10 embroidery stitches with photos.
- If you are a visual learner, you can find great tutorials by Handiworks and Let’s Explore on YouTube, with great video tutorials on embroidery stitches, techniques, and tips and tricks.
Conclusion
In conclusion, mastering the art of embroidery involves understanding the significance of stitches. They serve as the building blocks of this craft, allowing for creativity and versatility. Learning these 20 essential stitches outlined here will unlock possibilities in your embroidery projects.
Whether for outlining, filling, or decorating, these stitches are tools for artistic expression. To enhance your skills, consider exploring embroidery resources and tools available, and do not hesitate to combine stitches to create intricate designs.